
News & Updates from Giselle Topper · Page 2
- 1
- 2
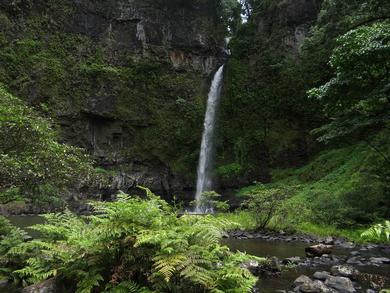
This is a gorgeous photo of one of the hidden gems of Far North Queensland - just 10 minutes drive from my doorstep.
Nandroya Falls is a walk through the rainforest at East Palmerston near the the Mamu Canopy Walkway.
You can take the circuit (7kms) or just walk along the quick track and return on the same route (approximately 5kms return).
Along the way you see a couple of mini waterfalls before you are rewarded with this beauty and the huge escarpment, combined is just breathtaking.
Nearby to this one, you see yet another falls and while I have never taken the full circuit, I am led to believe that there are a number to see on the way back.
Just wanted to share this little treasure...if you are in the area it is well worth the hike. These cards are some of my favourites that I have crafted from the beautiful sheets available - please feel free to check out my homepage.


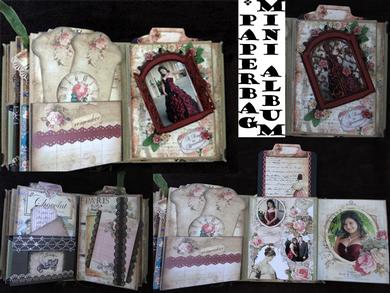
This is the final installment of my paperbag mini album that I crafted for my daughter, Stephanie's 21st. I hope that it has encouraged you to take a look at the possibilities that are showcased online.
The top RH corner shows one of the last pages in the album and is a chipboard gate that opens up to reveal the photo underneath, as you will see in the two page spread in the top LH corner.
I have placed matching paper flowers and leaves around the gates and it all ties in quite nicely with the vintage papers chosen to create the album.
In the bottom LH corner, I show the flap open to reveal more shots of my daughter from her Year 12 graduation, and her prom partner, Mark.
The photo's were cut to fit the design of the papers. I also show the tag that slides down into the paperbag, which on the back of it I did a collage of photo's of her closest group of friends.
The bottom LH corner shows another 2-page spread - which has the pocket from the gusset of the bag filled with a couple of sentiment tags and the opposite page another punch border that looks like a lace band to place tags and notes under.
Punched borders of different types can really add a lot of different dimension to your album and I have also used a ready-made border of diamontes to add a bit of bling.
Your choices really add an element of uniqueness and the possibilities are endless - just up to your imagination and what you can utilise.
I hope you have enjoyed these installments. My daughter was so pleased to open her present - we also added a letter from both her father and one from me remembering little moments of her life.
It bought tears to all our eyes and is something to really treasure.
These cards are some of my favourites that I have crafted from the beautiful sheets available. Check out my homepage for others I have crafted.
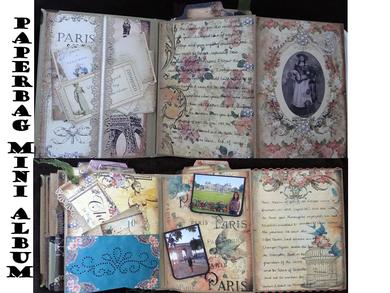
This installment shows a couple of the finished pages of the paperbag mini album I have been creating. I am enjoying sharing these with you and hope to inspire you to craft one of your own.
In the top picture, the photo shows the inside cover, with the flap folded out. On the LH side I added a punched border to create a band that you can place sentiment tags under, which fits in with the theme of the album and provides room on the backs of the tags to add thoughts/ comments of the receipient.
The centre page I added some journalling which gave the inspiration of the album. The RH side picture was taken in Tasmania in 2012 dressed in vintage clothing and I added some pearls and a diamonte "S".
The choices of what you include are endless. Just remember not to add bulk to the internal flaps.
The bottom picture - LH side shows the pocket which is created by the gusset of the bag - I have a couple of tags placed in there - on the centre page I added a couple of flaps whith some of photos of the sites we visited in our trip to Paris from 2013 and on the RH side journalling to explain other places we visited in Paris and some of the memories of the days spent there.
The tab that went inside the paperbag (that hangs out the top had other photo's of our visit to Tuscany and you can also add further photos to the back of the tag.) In next week's newsletter I hope you give you the final installment - although I haven't shown you all the pages - it might give you an insight as to what is possible.
You could also google the internet for futher ideas. Hope you like it! These cards are some of my favourites that I have crafted from the beautiful sheets available. Check out my homepage for others I have crafted.
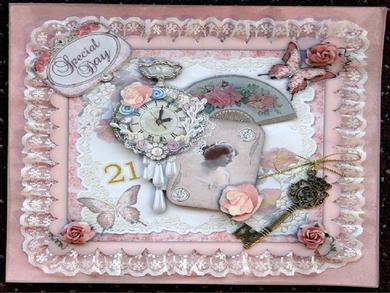
Just wanted to share with you the card I made to match the paperbag mini-album that I made for my daughter, Steph for her 21st.
I used cup434405_1035, inked the cardbase, added some pink lace, a bronze metal key, some diamontes and pink paper flowers.
It has come up a real treat. I used any left-over sentiment tags in my album as well as the same dusty pink paper flowers and lace - so it has a touch of both in each of the items.
I am hoping to send through another instalment next week with some more photos of the mini-album - hopefully complete.
These cards are some of my favourites that I have crafted from the beautiful sheets available. Check out my homepage for others I have crafted.
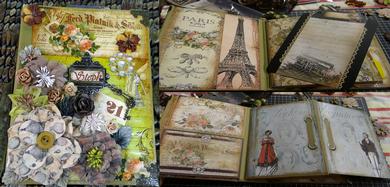
My eldest daughter, Stephanie is turning 21 in a week and I am in the midst of crafting a vintage paperbag mini album.
I visited the local craft shop where store owner Robyn had created one - it was so inspiring, I said, "One day, I must do that when I get the time...if only I could".
Robyn suggested I watch tutorials online - so I did. Before I knew it I was making my very first album.
I saw all the papers that suited my daughter to a tee - vintage, including paris, pride and prejudice - her favourite must see travel destination (where we visited last year) and her favourite book (or rather theme of books).
It was coming together nicely. All I needed was my creativity to come into play and do the book justice. I still have a ways to go with it, but really suggest everyone to give one a go. I included vintage papers from Craftsuprint (namely cup518399_1298).
You basically pick a theme or colour scheme and away you go. Six paperbags with gussets, 10 sheets of cardstock to match the bags and a couple of chipboard sheets is all you need to get you started - then the decorating goes from there with papers of your choice.
You can make it as fancy as you like.
In the photo I show the front cover and then a couple of pages inside. The pages include flaps that open out and the paperbags have hidden areas where you can include tags with tabs on the top that hang out of the album.
You can also decide whether you want a vertical or horizontal album.
Hope you like my creation and moreso, that my daughter loves it when I finally get it finished. I have a few photo's of Steph in old-style clothing so hoping to incorporate them too. Your imagination is the limit and you can add journalling, or leave them blank for the recipient to add their thoughts and memories.
These cards are some of my favourites that I have crafted from the beautiful sheets available. Check out my homepage for others I have crafted.
- 1
- 2