


Atc Ed004
Stitching with beads
Photographs from the Community (3)

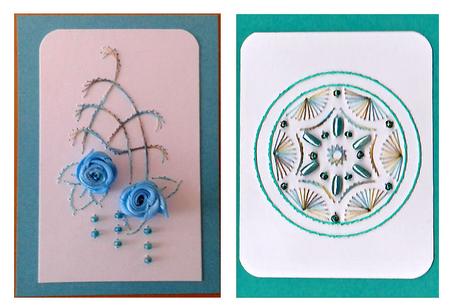
There are 2 designs on this sheet. Both of which I have completed with most pleasing results.
If you are new to sewing onto cards, there is really nothing to be lost by giving it a try. There are a few tips to follow, which I am sure you will find on Crafty Bob's help.
I printed out both designs on the same sheet of light weight white card 100gsm, and, cut them out to the size I wanted before pricking with a fine point tool the marked areas on to the working card. The working card is the same strength of card, 100gsm, as the master, which I had copied from the sheet provided. I made this mandala design first, and attached it to backing sheets in the same colourings as the sewing threads I have used. A deep leaf green thread, a metallic apple green thread and a metallic copper thread. and measured out the size I would need for the backing sheets, for each one. The mandala design, once I had pricked it through, I cut down to 7.5 x 8.5 cm. The beads I used are an iridescent turquoise green shade, 6 tiny seed beads,6 small seed beads and 6 pale pearl finished rice shaped beads. I completed all the stitching first, and then added the beads. I used magic tape to secure the stitching at the back and double sided tape to attach the stitched topper to the copper coloured card 9.5x8.5cm. I then used padded tape to add the deep leaf green backing sheet 10.5x 9.5cm. I used a bronze organza ribbon and a copper shade of double cord to wrap around the stitched card and backing sheets. I matted this onto a lightly patterned ivory card,
22 x12 cm, folded and attached the organza bow. It is now ready for the sentiment I will choose at a later date.
The second design lends itself to a definite female occasion, particularly as I have used hand made roses and the shades of aqua in the beads and ribbon.
I cut the white card to be stitched, down to 13 x 11cm , making sure the design sat in the centre of the space. I like to use metallic threads, however they are a little more difficult, as they tend to split and sometimes twist, so short threads are more rewarding when stitching with them. I used double threads for the 5 main long areas and a single thread for the leaf style designs. The roses, I made each one from, 1cm wide and a 10cm length of silver edged aqua satin ribbon. To make the roses, I used a tiny running thread in aqua along the bottom edge of the 10cm length of ribbon, starting with a knot to hold it in place, and leaving a tail to tighten the rose when completed. l then began to roll the ribbon very tightly, towards the tail end of the thread. Halfway along I folded the silver edge over to the outside so the rose began to have more depth. Don't worry, they always turn out slightly different. Once I was happy with the look of the roses, I punched a hole in the card at the marked position, and pushed the roses slightly through the hole, making a couple of stitches through to where I had attached the beads. This was to hold the rose backs flat, and in place. I wrapped a length of the same ribbon around the card front and added a sentiment. I made 2 backing sheets a pink patterned card 13.5 x 11.5 and a deeper shade of aqua 14 x 12.5cm and used padded tape to attach each of these to the topper. The main card is a slightly darker pink 27cm x 15 cm and also attached with padded tape.
Both designs have very easy instructions, both are delightful original designs, and a pleasure to work Thank you very much
Pamela Horton

Stitching with beads.
These are little patterns, special for ATC cards. But you can also use them for any card or occasion.

There are 2 designs on this sheet. Both of which I have completed with most pleasing results.
If you are new to sewing onto cards, there is really nothing to be lost by giving it a try. There are a few tips to follow, which I am sure you will find on Crafty Bob's help.
I printed out both designs on the same sheet of light weight white card 100gsm, and, cut them out to the size I wanted before pricking with a fine point tool the marked areas on to the working card. The working card is the same strength of card, 100gsm, as the master, which I had copied from the sheet provided. I made this mandala design first, and attached it to backing sheets in the same colourings as the sewing threads I have used. A deep leaf green thread, a metallic apple green thread and a metallic copper thread. and measured out the size I would need for the backing sheets, for each one. The mandala design, once I had pricked it through, I cut down to 7.5 x 8.5 cm. The beads I used are an iridescent turquoise green shade, 6 tiny seed beads,6 small seed beads and 6 pale pearl finished rice shaped beads. I completed all the stitching first, and then added the beads. I used magic tape to secure the stitching at the back and double sided tape to attach the stitched topper to the copper coloured card 9.5x8.5cm. I then used padded tape to add the deep leaf green backing sheet 10.5x 9.5cm. I used a bronze organza ribbon and a copper shade of double cord to wrap around the stitched card and backing sheets. I matted this onto a lightly patterned ivory card,
22 x12 cm, folded and attached the organza bow. It is now ready for the sentiment I will choose at a later date.
The second design lends itself to a definite female occasion, particularly as I have used hand made roses and the shades of aqua in the beads and ribbon.
I cut the white card to be stitched, down to 13 x 11cm , making sure the design sat in the centre of the space. I like to use metallic threads, however they are a little more difficult, as they tend to split and sometimes twist, so short threads are more rewarding when stitching with them. I used double threads for the 5 main long areas and a single thread for the leaf style designs. The roses, I made each one from, 1cm wide and a 10cm length of silver edged aqua satin ribbon. To make the roses, I used a tiny running thread in aqua along the bottom edge of the 10cm length of ribbon, starting with a knot to hold it in place, and leaving a tail to tighten the rose when completed. l then began to roll the ribbon very tightly, towards the tail end of the thread. Halfway along I folded the silver edge over to the outside so the rose began to have more depth. Don't worry, they always turn out slightly different. Once I was happy with the look of the roses, I punched a hole in the card at the marked position, and pushed the roses slightly through the hole, making a couple of stitches through to where I had attached the beads. This was to hold the rose backs flat, and in place. I wrapped a length of the same ribbon around the card front and added a sentiment. I made 2 backing sheets a pink patterned card 13.5 x 11.5 and a deeper shade of aqua 14 x 12.5cm and used padded tape to attach each of these to the topper. The main card is a slightly darker pink 27cm x 15 cm and also attached with padded tape.
Both designs have very easy instructions, both are delightful original designs, and a pleasure to work Thank you very much
Pamela Horton