


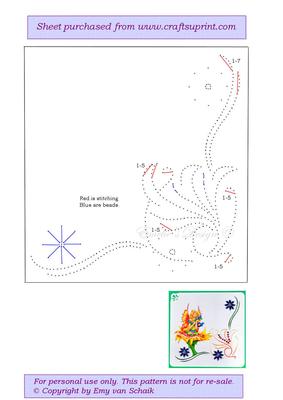
Ed015 Art Deco Corner
Stitching with beads
Photographs from the Community (3)
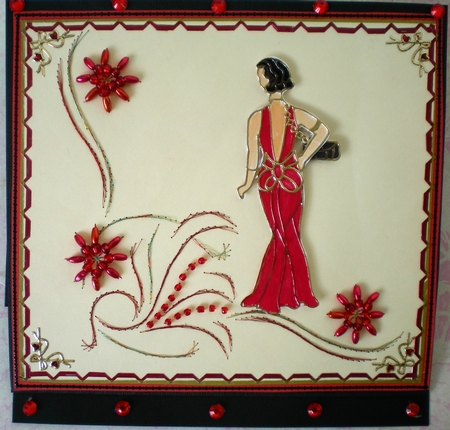

I have kept within the art deco theme of the stitching design by using beads and threads in the shades that were popular in that period of design and culture.
I completed all the stitching first before attempting to attach any beads.
I have used a metallic red, gold and green variegated thread for the 5 curved lines, and used a red metallic thread to complete the 10 curved shapes that imitate a floral design, and the circles that form the 3 flower centres.
The metallic threads I have kept short for each part of the stitching for 2 reasons.
The first is it twists very easily and secondly it tends to cut the thread, if pulled too tightly when stitching and particularly when you are ending and weaving through into the back of the work.
Once the stitching was completed, I then began to stitch the beads into position. I have used for the three completed flowers, 24 metallic red rice beads and 24 small 3.5mm round red glass beads.
I used regular red polyester thread to sew these in place.
I used 14 small 2mm red glass seed beads for the central part of the design.
As this is stitched onto a cream light weight 100gsm card cut at 16.5 x 14.5, and the stitching design is well spaced to allow for further embellishment, I was able to use a 1930’s elegant lady from a gold peel off set, colour in using red and black permanent pens and use a gold chain peel off to attach to the evening bag.
I have used padded tiny D.S. squares to attach this to them to the outside edge of the cream card front and then used a gold broad tipped pen and a ruler to colour the very edges of the cream card front.
I added the gold and red peel off bows with hearts to the 4 corners, before attaching this to the red backing sheet cut at 17 x 15.25cm, using D.S. tape.
I then used a black ornamental fine line peel off strip to attach to the red backing sheet, attempting to have an equal amount of red exposed on both sides of the peel off strip.
I made a simple easel style card from black linen finished 120gsm card.
I cut 2 pieces of A4 card at 29cm x 17.5cm and holding the both sheets in the portrait position, wrong side facing towards me, I then made a score mark at 16 cm on each sheet.
I folded the sheets to firmly mark the position of the fold.
Using one of the pieces of card, I now opened it and turned it over, so that the right side was facing me, and placed D.S. tape, along all 4 edges of the smaller 13.5 x 17.5cm rectangle and attached this to the wrong side of the other sheet 2.5cm away from the valley fold.
I then closed this up and attached the finished embellished topper to the card front, leaving a tiny black margin all the way around.
I have planned a tutorial for this on my home page, for later this week.
To finish the easel, I have used a length of the same black card cut at 16.5 x 3.5 and scored and folded it length wise, and used 2 strips of narrow D.S. tape along one side of the valley fold of this strip to attach this to the back behind the topper section to allow the fold to stay in place.
I have used the 1.5cm wide strip exposed at the front of the easel to add some red gems. I also added these to the black section at the top of the card front.
I am intending to use this card as a 60th Birthday card for a special friend, so I will add this sentiment and some coloured peel off 60 numbers to the card front, and look through the free verses to find one suitable.
I am delighted with the result. I would like to try a black and white of the same card. If time allows I will add that later to this upload.
This card has the look of a lot of work, but if you follow the stitching directions, it is relatively quick and easy to accomplish.
Pamela Horton. The Whispering Platypus.

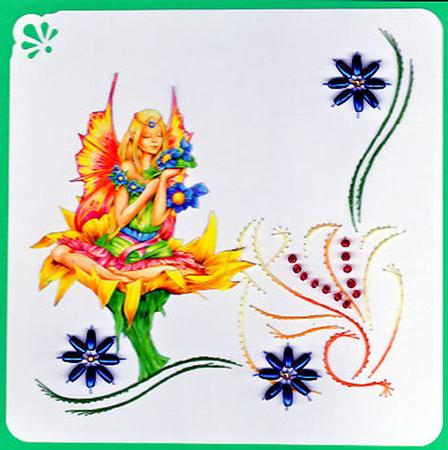
Stitching with beads.
Use cardstock to make this card. The beads I used are rice or long grain beads and glassbeads. Also used a cornerpunch.
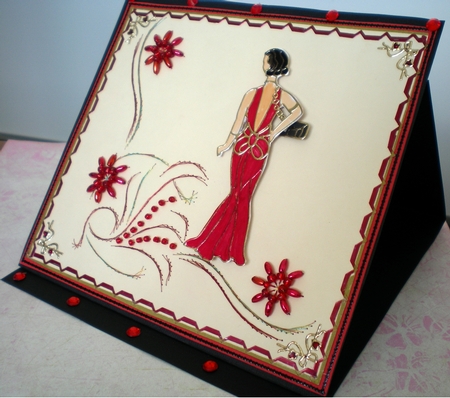
I have kept within the art deco theme of the stitching design by using beads and threads in the shades that were popular in that period of design and culture.
I completed all the stitching first before attempting to attach any beads.
I have used a metallic red, gold and green variegated thread for the 5 curved lines, and used a red metallic thread to complete the 10 curved shapes that imitate a floral design, and the circles that form the 3 flower centres.
The metallic threads I have kept short for each part of the stitching for 2 reasons.
The first is it twists very easily and secondly it tends to cut the thread, if pulled too tightly when stitching and particularly when you are ending and weaving through into the back of the work.
Once the stitching was completed, I then began to stitch the beads into position. I have used for the three completed flowers, 24 metallic red rice beads and 24 small 3.5mm round red glass beads.
I used regular red polyester thread to sew these in place.
I used 14 small 2mm red glass seed beads for the central part of the design.
As this is stitched onto a cream light weight 100gsm card cut at 16.5 x 14.5, and the stitching design is well spaced to allow for further embellishment, I was able to use a 1930’s elegant lady from a gold peel off set, colour in using red and black permanent pens and use a gold chain peel off to attach to the evening bag.
I have used padded tiny D.S. squares to attach this to them to the outside edge of the cream card front and then used a gold broad tipped pen and a ruler to colour the very edges of the cream card front.
I added the gold and red peel off bows with hearts to the 4 corners, before attaching this to the red backing sheet cut at 17 x 15.25cm, using D.S. tape.
I then used a black ornamental fine line peel off strip to attach to the red backing sheet, attempting to have an equal amount of red exposed on both sides of the peel off strip.
I made a simple easel style card from black linen finished 120gsm card.
I cut 2 pieces of A4 card at 29cm x 17.5cm and holding the both sheets in the portrait position, wrong side facing towards me, I then made a score mark at 16 cm on each sheet.
I folded the sheets to firmly mark the position of the fold.
Using one of the pieces of card, I now opened it and turned it over, so that the right side was facing me, and placed D.S. tape, along all 4 edges of the smaller 13.5 x 17.5cm rectangle and attached this to the wrong side of the other sheet 2.5cm away from the valley fold.
I then closed this up and attached the finished embellished topper to the card front, leaving a tiny black margin all the way around.
I have planned a tutorial for this on my home page, for later this week.
To finish the easel, I have used a length of the same black card cut at 16.5 x 3.5 and scored and folded it length wise, and used 2 strips of narrow D.S. tape along one side of the valley fold of this strip to attach this to the back behind the topper section to allow the fold to stay in place.
I have used the 1.5cm wide strip exposed at the front of the easel to add some red gems. I also added these to the black section at the top of the card front.
I am intending to use this card as a 60th Birthday card for a special friend, so I will add this sentiment and some coloured peel off 60 numbers to the card front, and look through the free verses to find one suitable.
I am delighted with the result. I would like to try a black and white of the same card. If time allows I will add that later to this upload.
This card has the look of a lot of work, but if you follow the stitching directions, it is relatively quick and easy to accomplish.
Pamela Horton. The Whispering Platypus.