


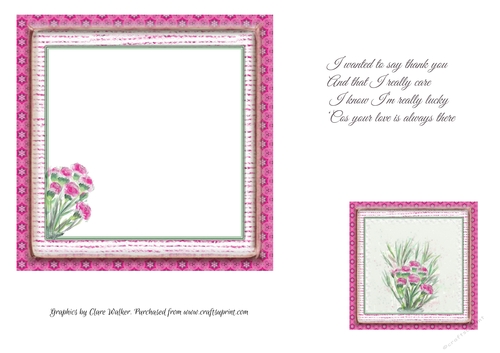
PINK CARNATIONS FLORAL INSERT: For Mothers Day, Birthdays & Female Occasions, With Optional Verse and Bonus Gift Tag/Mini Topper
This watercolour carnations (approximately 6" by 6") is perfect for Mother's Day, birthdays and other female occasions, and the included optional verse complements these occasions too.
The sheet also includes bonus approx 3 x 3" carnation image, which can be used as a gift tag, further insert picture on the inside left or back of the card, or even as a mini-topper in another project-the choice is yours.
This insert is designed to match my pink carnation quick card front sheet (cup860883_79993), but would also look great anywhere where you need a floral insert.
Best of all, this sheet comes with small scale commercial use. So you're free to sell anything you physically hand-make using this sheet, whether on CUP or anywhere else.

Photographs from the Community (4)
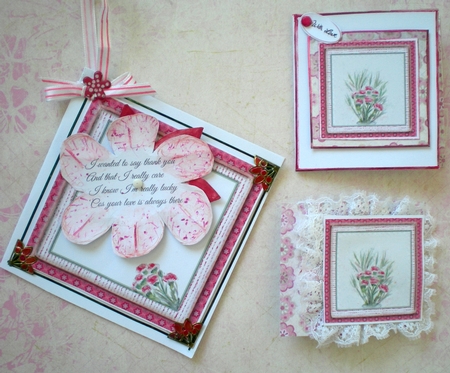

I purchased the main card, cup860883_79993, Pink Carnations Quick Card, and as this insert design supplied with this sheet, is the perfect match for the Pink Carnations Quick card, I felt it was absolutely necessary for me to purchase the insert as well.
I have had great fun in making many large, medium and small greeting and gift cards using combinations of each one.
The photographs I have attached focus on the insert design. I printed the sheet many times over a number of days, so I am not exactly sure now how many times I made copies.
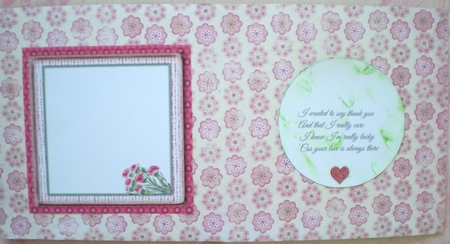
The insert for cup860883_79993 is the last photograph. The opened insert measures 28cm x 14cm.
The greeting insert measures 10 x 10cm and the circle around the verse supplied, measures 8cm diameter. The green smudging I did by drawing on my left pointer finger, using a bright green marker with a chisel nib, and then finger printing and gently rubbing onto the white circle.
The card with the corner ribbon is a white 200gsm CB matte card cut at 21m x 11cm and scored and folded.
The insert supplied with the sheet is attached to the card as a topper using padded D.S. tape. The method I used to put this card together is explained in easy steps.
The card is punched in the top left hand corner before the green peel off strips are attached, and the peel off corners which are attached after the card front is completed, are coloured with permanent pens in pink and green to look like flower posies.
I attached the ribbon for the bow into the hole that is punched through both front and back layers, and tied the bow and I threaded the extra length of ribbon through the same hole and tied it at the top, and then used a decorative split pin through the same hole to hold all together firmly.
I drew 2 flowers in water colour pencils. The first and main flower has 6 petals, and measures 8cm across from flower tip to flower tip. I began by making a circle using the verse supplied as the centre of the circle, and roughly drawing the petals on the back.
I then cut the flower shape out and I folded the centre of each petal back in half to make the crease that is visible, and used the light and dark pink pencils dry on the right side, and a damp brush to spread the colour and highlight the petal centres.
I then made a pointed end petal flower shape and again used the water colour pencils and the damp brush to colour the petals.
I used a tiny split pin to push through the 2 petals and the card topper front.
I then attached this to the white folded card front with the padded tape, and then added the peel off flower sprays to the corners.
The small gift card with the sentiment, “with love”, attached, is a white card, cut at 14.5 x 7.5 and scored for the fold at 7 cm in from the left hand side.
The small image is mounted with D.S. tape onto the floral backing sheet, and then onto the card front with padded tape.
The pink coloured peel off strips, are attached around the outer edge of the white card and the backing sheet.
The same floral print is attached to the exposed inside edge, and the verse copied and hand written on the inside of the card.
The little lace edged gift card is made by using the floral print in a tri fold, 16cm x 6.5cm and scored from the left at 5.25cm as a mountain fold and at 9.25 as a valley fold.
I used red power tape to attach and gather the lace and then attach it to the card front at the 3.5cm mark of the small image.
I use these small cards I make from the sheets provided to bundle together in groups of 5 and either ribbon wrap them or pop them in a small hand-made box to give as gifts for Birthdays and Christmas.
My friends and family now ask me for sets so they can give to their friends. I find that extremely rewarding and encouraging, as I also do with the comments and feed-back, I receive from designers.
Thank you, Clare for both the main feature and the insert designs, and for posting my finished work of the Carnation card on the featured post by designers.
Pamela Horton

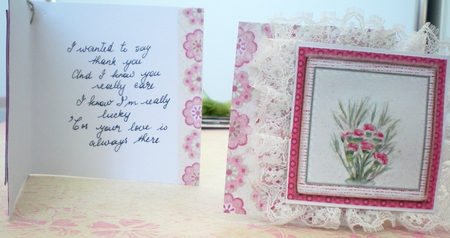
I purchased the main card, cup860883_79993, Pink Carnations Quick Card, and as this insert design supplied with this sheet, is the perfect match for the Pink Carnations Quick card, I felt it was absolutely necessary for me to purchase the insert as well.
I have had great fun in making many large, medium and small greeting and gift cards using combinations of each one.
The photographs I have attached focus on the insert design. I printed the sheet many times over a number of days, so I am not exactly sure now how many times I made copies.
The insert for cup860883_79993 is the last photograph. The opened insert measures 28cm x 14cm.
The greeting insert measures 10 x 10cm and the circle around the verse supplied, measures 8cm diameter. The green smudging I did by drawing on my left pointer finger, using a bright green marker with a chisel nib, and then finger printing and gently rubbing onto the white circle.
The card with the corner ribbon is a white 200gsm CB matte card cut at 21m x 11cm and scored and folded.
The insert supplied with the sheet is attached to the card as a topper using padded D.S. tape. The method I used to put this card together is explained in easy steps.
The card is punched in the top left hand corner before the green peel off strips are attached, and the peel off corners which are attached after the card front is completed, are coloured with permanent pens in pink and green to look like flower posies.
I attached the ribbon for the bow into the hole that is punched through both front and back layers, and tied the bow and I threaded the extra length of ribbon through the same hole and tied it at the top, and then used a decorative split pin through the same hole to hold all together firmly.
I drew 2 flowers in water colour pencils. The first and main flower has 6 petals, and measures 8cm across from flower tip to flower tip. I began by making a circle using the verse supplied as the centre of the circle, and roughly drawing the petals on the back.
I then cut the flower shape out and I folded the centre of each petal back in half to make the crease that is visible, and used the light and dark pink pencils dry on the right side, and a damp brush to spread the colour and highlight the petal centres.
I then made a pointed end petal flower shape and again used the water colour pencils and the damp brush to colour the petals.
I used a tiny split pin to push through the 2 petals and the card topper front.
I then attached this to the white folded card front with the padded tape, and then added the peel off flower sprays to the corners.
The small gift card with the sentiment, “with love”, attached, is a white card, cut at 14.5 x 7.5 and scored for the fold at 7 cm in from the left hand side.
The small image is mounted with D.S. tape onto the floral backing sheet, and then onto the card front with padded tape.
The pink coloured peel off strips, are attached around the outer edge of the white card and the backing sheet.
The same floral print is attached to the exposed inside edge, and the verse copied and hand written on the inside of the card.
The little lace edged gift card is made by using the floral print in a tri fold, 16cm x 6.5cm and scored from the left at 5.25cm as a mountain fold and at 9.25 as a valley fold.
I used red power tape to attach and gather the lace and then attach it to the card front at the 3.5cm mark of the small image.
I use these small cards I make from the sheets provided to bundle together in groups of 5 and either ribbon wrap them or pop them in a small hand-made box to give as gifts for Birthdays and Christmas.
My friends and family now ask me for sets so they can give to their friends. I find that extremely rewarding and encouraging, as I also do with the comments and feed-back, I receive from designers.
Thank you, Clare for both the main feature and the insert designs, and for posting my finished work of the Carnation card on the featured post by designers.
Pamela Horton
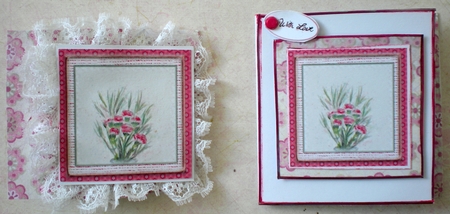
I purchased the main card, cup860883_79993, Pink Carnations Quick Card, and as this insert design supplied with this sheet, is the perfect match for the Pink Carnations Quick card, I felt it was absolutely necessary for me to purchase the insert as well.
I have had great fun in making many large, medium and small greeting and gift cards using combinations of each one.
The photographs I have attached focus on the insert design. I printed the sheet many times over a number of days, so I am not exactly sure now how many times I made copies.
The insert for cup860883_79993 is the last photograph. The opened insert measures 28cm x 14cm.
The greeting insert measures 10 x 10cm and the circle around the verse supplied, measures 8cm diameter. The green smudging I did by drawing on my left pointer finger, using a bright green marker with a chisel nib, and then finger printing and gently rubbing onto the white circle.
The card with the corner ribbon is a white 200gsm CB matte card cut at 21m x 11cm and scored and folded.
The insert supplied with the sheet is attached to the card as a topper using padded D.S. tape. The method I used to put this card together is explained in easy steps.
The card is punched in the top left hand corner before the green peel off strips are attached, and the peel off corners which are attached after the card front is completed, are coloured with permanent pens in pink and green to look like flower posies.
I attached the ribbon for the bow into the hole that is punched through both front and back layers, and tied the bow and I threaded the extra length of ribbon through the same hole and tied it at the top, and then used a decorative split pin through the same hole to hold all together firmly.
I drew 2 flowers in water colour pencils. The first and main flower has 6 petals, and measures 8cm across from flower tip to flower tip. I began by making a circle using the verse supplied as the centre of the circle, and roughly drawing the petals on the back.
I then cut the flower shape out and I folded the centre of each petal back in half to make the crease that is visible, and used the light and dark pink pencils dry on the right side, and a damp brush to spread the colour and highlight the petal centres.
I then made a pointed end petal flower shape and again used the water colour pencils and the damp brush to colour the petals.
I used a tiny split pin to push through the 2 petals and the card topper front.
I then attached this to the white folded card front with the padded tape, and then added the peel off flower sprays to the corners.
The small gift card with the sentiment, “with love”, attached, is a white card, cut at 14.5 x 7.5 and scored for the fold at 7 cm in from the left hand side.
The small image is mounted with D.S. tape onto the floral backing sheet, and then onto the card front with padded tape.
The pink coloured peel off strips, are attached around the outer edge of the white card and the backing sheet.
The same floral print is attached to the exposed inside edge, and the verse copied and hand written on the inside of the card.
The little lace edged gift card is made by using the floral print in a tri fold, 16cm x 6.5cm and scored from the left at 5.25cm as a mountain fold and at 9.25 as a valley fold.
I used red power tape to attach and gather the lace and then attach it to the card front at the 3.5cm mark of the small image.
I use these small cards I make from the sheets provided to bundle together in groups of 5 and either ribbon wrap them or pop them in a small hand-made box to give as gifts for Birthdays and Christmas.
My friends and family now ask me for sets so they can give to their friends. I find that extremely rewarding and encouraging, as I also do with the comments and feed-back, I receive from designers.
Thank you, Clare for both the main feature and the insert designs, and for posting my finished work of the Carnation card on the featured post by designers.
Pamela Horton
I purchased the main card, cup860883_79993, Pink Carnations Quick Card, and as this insert design supplied with this sheet, is the perfect match for the Pink Carnations Quick card, I felt it was absolutely necessary for me to purchase the insert as well.
I have had great fun in making many large, medium and small greeting and gift cards using combinations of each one.
The photographs I have attached focus on the insert design. I printed the sheet many times over a number of days, so I am not exactly sure now how many times I made copies.
The insert for cup860883_79993 is the last photograph. The opened insert measures 28cm x 14cm.
The greeting insert measures 10 x 10cm and the circle around the verse supplied, measures 8cm diameter. The green smudging I did by drawing on my left pointer finger, using a bright green marker with a chisel nib, and then finger printing and gently rubbing onto the white circle.
The card with the corner ribbon is a white 200gsm CB matte card cut at 21m x 11cm and scored and folded.
The insert supplied with the sheet is attached to the card as a topper using padded D.S. tape. The method I used to put this card together is explained in easy steps.
The card is punched in the top left hand corner before the green peel off strips are attached, and the peel off corners which are attached after the card front is completed, are coloured with permanent pens in pink and green to look like flower posies.
I attached the ribbon for the bow into the hole that is punched through both front and back layers, and tied the bow and I threaded the extra length of ribbon through the same hole and tied it at the top, and then used a decorative split pin through the same hole to hold all together firmly.
I drew 2 flowers in water colour pencils. The first and main flower has 6 petals, and measures 8cm across from flower tip to flower tip. I began by making a circle using the verse supplied as the centre of the circle, and roughly drawing the petals on the back.
I then cut the flower shape out and I folded the centre of each petal back in half to make the crease that is visible, and used the light and dark pink pencils dry on the right side, and a damp brush to spread the colour and highlight the petal centres.
I then made a pointed end petal flower shape and again used the water colour pencils and the damp brush to colour the petals.
I used a tiny split pin to push through the 2 petals and the card topper front.
I then attached this to the white folded card front with the padded tape, and then added the peel off flower sprays to the corners.
The small gift card with the sentiment, “with love”, attached, is a white card, cut at 14.5 x 7.5 and scored for the fold at 7 cm in from the left hand side.
The small image is mounted with D.S. tape onto the floral backing sheet, and then onto the card front with padded tape.
The pink coloured peel off strips, are attached around the outer edge of the white card and the backing sheet.
The same floral print is attached to the exposed inside edge, and the verse copied and hand written on the inside of the card.
The little lace edged gift card is made by using the floral print in a tri fold, 16cm x 6.5cm and scored from the left at 5.25cm as a mountain fold and at 9.25 as a valley fold.
I used red power tape to attach and gather the lace and then attach it to the card front at the 3.5cm mark of the small image.
I use these small cards I make from the sheets provided to bundle together in groups of 5 and either ribbon wrap them or pop them in a small hand-made box to give as gifts for Birthdays and Christmas.
My friends and family now ask me for sets so they can give to their friends. I find that extremely rewarding and encouraging, as I also do with the comments and feed-back, I receive from designers.
Thank you, Clare for both the main feature and the insert designs, and for posting my finished work of the Carnation card on the featured post by designers.
Pamela Horton