
Wiper Card Tutorial: 4¼ by 8½ Inch Cuts, Printables, Fixes

A wiper card is a pop-up style card where a small tag swings across the front when you pull the two panels apart. This tutorial shows you how to make a working single or multi-level version, with cutting sizes, a step-by-step build, troubleshooting and template guidance. The one rule to remember: only put adhesive on the triangular area of the wiper strip.
TL;DR:
- For a standard portrait build, cut two panels measuring 4 1/4 by 8 1/2 inches and a 1 1/2 by 3 inch strip.
- Apply adhesive only to the strip’s triangular section; glue on the moving area can bind the mechanism and stop the tag from swinging freely.
- Test the mechanism before decorating, then trim a catching strip in small increments, lighten a dragging tag, or adjust its diagonal score if movement remains sluggish.
- For double or tiered cards, stagger strips on separate panel bands, leave gaps between tags, and test each wiper before attaching the next.
- Print templates at intended scale without fit to page, and resize panels and strips together; test the printed dimensions against a ruler before cutting cardstock.
Table of Contents
- What supplies and measurements do you need before cutting?
- How do you assemble a wiper card step by step?
- How do you test the wiper and fix a sticky swing?
- How can you build double and tiered wipers?
- What does the downloadable template pack contain?
- What quick tips make the build easier?
- Where do wiper cards fit into a card-making routine?
- Where can you find ready-to-print wiper templates?
- FAQ
- Sources
What supplies and measurements do you need before cutting?
Gather everything first, because a wiper card punishes improvised substitutions. Here is the checklist we work from:
- Cardstock for the two panels, and lighter cardstock or patterned paper for the tag
- A scoring board or scoring tool, plus a bone folder for crisp creases
- A paper trimmer, a metal ruler and a craft knife for fine trimming
- Strong double-sided tape or strong wet glue for the wiper mechanism
- Acetate strips if you want a clear carrier for decorative pieces
- Embellishments such as stamped images, die-cut shapes or ephemera, kept light
For a standard portrait card, tutorials commonly use two panels of 4 1/4" x 8 1/2" with a wiper strip of 1 1/2" x 3", according to FotoBella’s wiper card tutorial. Score the strip diagonally from one corner to a mark 1 1/2" down the long side. A smaller variant uses a 1" x 1 7/8" strip, which suits lighter embellishments.
Another widely used layout is a 6" x 4" folded card built from two pieces of 4" high and 9" long, scored at 1 1/2" and 3", with a 3" x 1 1/2" tag, as Beccy’s Place describes. Pick one layout and stay with it throughout the build.
To make a square version, keep the strip proportions and scale everything by the same factor. Scale the strip and score marks along with the panels. Mixing scaled panels with an unscaled strip is the usual reason a swing comes out lopsided.
Adhesive rule: apply strong adhesive only to the designated triangular portion of the wiper mechanism, because adhesive across the movement area will bind the card and make it fail.
How do you assemble a wiper card step by step?
Work in order and resist gluing anything until the dry fit feels right.
- Cut and pre-score the panels. Trim both panels and the wiper strip to your chosen sizes. Score the panel fold lines, then fold them in the orientation your tutorial specifies: the centre fold lines fold as valley folds towards you, and the outer flaps fold back as mountain folds. Run the bone folder along each crease so the card opens and closes without fighting you.
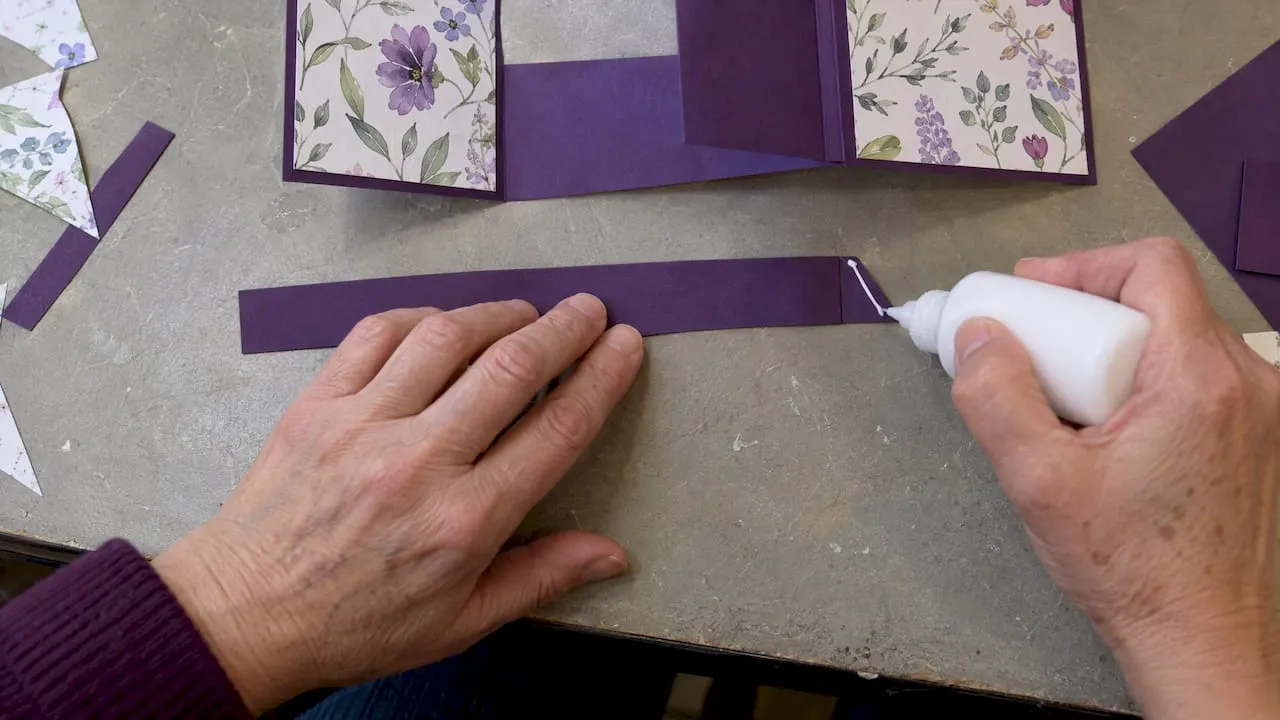
- Prepare the wiper strip. Mark 1 1/2" down the long side of the strip. Score a diagonal line from the corner to that mark, then pre-fold along it. If you like, round the top corner of the strip with a corner punch or scissors. A rounded top glides past the panel edge with less friction.
- Glue the triangle only. Apply strong tape or wet glue to the triangular section beneath the diagonal score, and nowhere else. Attach the strip between the two score lines on the inner panel, lining the diagonal up with the panel edge. Press firmly along the triangle, but keep the free part of the strip clear of adhesive.
- Join the card back to the front. Add adhesive to the outer edge panels, then bring the back and front together. Check the alignment at the top and bottom edges before you press down. Trim any overhang with the trimmer once the glue has set.
- Attach your decoration. Fix a paper tag, a stamped image or an acetate tab to the wiper. Pull the panels apart a few times to confirm the full range of motion before you commit to any final gluing.
Pro Tip: Cut a spare strip from scrap paper and run through steps 2 and 3 with it first, so you know exactly where the diagonal should sit before you use your good cardstock.
A few steps are worth photographing or sketching if you plan to share the project. A close-up of the diagonal score on the strip shows readers where the fold sits. An overhead shot of the glued triangle proves where adhesive belongs and where it must not go. A side-on photo of the panels half open shows the swing at work. Finally, a before-and-after of the finished card, closed and open, tells the story in two frames.
When you attach the tag, keep its weight in mind. A heavy chipboard shape will drag the strip and distort the diagonal fold, whereas a lightweight paper tag or acetate piece swings freely. If you want a bolder focal point, build it from layered thin paper rather than thick card.
Allow time for a first single wiper, and more if you hand-stamp or colour your images. Most of that time goes on careful scoring and checking the swing, and very little on the gluing itself.
Finally, think about how the card closes. The strip sits flat against the panels when the card is folded, so keep any embellishment on the tag below the thickness your envelope can handle. Check this before you finish decorating, not after.
How do you test the wiper and fix a sticky swing?
Test the mechanism before you decorate anything. Hold the two base sections together and gently pull them apart. The tag should sweep across the card in one smooth movement. If it catches or drags, adjust the placement or trim the strip until the motion is free.
When something is wrong, work through these checks in order:
- Catching at the edge: look for stray adhesive in the movement area, then trim a few millimetres from the strip.
- Dragging mid-swing: reduce the tag weight, or round the top corner of the strip further.
- Sluggish pull: replace weak tape with stronger wet glue, or nudge the diagonal score slightly so the angle gives the strip more room.
- Uneven closing: recheck that both panels are the same size and that the outer flaps are glued flush.
The table below sums up the most common faults and the fix we reach for first.
| Symptom | Likely cause | First fix |
|---|---|---|
| Tag sticks halfway | Adhesive beyond the triangle | Peel back and re-glue the triangle only |
| Strip scrapes the panel | Strip too long | Trim the strip in small steps |
| Tag swings slowly | Embellishment too heavy | Swap for lighter paper or acetate |
| Card will not close flat | Misaligned panels | Re-seat the outer flaps and trim overhang |
Before you finish decorating, tick off the basics: adhesive only on the triangle, panels aligned, strip length tested on scrap, and tag weight kept light. If all four are right and the swing is still stiff, burnish the folds again with the bone folder.
How can you build double and tiered wipers?
Once a single wiper works, adding more tiers is mostly a matter of spacing. For a second or third wiper, stagger the strips so each sits on its own band of the panel. Leave a clear gap between neighbouring strips so one tag never catches another as they sweep past.
Tiered designs behave best when you follow a few principles:
- Vary the lengths of the strips so the tags land at different points when the card opens fully.
- Space the panels evenly, and keep a consistent diagonal score on every strip.
- Choose lightweight embellishments for the upper tiers, since the lower tier takes more strain when you open the card.
- Add a thin backing layer behind heavier decoration so the panel does not bow.
- Test each tier separately before you add the next one.
A tiered card has the same core rule as a single one: adhesive on the triangle only, for every strip. The extra strips just repeat the pattern, so build one, test it, then add the next.
A square variant works well with the proportional scaling described earlier. Cut two square panels, scale the strip to match, and keep the diagonal ratio at roughly the same angle. A pop-out style, where the tag emerges from behind a window, needs a slightly longer strip so the tag clears the aperture.
As for timing, a single wiper takes the shortest time. Adding another strip takes extra time for the additional testing. A tiered version can take longer once you include decoration, because every layer needs its own dry fit.
Decoration ideas that suit the swing include:
- A stamped bird or butterfly that appears to fly across a scene
- A paper moon or sun that travels across a night or day backdrop
- A seasonal tag such as a Christmas bauble, a flower or a wedding bell
- A hot air balloon on acetate drifting over a landscape
If you want more mechanisms to combine with wipers, our guide to what a pop-up card mechanism is explains how the different movements work.
What does the downloadable template pack contain?
A ready-made template removes the most error-prone part of the project, the measuring. A good pack includes cutting guides for single, double and tiered wipers, each with clearly marked cut lines, score lines and trim points. That way you never have to guess where the diagonal begins or how far apart to space the strips.
To use a template well, follow these points:
- Print at the template’s intended scale, with no “fit to page” setting, so the measurements stay true
- Print on a plain sheet first and compare it against your ruler before using good paper
- Use cardstock for panels, and keep the tag on a lighter weight
- If you resize, scale the panels and strip together
- Keep the printed guide for future builds so you can reuse the same proportions
Cutting machine users should add registration marks, run a test cut on scrap and check the blade depth and pressure before the full cut. Manual trimmer users can simply lay the template over the cardstock and cut along the guides, scoring the fold lines with a bone folder and ruler. In both cases, a small test strip saves a whole sheet of cardstock.
What quick tips make the build easier?
A few habits will save you more time than any new tool. First, keep strong tape or wet glue strictly on the triangle, since adhesive across the movement area binds the card. Second, round the top of the tag to reduce friction and help it clear the panel edge. Third, test the strip length on scrap paper before final gluing. Fourth, pre-fold every score line and burnish lightly for crisper creases.
Pro Tip: If a strip keeps catching, shave a millimetre or two off its free end and test again, rather than reworking the glue.
Where do wiper cards fit into a card-making routine?
My own take is that the wiper deserves more credit than it gets. It looks like a clever trick, yet the mechanism is simple enough to teach in a single sitting, which makes it ideal for card sets and workshop tables where everyone needs a result they can be proud of. I like pairing it with a slider or a flap, so one card gives the recipient two surprises instead of one. Do not be afraid to bend the rules, either: swap the tag for a themed shape, or turn the card sideways and see what happens. Once the triangle rule is second nature, the rest is play. Make one, change something, and share what you build.
— Rob
Where can you find ready-to-print wiper templates?
We offer cutting files and card-making supplies that can help with this project. Browse our cutting files and our card making category for printable kits and project packs that pair well with a wiper build. A template can help reduce measuring as you work on your wiper card. Pick a design, print it at full scale and have your first wiper card finished this afternoon.

FAQ
What is a wiper card?
A wiper card is a folded card with a small tag that swings across the front when you pull the two panels apart. The motion comes from a diagonally scored strip fixed at one triangular point. It is a simple interactive mechanism that suits most card sizes.
Where should I put the glue on a wiper card?
Put strong double-sided tape or wet glue only on the triangular section of the wiper strip. Adhesive across the movement area binds the card, so keep the swinging part completely clear.
What size should a wiper card strip be?
A common choice is a 1 1/2" x 3" strip scored diagonally from one corner to a mark 1 1/2" down the long side, used with two 4 1/4" x 8 1/2" panels, as shown in FotoBella’s tutorial. The same layout works for most hobby projects, and scaling every piece by one factor gives you other sizes.
Why does my wiper card catch or drag?
Usually there is stray adhesive in the movement area, or the strip is slightly too long or the tag too heavy. Trim the strip, lighten the tag or move the diagonal score, then test again by pulling the panels apart.
Sources
- Splitcoaststampers - Tutorials
- Alisatilsner
- Beccy’s Place: Tutorial - Wiper Cards
- FotoBella: Wiper Card: Monthly Graphic 45 Card Tutorial