
Hobby Crafters: Foil Laser Printables with One Test Sheet
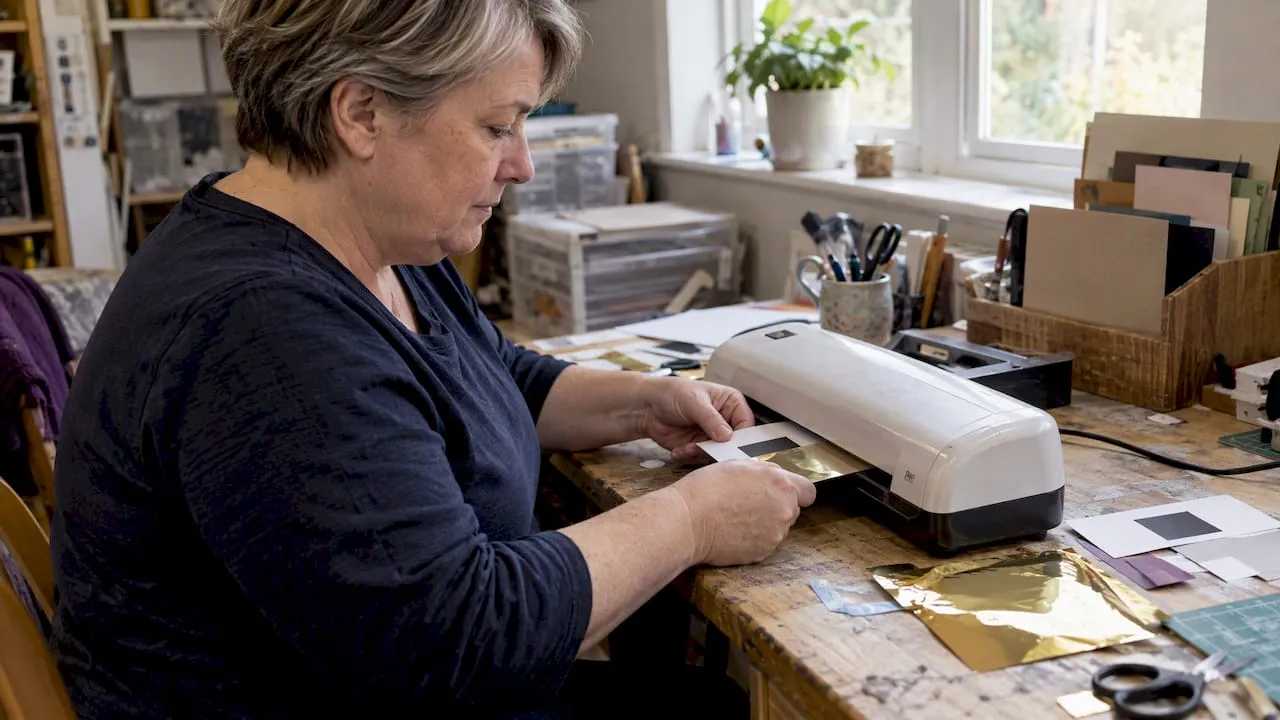
Yes, you can get metallic foiling from home printables: use a laser printer with toner-reactive foil and a heated laminating nip. The minimal kit is a laser printer, toner-reactive foil in sheet or roll form, a heated laminator or sleeking unit, a carrier sheet and suitable paper. Run one test sheet before committing to a full batch.
TL;DR:
- A mono laser printer produces dense, consistent black toner without color registration issues; color toner can deliberately alter the foil’s final shade.
- Choose a laminator that sustains at least 125°C under load, feeds slowly, and applies even roller pressure; test settings on scrap first.
- Smooth, uncoated or silk finish card around 250 to 300 gsm handles transfer better; bold toner fills work more reliably than fine strokes.
- Start within 110°C to 125°C, changing one setting at a time; for patchy coverage, try a slow second pass with fresh foil before raising heat.
- Let sheets cool fully before peeling, keep fingers clear of hot rollers, and use a carrier sheet to protect the machine and prevent feeding problems.
Table of Contents
- The essential kit: choosing a laser printer, foil and laminator for hobby foiling
- Step-by-step workflow for toner-reactive foiling with a home setup
- Machine settings and practical troubleshooting tips
- Paper, finishes and design choices that foil well
- Common problems and quick fixes
- Author’s note: why toner-reactive foiling suits crafters
- Where to start on Craftsuprint: printables and paper supplies
- FAQ
- Sources
The essential kit: choosing a laser printer, foil and laminator for hobby foiling
Toner-reactive foil only bonds to dry toner, the plastic-based powder that laser printers fuse onto paper. Inkjet printers lay down liquid ink rather than toner, so they will not activate the foil at all. A mono laser printer is usually the better starting point for crafters, since it produces dense, consistent black toner without the colour registration issues that can affect a colour laser unit, though using colour toner deliberately can shift the foil’s perceived shade if you want a tinted metallic effect.
Toner-reactive foil comes in two main formats. Pre-cut A4 or A3 sheets suit occasional, small-batch crafting, while rolls suit higher-volume or trade use. Sheet packs are commonly sold in small quantities, which makes them a sensible starting point for testing colours and finishes before buying in bulk.
For the heat source, a pouch laminator or a dedicated sleeking unit both work, provided the machine offers:
- A temperature control that reaches at least 125°C reliably under load
- Adjustable or slow feed speed, since foil transfer needs more dwell time than standard document lamination
- A flat, even roller pressure across the width of the sheet
Before running a full design, cut a small test swatch of foil over a scrap printout. It costs a fraction of a sheet and tells you immediately whether your printer, paper and laminator combination is going to work together.
Step-by-step workflow for toner-reactive foiling with a home setup
Once your kit is assembled, the process itself is short and repeatable.
- Prepare your artwork with solid black fills rather than thin outlines or hairline text, and set your printer to its highest toner density or “best quality” mode.
- Print the design onto your chosen paper stock using the laser printer.
- Build the foil sandwich: lay the foil shiny side up and dull side down against the toner, then place both inside a carrier sheet to protect your laminator’s rollers.
- Feed the sandwich through the laminator at your starting temperature and a slow speed, letting the heat and pressure transfer foil onto the toner.
- Let the sheet cool fully before handling it, since foil peeled while still warm tends to lift unevenly.
- Peel the foil backing away slowly at a shallow angle, checking coverage as you go.
- Re-run any patchy areas by repositioning a fresh piece of foil over just that section and passing it through again.
This three-step core, print, sandwich, laminate, mirrors the basic home workflow described by craft hobbyists using pouch laminators and purpose-built units such as the Minc.
Pro Tip: Keep a small offcut of every new paper you try, pre-printed with a solid black square, so you can test foil settings without wasting a full sheet of your actual project.
If an area fails to take foil on the first pass, resist the urge to turn up the heat drastically. A second slow pass at the same temperature with fresh foil usually fixes patchy transfer more reliably than forcing more heat through the machine.
Machine settings and practical troubleshooting tips
Most toner-reactive foiling starts somewhere between 110°C and 125°C, with operator manuals for dedicated laminating and foiling machines commonly recommending a starting point of a moderate temperature in the typical range with a slow nip speed. Supplier specifications typically call for 110°C to 125°C for consistent transfer, and different foil finishes or laminator models may need small adjustments either side of that range.
Speed and pressure matter as much as temperature. A faster feed gives the foil less time to bond, which tends to cause patchy, incomplete transfer, while too much pressure can push foil onto areas with no toner at all.
- Under-transfer (foil lifts away or leaves gaps): slow the feed speed, raise the temperature slightly, or run a second pass.
- Over-transfer (foil sticks beyond the design): reduce heat or pressure and check the paper surface is clean and free of toner dust.
- Inconsistent results across a batch: check the laminator has fully reached temperature before each run rather than feeding sheets back to back.
Hot rollers and nip points present a genuine burn and entrapment risk. HSE guidance on paper converting and finishing machines highlights these hazards specifically and recommends fixed or interlocking guarding along with safe operating procedures, which is worth keeping in mind even on a desktop hobby laminator. Always use a carrier sheet, keep fingers clear of the feed area, and let the unit cool before clearing a jam.
Some hobby laminators simply cannot sustain the required temperature once they are under continuous load. If test swatches keep coming out dull or incomplete despite correct settings, measuring the roller temperature with a non-contact thermometer will confirm whether the unit is underperforming, in which case a purpose-built sleeking machine is the more reliable option for repeat projects.
Paper, finishes and design choices that foil well
Smooth, uncoated or silk-finish card takes foil far more evenly than textured or heavily coated stock, since surface irregularities stop the foil making full contact with the toner. A mid-weight card in the 250 to 300 gsm range is a practical starting point for most card making and small packaging projects, giving enough rigidity without overloading the laminator.
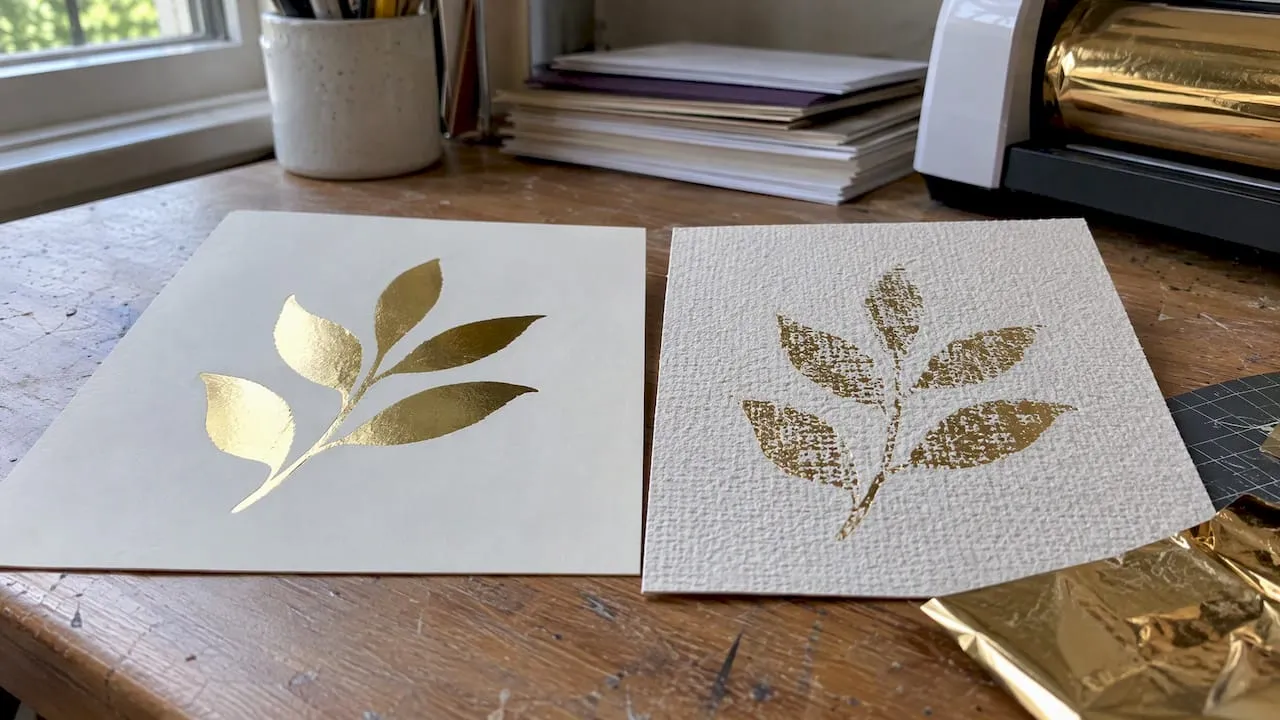
Design choices affect results just as much as paper. Bold, solid fills transfer cleanly, while fine hairline strokes or very light typefaces often fail to hold foil because there simply is not enough toner there to bond to. If a design needs fine detail, thickening the strokes slightly or adding a small trap around text improves adhesion.
Foil finish changes the entire character of a finished piece: metallic foils give a classic shiny effect, holographic foils add shifting colour, and satin finishes offer a more muted, premium look. Combining a coloured toner print with a complementary foil shade can shift the final appearance in ways a single black-toner print cannot achieve.
Before committing to a full print run, confirm your combination works with a short checklist:
- Print a solid test square on your intended paper stock
- Foil it at your chosen starting temperature
- Peel once cooled and check for even, complete coverage
- Adjust one variable (heat, speed or paper) if results are inconsistent
Common problems and quick fixes
Most foiling faults trace back to one of a handful of causes, and each has a straightforward fix.
- Patchy or incomplete foil: increase toner density in your print settings, switch to a smoother paper stock, or run a second pass over the affected area.
- Foil sticking where there is no toner: lower the heat or pressure slightly and check the paper surface is free of dust or toner residue from previous prints.
- Wrinkling or the sheet drifting as it feeds: check the feed alignment, reduce speed or pressure, and always use a carrier sheet to keep the sandwich flat.
- Consistent failure despite correct settings: the laminator may not be reaching or holding the required temperature under load, in which case a local print or sleeking service is a practical fallback for a one-off project.
Author’s note: why toner-reactive foiling suits crafters
Toner-reactive foiling gives hobbyists on-demand metallics for invitations, greetings cards and small packaging, without the cost or minimum order quantities that hot foil stamping usually demands. What makes it worth the small learning curve is how forgiving it is once you understand the variables: one test swatch tells you almost everything about whether a project will work. We built our printable designs and tutorials with exactly this kind of small-batch, trial-and-adjust crafting in mind.
— Rob
Where to start on Craftsuprint: printables and paper supplies
Printable designs built for projects like this are available, alongside paper and card supplies suitable for printing. Our Card Making category has templates sized and designed for foiling, and our Craft Supplies range includes card and paper stock suited to laser printing.
A simple way to start is to download one printable, print it on a smooth mid-weight card, and foil a single sheet to dial in your settings before committing to a full batch. If you want wider inspiration for paper projects beyond foiling, creative paper and leaf art ideas are worth a browse too.
- Browse Card Making for printable designs ready to foil
- Pick suitable stock from Craft Supplies
- Download a single printable and run a test foil sheet before a full project
FAQ
Can you do foiling without a laser printer?
No, toner-reactive foil needs dry toner to bond to, and only laser printers produce it. Inkjet prints use liquid ink, which will not activate the foil, so a laser printer is a required part of this process.
Is foil printing expensive?
Toner-reactive foil sheets are sold in small packs, often around ten sheets, which keeps the cost manageable for short runs and hobby projects. Running costs stay low because you already own or can access a standard laser printer and a laminator, unlike commercial hot foil stamping, which needs dedicated machinery.
What is the best laser printer for foiling?
A mono laser printer is often the better choice for hobbyists, since it produces dense, even black toner without colour registration concerns. A colour laser printer also works and can be used deliberately to tint the final foil’s appearance.
How can I make a foil stamping myself?
Print your design on a laser printer with solid, dense toner areas, then sandwich toner-reactive foil over the print with the shiny side facing up. Run the sandwich through a heated laminator at around 110°C to 125°C, let it cool fully, then peel the backing away slowly to reveal the foiled design.
Sources
- The Foil Edit The ultimate guide to toner reactive foiling
- Safeguarding paper converting and finishing machines in printing HSE
- CF2500 operator manual (Intec Printers)
- Toner reactive foil & toner sheets for foiling — specs, colours & sourcing AllInPacks