


HEXAGONAL GIFT BAG - PURPLE FLOWERS IN TEAPOT
To make this gift bag you will need the bag templates, smooth card, narrow ribbon, scissors, glue and maybe a lighter (for singeing the ends of your ribbons so that they don't fray).
Full step by step instructions are included in the kit.
The finished bag will be the shape of the photograph in the preview but will have the design shown in the diagrams.
The completed bag is quite large and measures approximately 6" at the widest part of the base and almost 5" tall.
They are quite eye-catching because of their shape and are sure to help your sales if you are using them to package your goods on a craft stall - or why not sell the finished bags themselves for customers to fill with their own goodies!
 HEXAGONAL GIFT BAG - SANTA AND GINGER BREAD
 HEXAGONAL GIFT BAG - HIBISCUS FLOWERS
 HEXAGONAL GIFT BAG - CHRISTMAS FOX
 HEXAGONAL GIFT BAG - FASHION GIRLS
 HEXAGONAL GIFT BAG - SNOWMAN 1
 HEXAGONAL GIFT BAG - WRAPPED UP CHRISTMAS
 HEXAGONAL GIFT BAG - SNOWMAN GLOBE
 HEXAGONAL GIFT BAG - SNOWY FIR TREES
 HEXAGONAL GIFT BAG - BUTTERFLIES
 HEXAGONAL GIFT BAG - CHRISTMAS BIRD HOUSE
 HEXAGONAL GIFT BAG - FLOWER OWLS
 HEXAGONAL GIFT BAG - CHRISTMAS TREES
 HEXAGONAL GIFT BAG - CHRISTMAS BIRDS
 HEXAGONAL GIFT BAG - GOLDEN RETRIEVER DOG
 HEXAGONAL GIFT BAG - FRENCH BULLDOG
 HEXAGONAL GIFT BAG - CHRISTMAS ELEPHANT
 HEXAGONAL GIFT BAG - PENGUIN BAUBLES
 HEXAGONAL GIFT BAG - CHRISTMAS ELVES
 HEXAGONAL GIFT BAG - STORK WITH BABY
 HEXAGONAL GIFT BAG - THANKSGIVING TURKEY
 HEXAGONAL GIFT BAG - CHRISTMAS TRINKET
 HEXAGONAL GIFT BAG - LITTLE RACCOONS
 HEXAGONAL GIFT BAG - PEACE ON EARTH
 HEXAGONAL GIFT BAG - GREY XMAS CATS
 HEXAGONAL GIFT BAG - LUMBERJACK GNOMES
 HEXAGONAL GIFT BAG - BOY BEAR AND ROSES
 HEXAGONAL GIFT BAG - BOY BEAR WITH BOUQUET
 HEXAGONAL GIFT BAG - VINTAGE POINSETTIAS
 HEXAGONAL GIFT BAG - WINTER VILLAGE
 HEXAGONAL GIFT BAG - CERISE ROSES
 HEXAGONAL GIFT BAG - WILD FLOWERS
 HEXAGONAL GIFT BAG - SKATING SNOWMEN
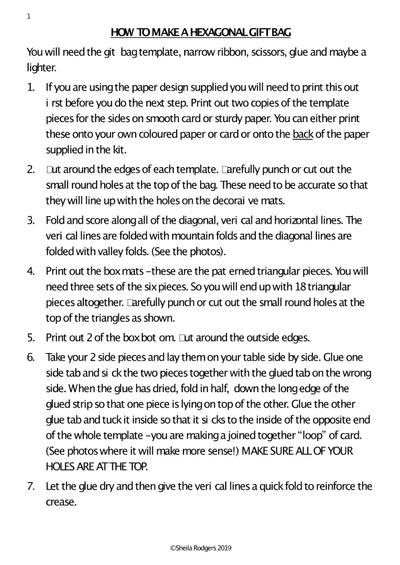
HOW TO MAKE A HEXAGONAL GIFT BAG You will need the gift bag template, narrow ribbon, scissors, glue and maybe a lighter. 1.
If you are using the paper design supplied you will need to print this out first before you do the next step.
Print out two copies of the template pieces for the sides on smooth card or sturdy paper. You can either print these onto your own coloured paper or card or onto the back of the paper supplied in the kit. 2.
Cut around the edges of each template. Carefully punch or cut out the small round holes at the top of the bag.
These need to be accurate so that they will line up with the holes on the decorative mats. 3. Fold and score along all of the diagonal, vertical and horizontal lines. The vertical lines are folded with mountain folds and the diagonal lines are folded with valley folds. (See the photos). 4.
Print out the box mats - these are the patterned triangular pieces.
You will need three sets of the six pieces. So you will end up with 18 triangular piec es altogether. Carefully punch or cut out the small round holes at the top of the triangles as shown. 5. Print out 2 of the box bottom. Cut around the outside edges. 6.
Take your 2 side pieces and lay them on your table side by side. Glue one side tab and stick the two pieces together with the glued tab on the wrong side. When the glue has dried, fold in half, down the long edge of the glued strip so that one piece is lying on top of the other.
Glue the other glue tab and tuck it inside so that it sticks to the inside of the opposite end of the whole template - you are making a joined together “loop” of card. (See photos where it will make more sense!) MAKE SURE ALL OF YOUR HOLES ARE AT THE TOP. 7.
Let the glue dry and then give the vertical lines a quick fold to reinforce the crease. ©Sheila Rodgers 2019 2 8. Glue the decorative triangular mats onto the main “loop” making sure to line up the holes. The decorative half triangles reinforce the holes.
Continue until all of the triangular mats are glued to the side piece. 9. Once the glue has dried, it’s time to glue the bottom glue tabs.
You will be gluing the piece of the tab which will be INSIDE THE BAG once they are all glued, carefully fold each tab inwards, inside the bag before carefully standing the bag on the table with the tabs at the bottom and the holes at the top. 10.
Carefully push one of your hexagons down inside your bag so that it gets glued into place on the tabs.
Press on the seams to make sure it sticks.
Let it dry then flip over your back and stick the other hexagon on the bottom to strengthen it and to hide your tabs.
Be careful to line up the corners and edges to make your bag neat. Flip it over and push down on the inside edges to make sure it’s flattened. Wait for the glue to dry. 11.
Stand the bag upright on the table and take your ribbon - measure around the box plus about 6 inches on each end and cut the ends diagonally.
Repeat this step. If your ribbon might fray then take your lighter and lightly singe the ends to seal them. 12. Start threading one ribbon through any hole. It is easier if you pinch the triangles together to double up on the holes. Try not to let the ribbon twist.
Once you have worked your way all round the top of the bag, pull the ribbon until the bag is closed and tie a bow to keep it closed whilst you thread the second ribbon.
Start the second ribbon threading on the opposite side from where you started the first. 13. Once the second ribbon threaded then tie a knot to join both ends together. Cut the ends diagonally to neaten it.
Untie the bow in the first ribbon and repeat the finishing off as you did on the second ribbon. 14. To close the bag, pull both ribbons by holding the knotted ends and pulling gently to close the bag top.
Tie in a bow and you are finished!
Related Products


Photographs from the Community

I printed onto 160gsm card and scored, as required, before cutting out all the pieces. I assembled the box using wet glue, punched holes and threaded a gold heart ribbon. Superb box that is easy to make and sure to impress.
