


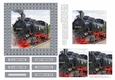
Steam Train Topper + Sayings
I had a request to create a steam train topper that will fit on a 5 X 7 card base with a narrow border between the topper and the card edge, so it can be attached to a black card base.
(This topper is sized to be 3/16" of an inch smaller than a standard 5 X 7 card base, but can be easily resized.)
Also included in the kit are 5 labels. 4 labels have sayings and one label is blank so you can use any saying you would like for your card. The sayings on the labels are:
HAPPY BIRTHDAY TO A SPECIAL DAD
HAPPY BIRTHDAY TO A SPECIAL SON
HAPPY FATHER'S DAY
HAPPY RETIREMENT


Photographs from the Community (2)

I have my 100 year old uncles Birthday next week and he loves train travel so thank you, Delores for this most opportune design.
I printed the sheet provided onto 200gsm matte CB white card, and then onto CB180gsm gloss white card.
I cut out the main image from the matte copy and used this copy as the main backing sheet. Before I attached it using D.S.
Padded tape to the next red backing sheet, I used a silver metallic fine line pen to draw along all the outside edges, and attached the striped red and white ribbon 1.5cm up from the bottom edge to the back of the main image with power tape.
The matching red backing sheet which measures 12.5 x 9 cm has the edges treated with the silver pen and a fine line ruled 3cm inside the edge on all 4 sides.
The next backing sheet is silver and measures 13.5 x 10cm, and is attached using the D.S. padded tape to the back of the red backing sheet.
The ribbon is now wrapped around and secured at the back of this group of backing sheets. I attached silver peel off strips just inside the edges of the silver backing sheet.
The backing sheets are then attached to the card front which measures 10.5cm x 14cm when scored and folded. I then added the same silver peel off strips around all 4 edges of the card front. I completed the insert before I continued with the decoupage for the card front.
I cut out the main image from the gloss copy, and cut away the main large ornamental frame, leaving the train image and the smaller frame intact, to add to the card front.
I used the same red card for the backing sheet on the upper section of the insert, cutting it at 10.5 x 2cm.
I have used 23 cm of the same striped ribbon to attach over this red card, folding under the raw edges and then attached a silver sheet, cut at 12 x 10.5cm.
I attached the red card first then the silver backing sheet and finally the ribbon which I attached down to the lower half edge of the insert.
I used the left over frame sections to attach to the lower and top half of the insert.
I then completed the card front by attaching the gloss image of the train to the card front using D.S. padded tape.
I finished the main image by attaching the same silver peel off strips around the smaller frame edge. I used the blank sentiment tag to mount onto red card and I have hand written the sentiment. This is a most appropriate choice for this special 101 year old birthday celebration.
However the subject has such a versatile appeal, I will be able to use this design for many occasions. Thank you, Deloris I did enjoy making this card. Pamela Horton.