


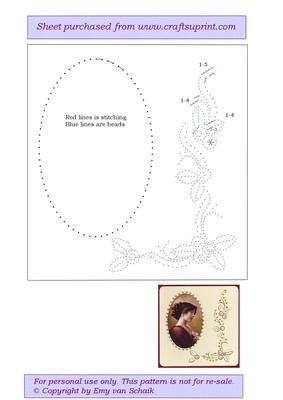
Ed037 Floral Border
Stitching with beads
Photographs from the Community (3)
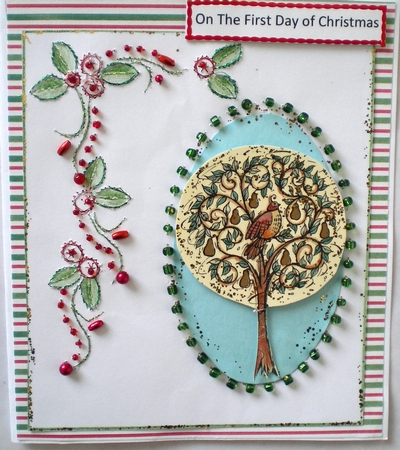
I have chosen to use this beautiful design as a Christmas greeting card topper and have used green and red for the 2 colours for the stitching theme.
This is a delicate but very quick and easy design to follow, to which I have added extra beads.
I have used pale green metallic thread to stitch the inside lines of the leaves and a slightly darker green metallic thread for the rest of the stitching.
I used the light green metallic thread double to attach the 38 glass seed beads in the oval shape. In each of the 8 small circular berries I have attached a tiny glass red seed bead.
For the bead lines I have used a mixture of 21 tiny red seed glass beads, 1 red 6mm metallic rice bead, 1 round red 2mm glass bead, and one 3mm red metallic round bead.
For the single buds I have used 1 red metallic tiny round bead, and 3 red 6mm metallic rice beads.
To complete the beading part of the project I have used 74 beads.
I used a green water colour pencil to colour the leaves to give them shading to add dimension to the image.
I cut the 120gsm white card to measure 15x13cm and when I had completed the stitching I used the watercolour green pencil to define the edges of the card and then used Gold Dust, glitter glue and a fine brush to carefully high light the green edges.
I then set this aside to dry while I prepared the backing sheets and the main card. I have used 200gsm, A4 white Crafty Bob photo paper to score and fold and then trim down to measure 17cm high.
I used a lighter weight 80gsm copy paper cut at 14 x13cm to attach to the back of the work to secure the stitching using red power tape.
The Christmas stripe linen textured backing sheet measures 16.75 x 14.25cm and is attached to the card front using D.S. tape.
The topper is attached using wide 6mm D.S. tape. I have chosen an image of the partridge in a pear tree to attach using padded D.S. tape onto a pale blue oval backing sheet.
I used the oval shape on the sheet provided as a template and cut it out inside the dotted line mark, so that it would fit inside the oval shape on the card front.
I printed the sentiment and attached it with D.S. padded tape. I used the Gold dust around the edges of the blue backing sheet, and the red peel off strips on the sentiment as extra embellishments.
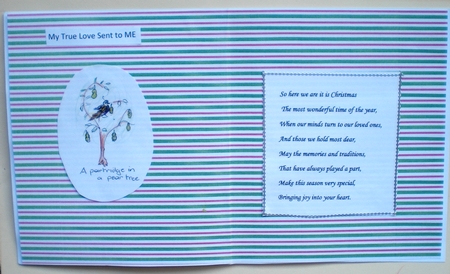
I have used the same Christmas stripe linen textured backing sheet as the insert and added a sentiment, a hand drawn image and a verse from the Christmas free verse list.
I intend to use this floral border to complete the 12 days of Christmas theme, by using an appropriate image for each of the 12 days in the beaded oval shape.
I am delighted with the final outcome of this project, thank you Emy, I love this quick and easy design.
Pamela Horton. The Whispering Platypus


Stitching with beads.
Use cardstock to make this card. Do the stitching first. The beads I used are glassbeads. Also used a cornerpunch.
I have chosen to use this beautiful design as a Christmas greeting card topper and have used green and red for the 2 colours for the stitching theme.
This is a delicate but very quick and easy design to follow, to which I have added extra beads.
I have used pale green metallic thread to stitch the inside lines of the leaves and a slightly darker green metallic thread for the rest of the stitching.
I used the light green metallic thread double to attach the 38 glass seed beads in the oval shape. In each of the 8 small circular berries I have attached a tiny glass red seed bead.
For the bead lines I have used a mixture of 21 tiny red seed glass beads, 1 red 6mm metallic rice bead, 1 round red 2mm glass bead, and one 3mm red metallic round bead.
For the single buds I have used 1 red metallic tiny round bead, and 3 red 6mm metallic rice beads.
To complete the beading part of the project I have used 74 beads.
I used a green water colour pencil to colour the leaves to give them shading to add dimension to the image.
I cut the 120gsm white card to measure 15x13cm and when I had completed the stitching I used the watercolour green pencil to define the edges of the card and then used Gold Dust, glitter glue and a fine brush to carefully high light the green edges.
I then set this aside to dry while I prepared the backing sheets and the main card. I have used 200gsm, A4 white Crafty Bob photo paper to score and fold and then trim down to measure 17cm high.
I used a lighter weight 80gsm copy paper cut at 14 x13cm to attach to the back of the work to secure the stitching using red power tape.
The Christmas stripe linen textured backing sheet measures 16.75 x 14.25cm and is attached to the card front using D.S. tape.
The topper is attached using wide 6mm D.S. tape. I have chosen an image of the partridge in a pear tree to attach using padded D.S. tape onto a pale blue oval backing sheet.
I used the oval shape on the sheet provided as a template and cut it out inside the dotted line mark, so that it would fit inside the oval shape on the card front.
I printed the sentiment and attached it with D.S. padded tape. I used the Gold dust around the edges of the blue backing sheet, and the red peel off strips on the sentiment as extra embellishments.
I have used the same Christmas stripe linen textured backing sheet as the insert and added a sentiment, a hand drawn image and a verse from the Christmas free verse list.
I intend to use this floral border to complete the 12 days of Christmas theme, by using an appropriate image for each of the 12 days in the beaded oval shape.
I am delighted with the final outcome of this project, thank you Emy, I love this quick and easy design.
Pamela Horton. The Whispering Platypus
