

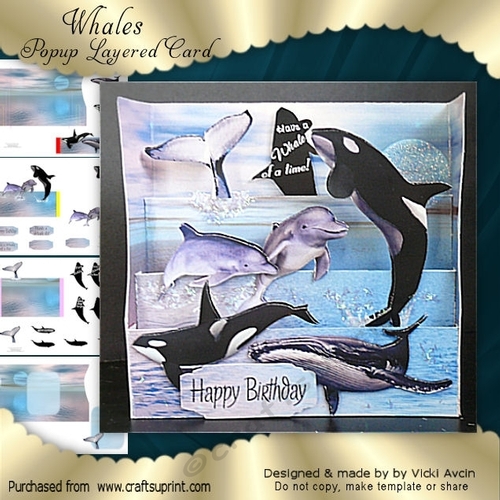


Whales Pop Up Layer Card
These stunning cards are not as hard as they look to make!!
They are free standing and will fold flat to fit easily into 8x8 envelopes.
The kit gives 4 sheets which have the base (front and back) and 3
sheets with each layer plus plenty of decoupage to use. There is
a tutorial both on CUP and also included in the kit. Each kit has various
sentiments or you can add your own. It really is a ‘flexible’ card where you
could add your own touches to it as well if you wish.
To view more designs type Pop Up Layer Card in the Search Engine.
I hope you will enjoy making these designs and I’m sure the recipient will
love it.
Keep checking my store as many more designs will be added.
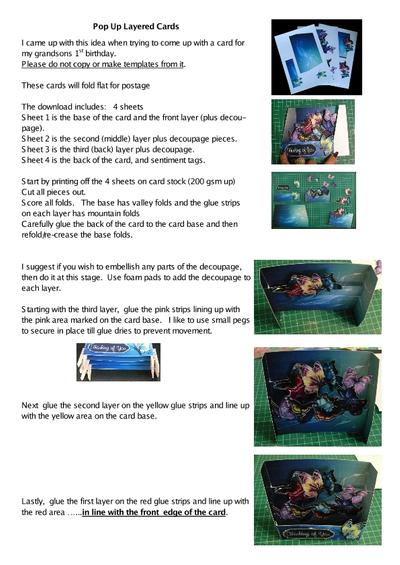
Pop Up Layered Cards I came up with this idea when trying to come up with a card for my grandsons 1st birthday. Please do not copy or make templates from it. These cards will fold flat for postage The download includes: 4 sheets Sheet 1 is the base of the card and the front layer (plus decoupage). Sheet 2 is the second (middle) layer plus decoupage pieces. Sheet 3 is the third (back) layer plus decoupage. Sheet 4 is the back of the card, and sentiment tags. Start by printing off the 4 sheets on card stock (200 gsm up) Cut all pieces out. Score all folds.
The base has valley folds and the glue strips on each layer has mountain folds Carefully glue the back of the card to the card base and then refold/re-crease the base folds. I suggest if you wish to embellish any parts of the decoupage, then do it at this stage.
Use foam pads to add the decoupage to each layer. Starting with the third layer, glue the pink strips lining up with the pink area marked on the card base.
I like to use small pegs to secure in place till glue dries to prevent movement. Next glue the second layer on the yellow glue strips and line up with the yellow area on the card base. Lastly, glue the first layer on the red glue strips and line up with the red area …...in line with the front edge of the card. TIPS: Use a colour marker pen to run around the edges to blend in (and cover where the back and front are glued), or, if you like bling use glitter pen.
I like gel base pens. Not all decoupage needs to be used. Some designs have ‘extras’ so you can use which ones you want. I find it easiest, as suggested to embellish ie glitter etc, before gluing the layers as you can work on a flat surface.
It is more difficult when card is assembled. When gluing the front and back, use a glue where you will have movement so that it can be lined up and the edges match.
Have a nice even coverage over the whole area. Double sided tape can be used if preferred. Trim if there are sections that may not quite match up.
This can happen in the cutting process or move slightly when gluing and dries. Use a good glue when gluing layers in place so they don’t separate.
Related Products
