


Cupcake Centre Cutout
These designs can be used to make a basic decoupage card or into a shaker card if you are comfortable in how to make them.
Each design has included several verses for you to choose from. Also included are 2 different design sentiment tags to give you lots of choices when making these designs up so you don’t give the exact same card to someone else….. just that little bit of variety to make many cards from one design.
Each kit also includes matching insert.
Designed for an 8 x 8 card but resize all sheets down when printing if you want a smaller card.
There are 4 sheets in this kit.
1 Back and top toppers and sentiment tags
2 Decoupage pieces and verses and sentiment tags
3 Verses sheet
4 Insert sheet
 Carnation Centre Cutout
 Nautical Centre Cutout
 Pink Mixed Floral Centre Cutout
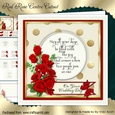 Red Roses Centre Cutout
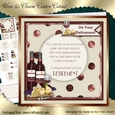 Wine and Cheese Centre Cutout
 Sunflower Centre Cutout
 Australian Floral Centre Cutout
 Easter Basket Centre Cutout
 Easter Religious Centre Cutout
 Champagne Celebration Centre Cutout
 Tropical Floral Centre Cutout
 Australian Christmas Centre Cutout
 Christmas Bells Centre Cutout
 ChristmasPointsettia Centre Cutout
 Wedding Centre Cutout
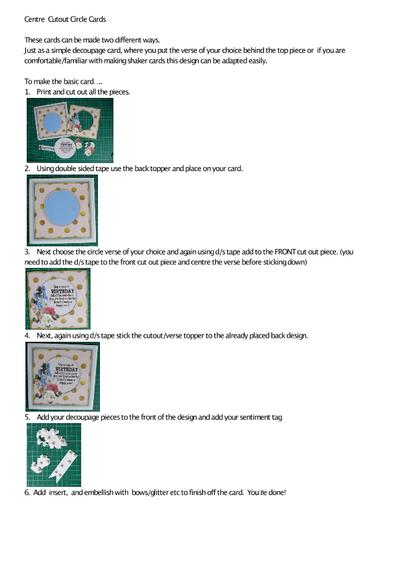
Centre Cutout Circle Cards These cards can be made two different ways. Just as a simple decoupage card, where you put the verse of your choice behind the top piece or if you are comfortable/familiar with making shaker cards this design can be adapted easily. To make the basic card….. 1.
Print and cut out all the pieces. 2. Using double sided tape use the back topper and place on your card. 3.
Next choose the circle verse of your choice and again using d/s tape add to the FRONT cut out piece. (you need to add the d/s tape to the front cut out piece and centre the verse before sticking down) 4.
Next, again using d/s tape stick the cutout/verse topper to the already placed back design. 5. Add your decoupage pieces to the front of the design and add your sentiment tag 6. Add insert, and embellish with bows/glitter etc to finish off the card.
You’re done! If you wish to make the shaker style card…. 1. Print and cut out all the pieces. 2. Using double sided tape use the back topper and place on your card. 3. Measure up and work out placement of the circle verse with the front cut out.
When happy with placement, using double sided tape stick to the BACK part of the topper. 4. Stick your acetate sheet to the front cutout using d/s tape. 5. Using your preferred way of ‘building’ the area where your shaker pieces go. Some people like to ‘build’ using foam tape, others die cut 2 circles of thick cardstock, glue one on top of the other.
You may need 3 or 4 circles depending on what you are using in your card for the ‘shakey’ items. 6.
Line up placement and stick down leaving a space to insert your ‘shakey bits’, then finish sticking down. 7. Add your decoupage pieces to the front of the design and add your sentiment tag 8. Add insert, and embellish with bows/glitter etc to finish off the card.
You’re done! FOOTNOTE: I prefer to use double sided tape to wet glue for sticking things as wet glue sometimes tends to ‘bubble’.
Plus you don’t have to wait for it to dry. Decoupage I use double sided foam pads. Other designs in this collection:
Related Products

Photographs from the Community (1)
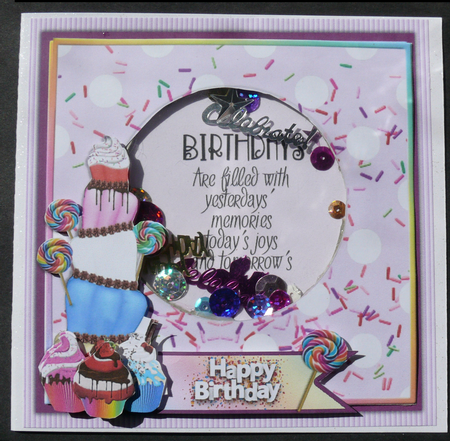
I printed and cut all the pieces. Glued the bottom base onto a 220gsm card that has a glitter fleck through it. Chose the verse I wanted to use from the ones given, glued to the back after lining up with the cutout and where it would be placed.
I decided to make this design into a shaker card, so added 2 die cut circles to the cut out piece.
Glued to the back leaving an opening for adding the 'shakey' pieces. This had small stars, hearts, sequins and Celebrate and a Happy Birthday words, then stuck the opening. Then I added the decoupage pieces and sentient tag which I tucked in behind the decoupage.
Added the insert to finish the card off. Very bright happy card.

More Products from Vicki Avcin ~ AusCrafts