


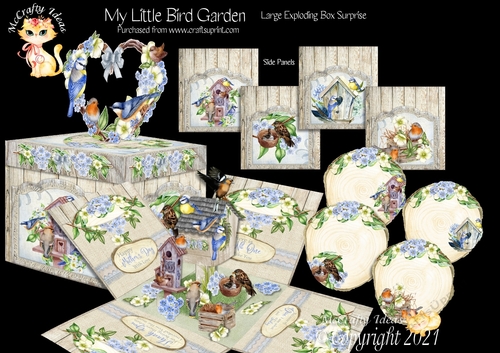

My Little Bird Garden Exploding Box Surprise Kit
this will make a beautiful spring gift for Mum's, it opens up to reveal a gorgeous Birdhouse, which you can put and LED T light in.
There are 4 large pocket with matching Tags to write on.
Another suggestion is to put seed packets in the pockets to make a beautiful gift.


Photographs from the Community


I printed the box sides and the lid onto good quality 300gsm white card and cut these out. I printed the inside panels and the bird house onto 200gsm white card and cut these out.
I printed the pockets also onto 200gsm white card and then fed all these sheets back through the printer to print the backing paper on the reverse.
The other elements I printed onto good quality 280gsm photographic paper and cut these out. I followed the instructions to assemble the box and lid. I added the pockets to the inside of each panel using wet glue.
I added the panels printed onto photographic paper to each side using thin foam tape. I assembled the bird house as instructed and added the birds, nests and birdhouse to this using wet glue.
I put a battery candle inside the birdhouse and left one side of the roof free so that it can be opened to take the candle in and out to switch it on/off.
Gorgeous when completed. Not difficult to do but it does take some time and patience but well worth it.


This was one of the prettiest exploding boxes that I have ever had the pleasure to assemble. Lots of fun details and colours. I added an inspirational quote to each pocket and gave it to a close friend for her birthday. She loved it.

These boxes are fantastic to make
Simple to cut and assemble with clear concise instructions
Print onto matt photographic paper and assembled with clear glue and foam pads
You can use all the elements of which there are loads or you can adapt them to suit
the celebration nothing is left out of these boxes and they make amazing cards or gifts

I printed the box sides and the lid onto good quality 300gsm white card and cut these out. I printed the inside panels and the bird house onto 200gsm white card and cut these out.
I printed the pockets also onto 200gsm white card and then fed all these sheets back through the printer to print the backing paper on the reverse.
The other elements I printed onto good quality 280gsm photographic paper and cut these out. I followed the instructions to assemble the box and lid. I added the pockets to the inside of each panel using wet glue.
I added the panels printed onto photographic paper to each side using thin foam tape. I assembled the bird house as instructed and added the birds, nests and birdhouse to this using wet glue.
I put a battery candle inside the birdhouse and left one side of the roof free so that it can be opened to take the candle in and out to switch it on/off.
Gorgeous when completed. Not difficult to do but it does take some time and patience but well worth it.

This was one of the prettiest exploding boxes that I have ever had the pleasure to assemble. Lots of fun details and colours. I added an inspirational quote to each pocket and gave it to a close friend for her birthday. She loved it.

This was one of the prettiest exploding boxes that I have ever had the pleasure to assemble. Lots of fun details and colours. I added an inspirational quote to each pocket and gave it to a close friend for her birthday. She loved it.

These boxes are fantastic to make
Simple to cut and assemble with clear concise instructions
Print onto matt photographic paper and assembled with clear glue and foam pads
You can use all the elements of which there are loads or you can adapt them to suit
the celebration nothing is left out of these boxes and they make amazing cards or gifts

I printed the box sides and the lid onto good quality 300gsm white card and cut these out. I printed the inside panels and the bird house onto 200gsm white card and cut these out.
I printed the pockets also onto 200gsm white card and then fed all these sheets back through the printer to print the backing paper on the reverse.
The other elements I printed onto good quality 280gsm photographic paper and cut these out. I followed the instructions to assemble the box and lid. I added the pockets to the inside of each panel using wet glue.
I added the panels printed onto photographic paper to each side using thin foam tape. I assembled the bird house as instructed and added the birds, nests and birdhouse to this using wet glue.
I put a battery candle inside the birdhouse and left one side of the roof free so that it can be opened to take the candle in and out to switch it on/off.
Gorgeous when completed. Not difficult to do but it does take some time and patience but well worth it.