
Toppers and Accessories - Sail AwayCompleted by Pamela Horton The whispering Platypus
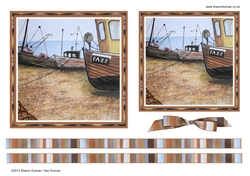
OccasionThis design is called Sail Away, and it certainly portrays that image, with blue skies, sea, sand, boats, fishing tackle, and birds. It is very easily made into a male card, suitable for any occasion. Often it is difficult to find just the right design, for a male friend, and so, thank you, Sharon and Ken, this one is perfect.
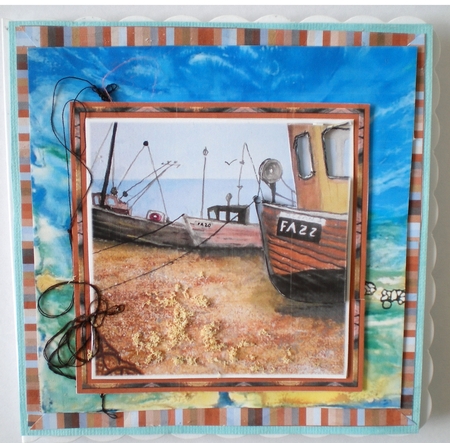
I made 2 copies, of the sheet provided, onto white 200gsm card, but I probably would make 3 next time. I used the first copy, to carefully cut away, the outside frame, of the main element. I kept this frame, as I wanted to use it later, when I was ready to make the insert. I made the backing sheet, for the first copy, from a watery scene, that I had in my stash, and cut it down to a size of, 10.5cm square. Now using the second copy I then carefully cut away the main boat feature, making sure that I left the double frame intact. To do this, I cut in from a 45 degree angle, at the top right hand corner. The rest of this second copy, is what I used, as the main backing sheet, for the decoupage I made. I then used, D.S. padded squares to attach this second copy onto the watery scene. Then taking the first copy, I attached it, over the top, of the 2 backing sheets. I cut out, the windows on the boat, using a craft knife, and used tiny D.S. padded squares, to attach the boat. To achieve the look, of the texture of sand, in the front of the boat, I used very small dots of wet, clear glue, and sprinkled, ivory flower soft, over the glue. To give the appearance of nets and rope, nonchalantly left lying around, I used 2 lengths, of dark brown sewing thread, and twisted them both separately, while doubled, and added a few knots. I then used the wet glue again, to hold it in place. I set this aside to dry while I made the rest of the main card and backing sheets.
I used a scalloped card, I had purchased from Crafty Bob's supply. It measures 12.5 cm square, when folded. To this I attached a textured, pale blue backing sheet, which measures, 12cm square, using D.S. padded tape. I cut out the striped elements from the 2 sheets, and, lightly marked a position for the inside edge of these strips on the blue backing sheet. The strips measure 0.7cm wide. I allowed a margin of 0.2cm of the blue backing sheet to be visible. This meant the line I drew, as a guide for gluing the strips, had to be almost, 1cm in, from all sides. I knew this line would not be seen when the card was finished, as it would be well hidden by the topper. I placed the wet glue, along this line and attached the strips to make a square. This formed an, underneath frame, for the backing sheets. Once this was dry, and I had made sure it was all sitting perfectly flat, I used long strips of heavy duty D.S. tape to attach the completed topper.
For the insert, I used the same watery scene on the left hand side, and added the smaller scene, from the sheet. On the right hand side, I used the frame, I had saved and also attached the bow. This is the area, I have planned, for the greeting I will add later.
A delightful finish, that shows plenty of dimension.
Thank You, for this design.
Pamela Horton

Make your Own, Buy the Download!
Toppers and Accessories - Sail Away
2 toppers, 2 ribbons and a bow.