

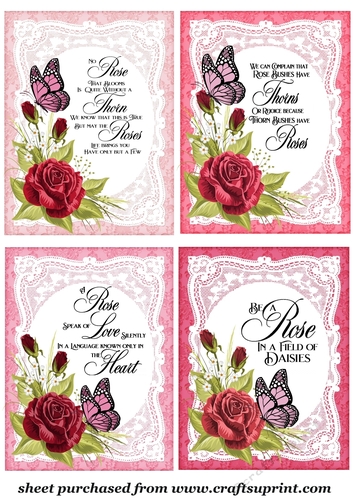

4 Pink rose verse toppers
4 Pink rose verse toppers


Photographs from the Community (4)

Mothers’ Day is the next big celebration on the Calendar, in Australia, and here are 4 perfect beautiful designs, by Stephen Poore, all on the one sheet, which are also so versatile in appeal it makes them all suitable for most female celebrations and occasions.
I have made 5 cards, all very different today. I printed the sheet provided twice onto A4 white satin finished 170gsm photo paper, and once at the smaller size fitting 8 images onto the one A4 sheet.
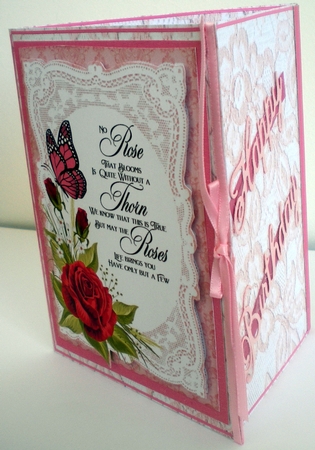
The first card measures, 29x13cm and is printed onto both sides using pink lace over white satin card.
I have shown the inside of this card in the last photograph attached. With the inside facing, I scored and folded it 10.5cm and 10.5cm. I cut out the main palest of the pink elements and the corresponding, matching inner lace edged image.
Using very narrow 0.4mm wide red power tape and the same width pale pink ribbon, to which I have attached a tiny pink bow, complete with tails, attached the ribbon to the very front outside and inside edges of the card front.
I attached the 12.25x9.5cm pink backing sheet to the card front using D.S. tape. I completed the topper, attaching the main image using D.S. tape and the lace edged central image using padded D.S. tape.
I folded the smaller, 8cm, back panel in and attached the pink 13x0.5cm strip flush with the folded edge. I have used the pale pink, cut sentiment to back with 2 pink strips using silicone gel. I have used pink peel off strips to attach to all edges and a smaller version of the roses and butterfly on the inside left cover.
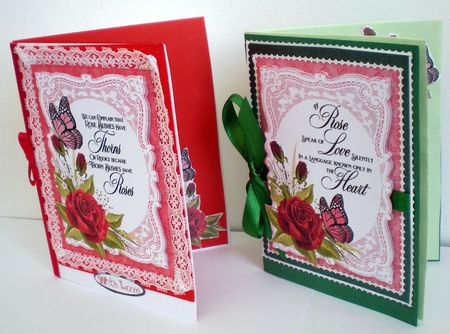
To complete the second card, which is in the second photograph attached, I have used lace to attach behind the main image, using a glue tape runner, I have then attached the lace edged central image to attach to the card front using padded D.S. tape to make the next topper and attached this to the red, 14x11cm backing sheet.
I attached, the red ribbon, which already has the bow attached, along the folded edge of the white 15x11.5card front, carrying the tails to the inside of the card and securing them with red power tape, before attaching the red insert.
To complete the green themed card, which is paired in the second photograph attached, I have used green card to cut at 21x14.5cm and attached a pale green insert to match.
Using D.S. tape, I have attached the main image onto the metallic green 13x 10cm backing sheet and wrapped the green ribbon across 5.5 cm down from the top edge and secured the tails at the back.
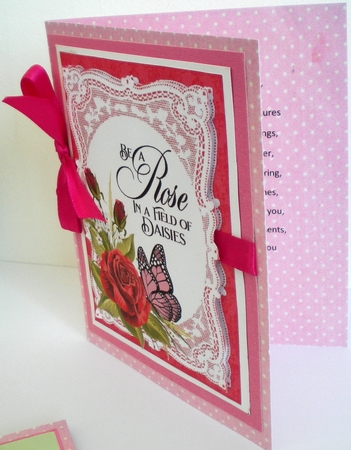
I have used padded D.S. tape to attach the lace edged image and attached the green bow. The 4th card shown in the next photograph attached, I have used pink tiny white spot card, printed onto both sides to cut at 22.5x14cm and is printed with the verse, I have chosen, onto the right side of the insert, then scored and folded.
I have made 2 backing sheets to attach to the back of the main image, a rose pink 13x10.5cm and a white12x9.5cm and attached them together using D.S. tape.
I have used the deep pink satin ribbon to attach horizontally 5.5cm down from the top edge of the pink backing sheet.
I have attached the matching bow. I secured the tails of the ribbon at the back before attaching this part of the topper to the card front.
As before I have attached the lace edged image using padded D.S. tape.
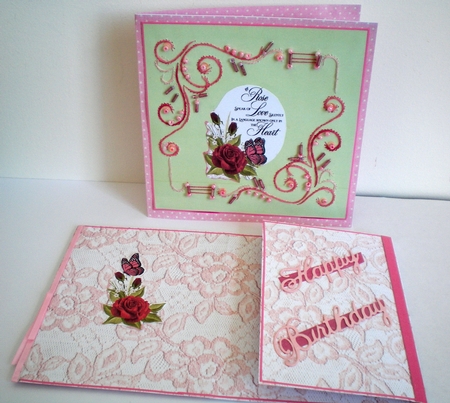
I have made a set of gift cards with the remaining smaller main images and used the oval shape cut from one of them to add as an embellishment to the stitched and beaded design, cup1104578, ED225, a design by Emy van Schaik, which is in the 4th photograph attached together with the insert of the partially opened insert of the lace imaged backing of the first card featured.
I have completed the stitched and beading card in a variety of pink shades on a green background. This sheet for purchase featuring 4 individually designed cards is certainly a design I will use many times. Pamela Horton. The Whispering Platypus.

Mothers’ Day is the next big celebration on the Calendar, in Australia, and here are 4 perfect beautiful designs, by Stephen Poore, all on the one sheet, which are also so versatile in appeal it makes them all suitable for most female celebrations and occasions.
I have made 5 cards, all very different today. I printed the sheet provided twice onto A4 white satin finished 170gsm photo paper, and once at the smaller size fitting 8 images onto the one A4 sheet.
The first card measures, 29x13cm and is printed onto both sides using pink lace over white satin card.
I have shown the inside of this card in the last photograph attached. With the inside facing, I scored and folded it 10.5cm and 10.5cm. I cut out the main palest of the pink elements and the corresponding, matching inner lace edged image.
Using very narrow 0.4mm wide red power tape and the same width pale pink ribbon, to which I have attached a tiny pink bow, complete with tails, attached the ribbon to the very front outside and inside edges of the card front.
I attached the 12.25x9.5cm pink backing sheet to the card front using D.S. tape. I completed the topper, attaching the main image using D.S. tape and the lace edged central image using padded D.S. tape.
I folded the smaller, 8cm, back panel in and attached the pink 13x0.5cm strip flush with the folded edge. I have used the pale pink, cut sentiment to back with 2 pink strips using silicone gel. I have used pink peel off strips to attach to all edges and a smaller version of the roses and butterfly on the inside left cover.
To complete the second card, which is in the second photograph attached, I have used lace to attach behind the main image, using a glue tape runner, I have then attached the lace edged central image to attach to the card front using padded D.S. tape to make the next topper and attached this to the red, 14x11cm backing sheet.
I attached, the red ribbon, which already has the bow attached, along the folded edge of the white 15x11.5card front, carrying the tails to the inside of the card and securing them with red power tape, before attaching the red insert.
To complete the green themed card, which is paired in the second photograph attached, I have used green card to cut at 21x14.5cm and attached a pale green insert to match.
Using D.S. tape, I have attached the main image onto the metallic green 13x 10cm backing sheet and wrapped the green ribbon across 5.5 cm down from the top edge and secured the tails at the back.
I have used padded D.S. tape to attach the lace edged image and attached the green bow. The 4th card shown in the next photograph attached, I have used pink tiny white spot card, printed onto both sides to cut at 22.5x14cm and is printed with the verse, I have chosen, onto the right side of the insert, then scored and folded.
I have made 2 backing sheets to attach to the back of the main image, a rose pink 13x10.5cm and a white12x9.5cm and attached them together using D.S. tape.
I have used the deep pink satin ribbon to attach horizontally 5.5cm down from the top edge of the pink backing sheet.
I have attached the matching bow. I secured the tails of the ribbon at the back before attaching this part of the topper to the card front.
As before I have attached the lace edged image using padded D.S. tape.
I have made a set of gift cards with the remaining smaller main images and used the oval shape cut from one of them to add as an embellishment to the stitched and beaded design, cup1104578, ED225, a design by Emy van Schaik, which is in the 4th photograph attached together with the insert of the partially opened insert of the lace imaged backing of the first card featured.
I have completed the stitched and beading card in a variety of pink shades on a green background. This sheet for purchase featuring 4 individually designed cards is certainly a design I will use many times. Pamela Horton. The Whispering Platypus.
Mothers’ Day is the next big celebration on the Calendar, in Australia, and here are 4 perfect beautiful designs, by Stephen Poore, all on the one sheet, which are also so versatile in appeal it makes them all suitable for most female celebrations and occasions.
I have made 5 cards, all very different today. I printed the sheet provided twice onto A4 white satin finished 170gsm photo paper, and once at the smaller size fitting 8 images onto the one A4 sheet.
The first card measures, 29x13cm and is printed onto both sides using pink lace over white satin card.
I have shown the inside of this card in the last photograph attached. With the inside facing, I scored and folded it 10.5cm and 10.5cm. I cut out the main palest of the pink elements and the corresponding, matching inner lace edged image.
Using very narrow 0.4mm wide red power tape and the same width pale pink ribbon, to which I have attached a tiny pink bow, complete with tails, attached the ribbon to the very front outside and inside edges of the card front.
I attached the 12.25x9.5cm pink backing sheet to the card front using D.S. tape. I completed the topper, attaching the main image using D.S. tape and the lace edged central image using padded D.S. tape.
I folded the smaller, 8cm, back panel in and attached the pink 13x0.5cm strip flush with the folded edge. I have used the pale pink, cut sentiment to back with 2 pink strips using silicone gel. I have used pink peel off strips to attach to all edges and a smaller version of the roses and butterfly on the inside left cover.
To complete the second card, which is in the second photograph attached, I have used lace to attach behind the main image, using a glue tape runner, I have then attached the lace edged central image to attach to the card front using padded D.S. tape to make the next topper and attached this to the red, 14x11cm backing sheet.
I attached, the red ribbon, which already has the bow attached, along the folded edge of the white 15x11.5card front, carrying the tails to the inside of the card and securing them with red power tape, before attaching the red insert.
To complete the green themed card, which is paired in the second photograph attached, I have used green card to cut at 21x14.5cm and attached a pale green insert to match.
Using D.S. tape, I have attached the main image onto the metallic green 13x 10cm backing sheet and wrapped the green ribbon across 5.5 cm down from the top edge and secured the tails at the back.
I have used padded D.S. tape to attach the lace edged image and attached the green bow. The 4th card shown in the next photograph attached, I have used pink tiny white spot card, printed onto both sides to cut at 22.5x14cm and is printed with the verse, I have chosen, onto the right side of the insert, then scored and folded.
I have made 2 backing sheets to attach to the back of the main image, a rose pink 13x10.5cm and a white12x9.5cm and attached them together using D.S. tape.
I have used the deep pink satin ribbon to attach horizontally 5.5cm down from the top edge of the pink backing sheet.
I have attached the matching bow. I secured the tails of the ribbon at the back before attaching this part of the topper to the card front.
As before I have attached the lace edged image using padded D.S. tape.
I have made a set of gift cards with the remaining smaller main images and used the oval shape cut from one of them to add as an embellishment to the stitched and beaded design, cup1104578, ED225, a design by Emy van Schaik, which is in the 4th photograph attached together with the insert of the partially opened insert of the lace imaged backing of the first card featured.
I have completed the stitched and beading card in a variety of pink shades on a green background. This sheet for purchase featuring 4 individually designed cards is certainly a design I will use many times. Pamela Horton. The Whispering Platypus.
Mothers’ Day is the next big celebration on the Calendar, in Australia, and here are 4 perfect beautiful designs, by Stephen Poore, all on the one sheet, which are also so versatile in appeal it makes them all suitable for most female celebrations and occasions.
I have made 5 cards, all very different today. I printed the sheet provided twice onto A4 white satin finished 170gsm photo paper, and once at the smaller size fitting 8 images onto the one A4 sheet.
The first card measures, 29x13cm and is printed onto both sides using pink lace over white satin card.
I have shown the inside of this card in the last photograph attached. With the inside facing, I scored and folded it 10.5cm and 10.5cm. I cut out the main palest of the pink elements and the corresponding, matching inner lace edged image.
Using very narrow 0.4mm wide red power tape and the same width pale pink ribbon, to which I have attached a tiny pink bow, complete with tails, attached the ribbon to the very front outside and inside edges of the card front.
I attached the 12.25x9.5cm pink backing sheet to the card front using D.S. tape. I completed the topper, attaching the main image using D.S. tape and the lace edged central image using padded D.S. tape.
I folded the smaller, 8cm, back panel in and attached the pink 13x0.5cm strip flush with the folded edge. I have used the pale pink, cut sentiment to back with 2 pink strips using silicone gel. I have used pink peel off strips to attach to all edges and a smaller version of the roses and butterfly on the inside left cover.
To complete the second card, which is in the second photograph attached, I have used lace to attach behind the main image, using a glue tape runner, I have then attached the lace edged central image to attach to the card front using padded D.S. tape to make the next topper and attached this to the red, 14x11cm backing sheet.
I attached, the red ribbon, which already has the bow attached, along the folded edge of the white 15x11.5card front, carrying the tails to the inside of the card and securing them with red power tape, before attaching the red insert.
To complete the green themed card, which is paired in the second photograph attached, I have used green card to cut at 21x14.5cm and attached a pale green insert to match.
Using D.S. tape, I have attached the main image onto the metallic green 13x 10cm backing sheet and wrapped the green ribbon across 5.5 cm down from the top edge and secured the tails at the back.
I have used padded D.S. tape to attach the lace edged image and attached the green bow. The 4th card shown in the next photograph attached, I have used pink tiny white spot card, printed onto both sides to cut at 22.5x14cm and is printed with the verse, I have chosen, onto the right side of the insert, then scored and folded.
I have made 2 backing sheets to attach to the back of the main image, a rose pink 13x10.5cm and a white12x9.5cm and attached them together using D.S. tape.
I have used the deep pink satin ribbon to attach horizontally 5.5cm down from the top edge of the pink backing sheet.
I have attached the matching bow. I secured the tails of the ribbon at the back before attaching this part of the topper to the card front.
As before I have attached the lace edged image using padded D.S. tape.
I have made a set of gift cards with the remaining smaller main images and used the oval shape cut from one of them to add as an embellishment to the stitched and beaded design, cup1104578, ED225, a design by Emy van Schaik, which is in the 4th photograph attached together with the insert of the partially opened insert of the lace imaged backing of the first card featured.
I have completed the stitched and beading card in a variety of pink shades on a green background. This sheet for purchase featuring 4 individually designed cards is certainly a design I will use many times. Pamela Horton. The Whispering Platypus.