

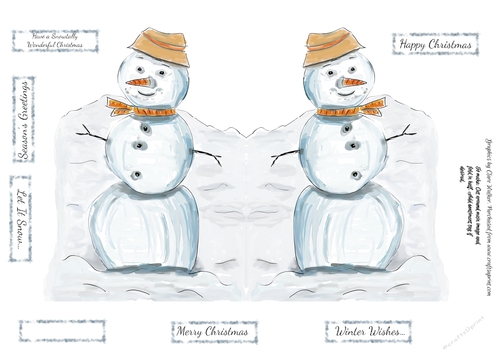
CHRISTMAS SNOWMAN-Shaped Card,with 7 Sentiment Tags and Commercial Use
This Christmas snowman shaped card is sure to please recipients of all ages. It's cute and looks great, but is specially designed to be quick and easy to cut and make. If you want to just cut out the main image, fold it in half, add a sentiment tag and send it, for an impressive but easy card, you can. (When printed onto an A4 sheet of paper, the finished design should fit easily into a standard 7" by 5" greeting card envelope).
On the other hand, the card has plenty of space on and around the snowman for your own decoration and finishing touches. (And if you want to add decoupage layers, simply print out the sheet again and cut around the snowman as you please).
Finally, this item also comes with small scale commercial use, meaning that you're free to sell card you hand make with this sheet, on CUP or anywhere else. Happy making!

Photographs from the Community


What a cutie. A great card to send to those friends, I have, who have come from a cold Winter, and for those wishing for a cold Christmas.
The instructions and cutting lines are absolutely perfect. It made the card so easy and quick to complete.
I printed the sheet supplied twice. Once, onto white 200gsm card, and once onto good quality copy paper.
After I had cut out the main feature and the sentiment I had chosen, I chose 3 green sequins and 3 black tiny pearl finished seed beads and stitched them in place for buttons, on the front image only. I then used, 2 of the same tiny seed beads, to stitch in place for eyes. To hold these firm, I then used tiny strips of scrap white paper and dots of white glue to paste over the stitching threads on the inside. I then used white glitter glue and a tiny brush to cover the snowman only.
While it was drying, I cut out the main feature from the lighter weight copy paper.
Once the front was completely dry, I used power tape to attach the snowman exactly in place on the inside.
Such A cute card, I have decided to make some snowman ear rings.
I have included a standing snowman, however it doesn't do justice to the 3 dimensional effect of the seed beads
Thank you Clare A big Hug
Pamela Horton


I printed the sheet onto heavy weight card paper, cut it out saving the shape of snowman. I added some glittering and printed season greeting.

What a cutie. A great card to send to those friends, I have, who have come from a cold Winter, and for those wishing for a cold Christmas.
The instructions and cutting lines are absolutely perfect. It made the card so easy and quick to complete.
I printed the sheet supplied twice. Once, onto white 200gsm card, and once onto good quality copy paper.
After I had cut out the main feature and the sentiment I had chosen, I chose 3 green sequins and 3 black tiny pearl finished seed beads and stitched them in place for buttons, on the front image only. I then used, 2 of the same tiny seed beads, to stitch in place for eyes. To hold these firm, I then used tiny strips of scrap white paper and dots of white glue to paste over the stitching threads on the inside. I then used white glitter glue and a tiny brush to cover the snowman only.
While it was drying, I cut out the main feature from the lighter weight copy paper.
Once the front was completely dry, I used power tape to attach the snowman exactly in place on the inside.
Such A cute card, I have decided to make some snowman ear rings.
I have included a standing snowman, however it doesn't do justice to the 3 dimensional effect of the seed beads
Thank you Clare A big Hug
Pamela Horton