

PEACOCK-SHAPED CARD with Decoupage For Birthdays and Other Occasions, With Commercial UseCompleted by Pamela Horton The whispering Platypus
OccasionHow to make a card with a stand, for, cup829094_79993,
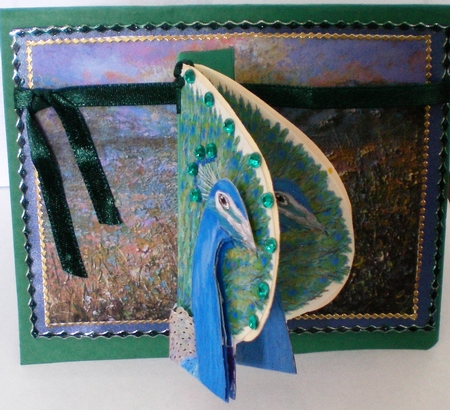
Peacock-Shaped card by Clare Walker
Another amazing pen and water colour original, by Clare Walker, for me to be able to work with. Thank you, Clare. I really did have fun working out how to make the absolute best view of this 4 sided peacock card.
I printed the sheet supplied twice, once, onto 200gsm white card, and once, onto white copy paper. I cut out all the elements from the 200gsm, card, and just, the peacock image, from the lighter weight paper.
I traced around the shape of the card copy, and made a template from this, that was 2mm, wider around the area, of the beautiful tail. I used this template to make an insert in an ivory light weight card. I then used white glue onto the ivory card and attached the 2 images either side of the ivory card. Once this was dry, I folded this, as indicated by the instructions on the sheet. I used the 200gsm copy, as the out - side, or main image, of the peacock. I then made up the decoupage, using small padded squares. I added the green rhinestones along the front image, just at the top edge of the beautiful peacock’s tail, and also, on the top edge of the crown. As I wanted to be able to view the peacock from all 4 sides, I needed to make a stand, to attach it, to the front of the card. I set the finished peacock image aside, while I made the card, and also, the backing sheets. The main card is a deep green, and the front measures, 14cm, wide, and 12.5 cm high. I made a backing sheet in a bluish purple, pearl finished card, which measures, 13cm x 10 cm. For the main backing sheet, I had a suitable meadow print, in my stash, that mirrored the tones of the peacock, but, in very subtle soft tones, so I cut it down to, 12cm x 9cm. I then attached this, to the bluish purple backing sheet, with red power tape.
I now used a craft knife, to cut a slit in the very centre, of the backing sheets. Starting at, 0.5cm, from the top down, to a point, 3cm, up, from the bottom. I set this aside with the green main card, and the completed peacock, to now work on the stand.
To do this I began with a piece of card exactly the same colour as the green card, measuring 14cm high and 10 cm wide. Then with the wrong side of the card facing, on a flat surface, and using a ruler and a scoring tool,
1. I measured down, 5cm and drew a faint pencil line across, and using the scoring tool, 1 firmly, scored this across, from left to right. This will make a valley fold.
2. I measured and marked across the top edge, at 2.5cm, at 5cm, and at 7.5cm.
3. I Repeated these measurements across the bottom edge.
4. I then scored, lightly, down these 3 lines.
5. I then folded at the horizontal score line, and using small scissors, cut the lower left hand piece, below the folded down edge, which measures 2.5cm wide x 4cm high. I also repeated this, and cut away on the right hand side, the piece that measures 2.5cm wide x 4cm high. The shape, I was left with, looks like a fat letter T.
6. I then kept the folded piece, now in the open position and turned the card over so that the right side was now facing me. And now working with the very top area of the card, above the fold line, I used the scorer to change the centre mountain fold into a valley fold. This fold line measures, 5cm only. I next worked below the fold line, and kept the centre fold, which is now a mountain fold on this side, but I re- scored the 2.5cm line, and the 7.5cm line, to now make them valley folds. This completed all the scoring.
7. I then folded the top section over to the back, and now,looking from the front, which is the right side, I was now looking at an odd shaped T, with 3 folds, a valley, then a mountain, and then a valley fold.
8. I used a single hole punch, to then make 2 small holes, one, in the very top centre of the mountain fold. The top opening of the hole, being 0.5cm down, from the top edge, and one in the bottom edge of the mountain fold, so that the bottom opening of the hole is 0.5cm up from the bottom edge. My space between the 2 holes, measures exactly, 7 cm.
9. Holding the mountain fold edge against the middle of the closed peacock, I now marked lightly, the points to make the same holes, with the same size punch. These are the matching points, where I needed to join the stand, to the peacock.
10. I used, 2 short lengths of 6mm wide dark green ribbon, to thread through the open peacock card into the open mountain fold, which I then secured with red power tape on the wrong side of the green stand. I then used white glue to close the mountain fold.
11. Once the glue was dry, I used the 2 pieces which looked like wings and measure 2.5cm x 5cm each, to pinch together and push through the slit previously made in the backing sheet. Once they were firmly through the slit, I used white glue to firmly attach them, to either side, of the slit, to the back of, the bluish purple, backing sheet.
12. Next I attached the decorative, peel off strips on both, the meadow image, and the other backing sheet. I then measured down, 2.5cm and used 31cm, of the same green ribbon, to wrap completely around all the items on the card front, threading the ribbon through the gap between the peacock and the green stand, and using very short lengths of D.S. tape, to help hold the ribbon, while I was continuing the wrapping procedure.
13. I now had completed the main front of the card, and for the insert I found some embossed coloured card to which, I attached a peel off peacock. I cut around it and then white glued it, onto to the top half of the card. I used 4 lengths of this coloured card to make a frame for the personal greeting.
It may seem like a lot of work, but, now that I have worked out how to make this stand, I will be able to use the design, to use it again, to definitely, make a difference to a special presentation for the front of a card.
I have written and photographed a tutorial for this, and it is available from the craftsuprint, website as well
A big Hug to you Clare, for your design and inspiration.
Pamela Horton

Make your Own, Buy the Download!
PEACOCK-SHAPED CARD with Decoupage For Birthdays and Other Occasions, With Commercial Use
This stunning peacock-shaped card will wow anyone, and yet is simple to make and easy to post. It's up to you whether to cut around the "glow" surrounding the peacock's feathers, or "fussy cut" them a ... Read More

