

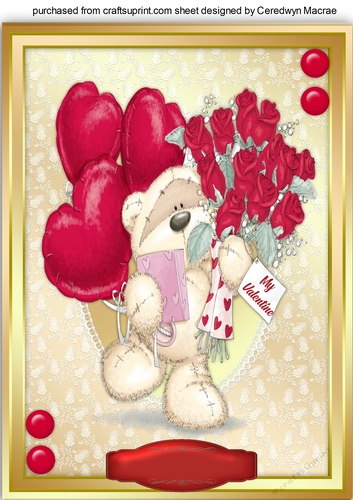

A4 ,Be My Valentine
A lovely A4 card to make and give to any valentine on the special day has 1 greeting tag left blank for your choice of sentiment


Photographs from the Community (4)
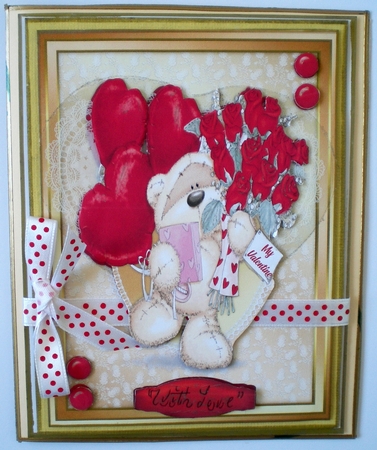

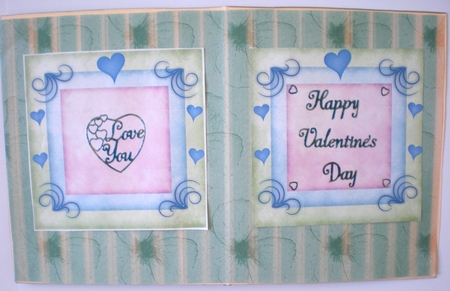
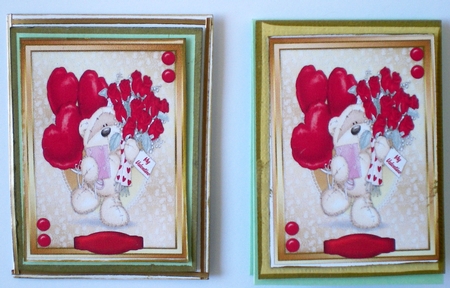
This is a very cute and very busy bear with gifts galore, all framed together in gold. What more could you want other than these balloons, roses and chocolates, maybe real ones of course. I printed it onto 200gm white card twice, to achieve the finished decoupage, at 15.2 x 10.2cm, and again twice more in a very tiny, 6x 4cm to make 2 gift cards. The card is amazing when made up to an A4, without any adornments, but I love working with Ceredwyn’s designs, and my family and friends love receiving them, and often postage costs become a consideration. I used the first larger copy as the main backing sheet, and used a gold metallic pen to colour the edges before using D.S. padded tape to attach it the next backing sheet. This is a matte gold textured card, which measures 14.5 x 11cm, and has the edges coloured in the same metallic pen. The next backing sheet is white and measures 15 x 11.5cm, and the edges are also coloured with the same gold metallic pen. The main back ground, which is the main element, and the next 2 backing sheets, are attached together, using D.S padded tape, and then held together with a red spotted ribbon, 4cm up from the bottom edge of the white backing sheet and secured at the back with D.S tape of the white backing sheet. Before I attached this to the main ivory card, which I cut at, 25.25 x 15.5 cm, and also coloured the very edges of this card with the metallic pen, then scored and folding it, and then attached the gold peel off strips to all 4 sides of the card front to this ivory card front. This made a beautiful card without having to add anything extra, however, I do really enjoy making a difference, and I love the decoupage images when finished, even though the photograph of the finished items show very little difference, the eye is in the beholder, and in this case in the receiver. To make the decoupage I used very tiny sharp and pointed scissors, and the second copy, to carefully cut out the red buttons, the red blank sentiment, and right around the bear, keeping the lower half of the heart and gift card, the roses,the balloons and the bears feet. I kept some of the tiny bridal shower flower edges as well. I had a peel off opaque lace heart that I added to the card front, however I would not do this again, I would use a tiny doily folded into a heart next time, as this peel off is lost, even though I have edged it with a glitter pen. I used padded tiny squares, and lots of them, to attach this to the card front. I made a simple bow using the same ribbon and attached it to the card front. For the insert, I used cup627996_2248, designed by Donna Kelly, which I printed off twice onto copy paper, and used D.S tape to attach it to a green floral striped print, which I had cut at 25cm x 15 cm. I then used some peel offs that I had coloured in blue to complete the greeting and sentiments. I then used the 2 smaller prints of the main element to make 2 tiny gift cards. I have included the photographs of both of these, as although I used the same method to assemble them, the backing sheets are in different shades , and the tiny green tiny gift card, opens easel style. I have made very good and valuable use of this one purchase, and will use it many times, as I find it suitable for many occasions, I will just need to make the tiny gift card, which is part of the design, say get well, or happy birthday, or even simply Hi. This design is a must for every card maker to keep in their stash
Pamela Horton

This is a very cute and very busy bear with gifts galore, all framed together in gold. What more could you want other than these balloons, roses and chocolates, maybe real ones of course. I printed it onto 200gm white card twice, to achieve the finished decoupage, at 15.2 x 10.2cm, and again twice more in a very tiny, 6x 4cm to make 2 gift cards. The card is amazing when made up to an A4, without any adornments, but I love working with Ceredwyn’s designs, and my family and friends love receiving them, and often postage costs become a consideration. I used the first larger copy as the main backing sheet, and used a gold metallic pen to colour the edges before using D.S. padded tape to attach it the next backing sheet. This is a matte gold textured card, which measures 14.5 x 11cm, and has the edges coloured in the same metallic pen. The next backing sheet is white and measures 15 x 11.5cm, and the edges are also coloured with the same gold metallic pen. The main back ground, which is the main element, and the next 2 backing sheets, are attached together, using D.S padded tape, and then held together with a red spotted ribbon, 4cm up from the bottom edge of the white backing sheet and secured at the back with D.S tape of the white backing sheet. Before I attached this to the main ivory card, which I cut at, 25.25 x 15.5 cm, and also coloured the very edges of this card with the metallic pen, then scored and folding it, and then attached the gold peel off strips to all 4 sides of the card front to this ivory card front. This made a beautiful card without having to add anything extra, however, I do really enjoy making a difference, and I love the decoupage images when finished, even though the photograph of the finished items show very little difference, the eye is in the beholder, and in this case in the receiver. To make the decoupage I used very tiny sharp and pointed scissors, and the second copy, to carefully cut out the red buttons, the red blank sentiment, and right around the bear, keeping the lower half of the heart and gift card, the roses,the balloons and the bears feet. I kept some of the tiny bridal shower flower edges as well. I had a peel off opaque lace heart that I added to the card front, however I would not do this again, I would use a tiny doily folded into a heart next time, as this peel off is lost, even though I have edged it with a glitter pen. I used padded tiny squares, and lots of them, to attach this to the card front. I made a simple bow using the same ribbon and attached it to the card front. For the insert, I used cup627996_2248, designed by Donna Kelly, which I printed off twice onto copy paper, and used D.S tape to attach it to a green floral striped print, which I had cut at 25cm x 15 cm. I then used some peel offs that I had coloured in blue to complete the greeting and sentiments. I then used the 2 smaller prints of the main element to make 2 tiny gift cards. I have included the photographs of both of these, as although I used the same method to assemble them, the backing sheets are in different shades , and the tiny green tiny gift card, opens easel style. I have made very good and valuable use of this one purchase, and will use it many times, as I find it suitable for many occasions, I will just need to make the tiny gift card, which is part of the design, say get well, or happy birthday, or even simply Hi. This design is a must for every card maker to keep in their stash
Pamela Horton
This is a very cute and very busy bear with gifts galore, all framed together in gold. What more could you want other than these balloons, roses and chocolates, maybe real ones of course. I printed it onto 200gm white card twice, to achieve the finished decoupage, at 15.2 x 10.2cm, and again twice more in a very tiny, 6x 4cm to make 2 gift cards. The card is amazing when made up to an A4, without any adornments, but I love working with Ceredwyn’s designs, and my family and friends love receiving them, and often postage costs become a consideration. I used the first larger copy as the main backing sheet, and used a gold metallic pen to colour the edges before using D.S. padded tape to attach it the next backing sheet. This is a matte gold textured card, which measures 14.5 x 11cm, and has the edges coloured in the same metallic pen. The next backing sheet is white and measures 15 x 11.5cm, and the edges are also coloured with the same gold metallic pen. The main back ground, which is the main element, and the next 2 backing sheets, are attached together, using D.S padded tape, and then held together with a red spotted ribbon, 4cm up from the bottom edge of the white backing sheet and secured at the back with D.S tape of the white backing sheet. Before I attached this to the main ivory card, which I cut at, 25.25 x 15.5 cm, and also coloured the very edges of this card with the metallic pen, then scored and folding it, and then attached the gold peel off strips to all 4 sides of the card front to this ivory card front. This made a beautiful card without having to add anything extra, however, I do really enjoy making a difference, and I love the decoupage images when finished, even though the photograph of the finished items show very little difference, the eye is in the beholder, and in this case in the receiver. To make the decoupage I used very tiny sharp and pointed scissors, and the second copy, to carefully cut out the red buttons, the red blank sentiment, and right around the bear, keeping the lower half of the heart and gift card, the roses,the balloons and the bears feet. I kept some of the tiny bridal shower flower edges as well. I had a peel off opaque lace heart that I added to the card front, however I would not do this again, I would use a tiny doily folded into a heart next time, as this peel off is lost, even though I have edged it with a glitter pen. I used padded tiny squares, and lots of them, to attach this to the card front. I made a simple bow using the same ribbon and attached it to the card front. For the insert, I used cup627996_2248, designed by Donna Kelly, which I printed off twice onto copy paper, and used D.S tape to attach it to a green floral striped print, which I had cut at 25cm x 15 cm. I then used some peel offs that I had coloured in blue to complete the greeting and sentiments. I then used the 2 smaller prints of the main element to make 2 tiny gift cards. I have included the photographs of both of these, as although I used the same method to assemble them, the backing sheets are in different shades , and the tiny green tiny gift card, opens easel style. I have made very good and valuable use of this one purchase, and will use it many times, as I find it suitable for many occasions, I will just need to make the tiny gift card, which is part of the design, say get well, or happy birthday, or even simply Hi. This design is a must for every card maker to keep in their stash
Pamela Horton
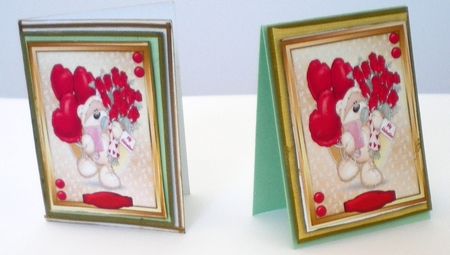
This is a very cute and very busy bear with gifts galore, all framed together in gold. What more could you want other than these balloons, roses and chocolates, maybe real ones of course. I printed it onto 200gm white card twice, to achieve the finished decoupage, at 15.2 x 10.2cm, and again twice more in a very tiny, 6x 4cm to make 2 gift cards. The card is amazing when made up to an A4, without any adornments, but I love working with Ceredwyn’s designs, and my family and friends love receiving them, and often postage costs become a consideration. I used the first larger copy as the main backing sheet, and used a gold metallic pen to colour the edges before using D.S. padded tape to attach it the next backing sheet. This is a matte gold textured card, which measures 14.5 x 11cm, and has the edges coloured in the same metallic pen. The next backing sheet is white and measures 15 x 11.5cm, and the edges are also coloured with the same gold metallic pen. The main back ground, which is the main element, and the next 2 backing sheets, are attached together, using D.S padded tape, and then held together with a red spotted ribbon, 4cm up from the bottom edge of the white backing sheet and secured at the back with D.S tape of the white backing sheet. Before I attached this to the main ivory card, which I cut at, 25.25 x 15.5 cm, and also coloured the very edges of this card with the metallic pen, then scored and folding it, and then attached the gold peel off strips to all 4 sides of the card front to this ivory card front. This made a beautiful card without having to add anything extra, however, I do really enjoy making a difference, and I love the decoupage images when finished, even though the photograph of the finished items show very little difference, the eye is in the beholder, and in this case in the receiver. To make the decoupage I used very tiny sharp and pointed scissors, and the second copy, to carefully cut out the red buttons, the red blank sentiment, and right around the bear, keeping the lower half of the heart and gift card, the roses,the balloons and the bears feet. I kept some of the tiny bridal shower flower edges as well. I had a peel off opaque lace heart that I added to the card front, however I would not do this again, I would use a tiny doily folded into a heart next time, as this peel off is lost, even though I have edged it with a glitter pen. I used padded tiny squares, and lots of them, to attach this to the card front. I made a simple bow using the same ribbon and attached it to the card front. For the insert, I used cup627996_2248, designed by Donna Kelly, which I printed off twice onto copy paper, and used D.S tape to attach it to a green floral striped print, which I had cut at 25cm x 15 cm. I then used some peel offs that I had coloured in blue to complete the greeting and sentiments. I then used the 2 smaller prints of the main element to make 2 tiny gift cards. I have included the photographs of both of these, as although I used the same method to assemble them, the backing sheets are in different shades , and the tiny green tiny gift card, opens easel style. I have made very good and valuable use of this one purchase, and will use it many times, as I find it suitable for many occasions, I will just need to make the tiny gift card, which is part of the design, say get well, or happy birthday, or even simply Hi. This design is a must for every card maker to keep in their stash
Pamela Horton
More Products from Craft Express