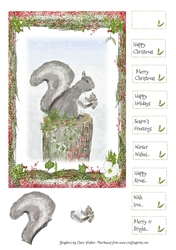
CUTE SQUIRREL CHRISTMAS CARD With Easy Decoupage, 9 Sentiment Tags & Commercial Use Completed by Pamela Horton The whispering Platypus
OccasionThis delightful design, of a busy Christmas Squirrel, with a pine cone, reminds me of how busy and frantic, the festive season becomes. with preparing , shopping and visiting.
So I kept within that busy theme, and made a busy card. The design lends itself, to being put together so easily, and so simply, and yet, I like to always make a point of difference. I made the base card and insert first, as the main card topper and decoration, that I have chosen, needs to rest for a short while, before working on the inside.
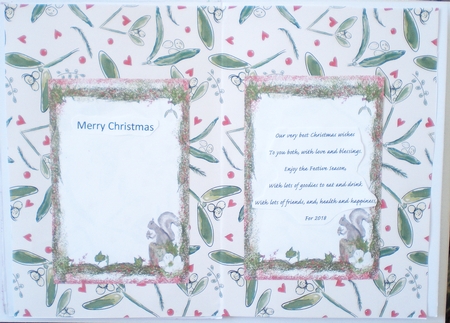
I used a white, 200gsm, card, cut at 28cm x 14cm, and folded it in half. The insert I chose is Christmas Mistletoe and Berries Background, cup797371_79993, a design by, Clare Walker. I cut this to fit the inside of the card, and then attached, two sections from the following, sheet insert, design, by Clare Walker, Cute Squirrel Christmas Card, Cup822663_79993, with D.S tape, and added a Merry Christmas sentiment and a greeting.
I then printed off the main sheet, for this design, at 20.3cm x 25.4cm, onto 200gsm white card, twice. One copy I used for the topper background, and the smaller elements, for part of the decoupage. With the second copy, I wanted to keep the squirrel on the log, and the whole frame, intact, so this required careful cutting, with very tiny scissors, to be able to include, the mistletoe, holly, ivy, berries and the white flower. Once I had completed this, I used padded, D.S tape to attach it, to the front, over the main art work. I was now able to decoupage the work, using all the rest of the elements, from both sheets, and using tiny padded squares.
I then used, a silver, glitter pen, to high light the shape of the tail, and the pine cone, and the eyes and ears of the squirrel. I then made tiny dots, with the silver glitter pen, to high light the snow drops, on the frame area.
Next, I made a dark green, backing sheet, 19x 13cm, and edged it with the glitter pen, and attached it to the back of the squirrel art work with regular D.S. tape.
The next backing sheet, is white card, cut at the same size as the main card front, 20x14cm. I used 0.25cm wide D.S. tape, to attach to the front 4 sides, as close to the edges as possible. Do Not peel off the backing strips at this stage.
I then prepared a sheet, for the Flower Soft material. For this, I used a plain sheet, of at least, 80gsm A4 paper or card, folded firmly in half, and opened again. I used a very small amount, of the strawberry, red flower soft, to sprinkle along the fold.
I peeled off, ONLY ONE, of the D.S. tape backing strips, and, turned the sheet upside down, and pressed the sticky side, of the D.S. tape, onto the flower soft. Once I was happy that the sticky area was fully covered, I repeated this process for each edge. With the crease, in the working paper, it is easy to tip the excess flower soft, back into the container. I used a sheet of clean white paper to press down, quite firmly, onto the front of the sheet, with the red flower soft edges, before continuing with, the shamrock green, flower soft.
I used white glue, that I had dispensed into a small bottle, with a very small hole, to make small spots of the white glue, along one edge, where the red flower soft, has already been stuck, and repeated the process as before, but using the green flower soft. Once all 4 edges were completed, I again used a plain white paper sheet to press down, to firm this next layer of green flower soft.
NOTE, I found a sheet of white baking paper, perfect for this purpose. Lastly when I was sure everything was firmly attached, I gently shook the page to dislodge any loose pieces, and to check to see if I needed to re-glue, or add more flower soft, to any areas.
If you now have a mix of the red and green flower soft, keep it in a separate little container. it will come in handy for another day.
Now, I was able to use padded, D.S tape to attach the green backing sheet to this flower soft sheet, and power red D.S. tape, to attach this, finally, to the front of the card. I used the Merry Christmas sentiment, the edges of which I had edged with a red pen and then a silver glitter pen, to complete the card front.
I was extremely happy, with the outcome, as the 2 colours of the flower soft, match the shades Clare used in the art work. It may seem a lot of work, but I have to say, it didn't take very long at all, and all the measurements are there for you. I say, give it a try. It is much easier than wrestling with, and trying to get, D.S tape to stick to felt, fluffy or glitter textures/.
A beautiful outcome for a beautiful cute Christmas design. thank you so much Clare.
Pamela Horton

Make your Own, Buy the Download!
CUTE SQUIRREL CHRISTMAS CARD With Easy Decoupage, 9 Sentiment Tags & Commercial Use
This cute Christmas squirrel sitting on his tree stump among holly, ivy, berries and snow will delight squirrel and animal lovers, and he's quick and easy to make.
If you like, you can just cut out t ... Read More