


Leave Room in Your Garden
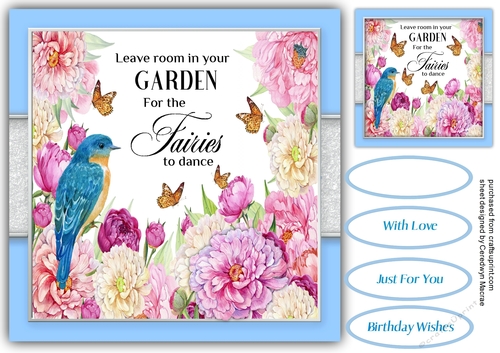
A lovely card with a Beautiful quote to make and give to anyone on there birthday with Leave room in your Garden has 3 greeting tags and a blank one


Photographs from the Community (4)

Ceredwyn’s designs are always a great choice to purchase and this beautiful floral, bird and butterflies with verse, has such universal appeal which will suit almost all female celebrations and occasions.
I printed the design onto 2 sheets of A4 white satin finished photo paper, fitting 2 images on to each of the sheets.
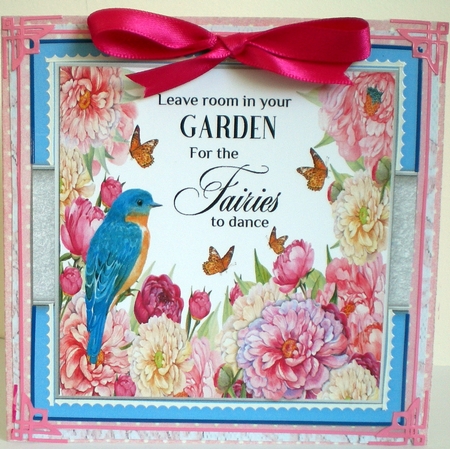
I used one of the images to make a very quick easy card, which is featured in the 3rd photograph attached.
I printed the pink tiny white spot backing sheet onto both sides of 170gsm photo paper, printing the verse onto the right side of the insert section, trimmed this to measure 28x14cm and scored and folded it before attaching the 2 backing sheets using D.S. tape.
The Pink Chantilly lace backing sheet, cup1106589_21027, is cut at 13.5cm square and the matching pink white spot backing sheet measures 13cm square.
I attached the pink fine line peel off strips to the outside edges of the pink backing sheet.
I cut out the main element and attached it to the card front, attaching the blue peel off strips to the outside edges of the central image, then the white decorative strips to the outside edges of the central image, leaving the ribbon image untouched to give more depth to the final image.
I finished the embellishment to the card front attaching the deep rose, pink bow and the pink decorative peel off corners.
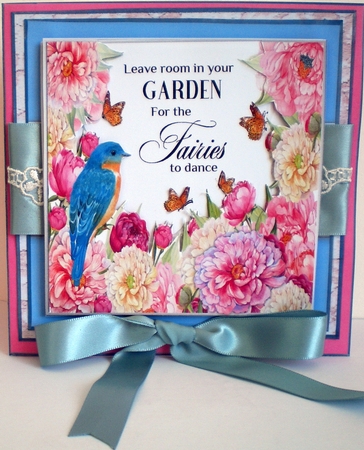
I used the 3 images from the printed copies, to make a step-by-step decoupage to complete the next card, which is the 1st photograph attached.
I prepared the main card using 170gsm satin finished white paper to copy a pink backing sheet onto the insert side and repeat the copying twice to give a darker rose, pink image on the outside section of the card.
I trimmed the sheet to measure 29x14cm and scored and folded it before defining the card front section using a blue metallic permanent pen.
I set this aside while I prepared the decoupage.
I wanted to retain 2 of the main blue outer frames to use as part of the insert, and carefully cut this frame away carefully, from each of the 2 images, so as not to damage the rest of the images.
I used my glue tape runner to attach both of these to the inside of the card. I used cup1106589_21027, to cut at 13cm square and defined the edge with the blue metallic pen.
To this backing sheet I attached the one full main image, complete with the blue frame, the edges of which I have also defined with the blue metallic pen.
I used the broad steel blue satin ribbon to attach horizontally across the ribbon print and using a glue tape roller attached the floral, lace strip, wrapping the tails at the back of the larger backing sheet, before attaching this image to the card front, using red power tape.
I used the next main image, which has had the blue frame removed, to attach using padded D.S. tape. The next image which has also had the frame removed, I have carefully cut away the verse and the butterflies, leaving intact the bird and all the flowers and some of the darker foliage.
I attached this using a combination of silicone glue, allowing it to dry a little to become quite tacky, D.S. tape and squares.
I cut away the butterflies from the verse section, I had removed, and attached them using silicone glue. I have made a large, matching blue, ribbon bow from narrower ribbon.
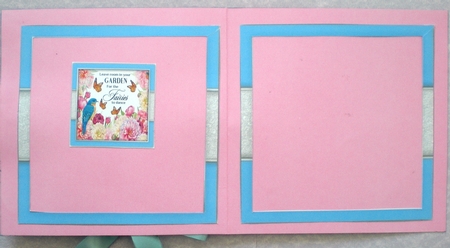
I have attached a small image from the sheet provided onto the left side of the insert and have made 3 small 6x6cm folded gift cards with matching envelopes.
I have a friend moving house soon and she is moving her whole garden with her, so I have left the inside verse section blank as I am using this as a welcome to your new house greeting card.
Thank you Ceredwyn, I love this design.
Pamela Horton The Whispering Platypus.

Ceredwyn’s designs are always a great choice to purchase and this beautiful floral, bird and butterflies with verse, has such universal appeal which will suit almost all female celebrations and occasions.
I printed the design onto 2 sheets of A4 white satin finished photo paper, fitting 2 images on to each of the sheets.
I used one of the images to make a very quick easy card, which is featured in the 3rd photograph attached.
I printed the pink tiny white spot backing sheet onto both sides of 170gsm photo paper, printing the verse onto the right side of the insert section, trimmed this to measure 28x14cm and scored and folded it before attaching the 2 backing sheets using D.S. tape.
The Pink Chantilly lace backing sheet, cup1106589_21027, is cut at 13.5cm square and the matching pink white spot backing sheet measures 13cm square.
I attached the pink fine line peel off strips to the outside edges of the pink backing sheet.
I cut out the main element and attached it to the card front, attaching the blue peel off strips to the outside edges of the central image, then the white decorative strips to the outside edges of the central image, leaving the ribbon image untouched to give more depth to the final image.
I finished the embellishment to the card front attaching the deep rose, pink bow and the pink decorative peel off corners.
I used the 3 images from the printed copies, to make a step-by-step decoupage to complete the next card, which is the 1st photograph attached.
I prepared the main card using 170gsm satin finished white paper to copy a pink backing sheet onto the insert side and repeat the copying twice to give a darker rose, pink image on the outside section of the card.
I trimmed the sheet to measure 29x14cm and scored and folded it before defining the card front section using a blue metallic permanent pen.
I set this aside while I prepared the decoupage.
I wanted to retain 2 of the main blue outer frames to use as part of the insert, and carefully cut this frame away carefully, from each of the 2 images, so as not to damage the rest of the images.
I used my glue tape runner to attach both of these to the inside of the card. I used cup1106589_21027, to cut at 13cm square and defined the edge with the blue metallic pen.
To this backing sheet I attached the one full main image, complete with the blue frame, the edges of which I have also defined with the blue metallic pen.
I used the broad steel blue satin ribbon to attach horizontally across the ribbon print and using a glue tape roller attached the floral, lace strip, wrapping the tails at the back of the larger backing sheet, before attaching this image to the card front, using red power tape.
I used the next main image, which has had the blue frame removed, to attach using padded D.S. tape. The next image which has also had the frame removed, I have carefully cut away the verse and the butterflies, leaving intact the bird and all the flowers and some of the darker foliage.
I attached this using a combination of silicone glue, allowing it to dry a little to become quite tacky, D.S. tape and squares.
I cut away the butterflies from the verse section, I had removed, and attached them using silicone glue. I have made a large, matching blue, ribbon bow from narrower ribbon.
I have attached a small image from the sheet provided onto the left side of the insert and have made 3 small 6x6cm folded gift cards with matching envelopes.
I have a friend moving house soon and she is moving her whole garden with her, so I have left the inside verse section blank as I am using this as a welcome to your new house greeting card.
Thank you Ceredwyn, I love this design.
Pamela Horton The Whispering Platypus.
Ceredwyn’s designs are always a great choice to purchase and this beautiful floral, bird and butterflies with verse, has such universal appeal which will suit almost all female celebrations and occasions.
I printed the design onto 2 sheets of A4 white satin finished photo paper, fitting 2 images on to each of the sheets.
I used one of the images to make a very quick easy card, which is featured in the 3rd photograph attached.
I printed the pink tiny white spot backing sheet onto both sides of 170gsm photo paper, printing the verse onto the right side of the insert section, trimmed this to measure 28x14cm and scored and folded it before attaching the 2 backing sheets using D.S. tape.
The Pink Chantilly lace backing sheet, cup1106589_21027, is cut at 13.5cm square and the matching pink white spot backing sheet measures 13cm square.
I attached the pink fine line peel off strips to the outside edges of the pink backing sheet.
I cut out the main element and attached it to the card front, attaching the blue peel off strips to the outside edges of the central image, then the white decorative strips to the outside edges of the central image, leaving the ribbon image untouched to give more depth to the final image.
I finished the embellishment to the card front attaching the deep rose, pink bow and the pink decorative peel off corners.
I used the 3 images from the printed copies, to make a step-by-step decoupage to complete the next card, which is the 1st photograph attached.
I prepared the main card using 170gsm satin finished white paper to copy a pink backing sheet onto the insert side and repeat the copying twice to give a darker rose, pink image on the outside section of the card.
I trimmed the sheet to measure 29x14cm and scored and folded it before defining the card front section using a blue metallic permanent pen.
I set this aside while I prepared the decoupage.
I wanted to retain 2 of the main blue outer frames to use as part of the insert, and carefully cut this frame away carefully, from each of the 2 images, so as not to damage the rest of the images.
I used my glue tape runner to attach both of these to the inside of the card. I used cup1106589_21027, to cut at 13cm square and defined the edge with the blue metallic pen.
To this backing sheet I attached the one full main image, complete with the blue frame, the edges of which I have also defined with the blue metallic pen.
I used the broad steel blue satin ribbon to attach horizontally across the ribbon print and using a glue tape roller attached the floral, lace strip, wrapping the tails at the back of the larger backing sheet, before attaching this image to the card front, using red power tape.
I used the next main image, which has had the blue frame removed, to attach using padded D.S. tape. The next image which has also had the frame removed, I have carefully cut away the verse and the butterflies, leaving intact the bird and all the flowers and some of the darker foliage.
I attached this using a combination of silicone glue, allowing it to dry a little to become quite tacky, D.S. tape and squares.
I cut away the butterflies from the verse section, I had removed, and attached them using silicone glue. I have made a large, matching blue, ribbon bow from narrower ribbon.
I have attached a small image from the sheet provided onto the left side of the insert and have made 3 small 6x6cm folded gift cards with matching envelopes.
I have a friend moving house soon and she is moving her whole garden with her, so I have left the inside verse section blank as I am using this as a welcome to your new house greeting card.
Thank you Ceredwyn, I love this design.
Pamela Horton The Whispering Platypus.
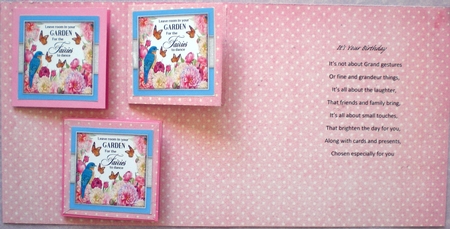
Ceredwyn’s designs are always a great choice to purchase and this beautiful floral, bird and butterflies with verse, has such universal appeal which will suit almost all female celebrations and occasions.
I printed the design onto 2 sheets of A4 white satin finished photo paper, fitting 2 images on to each of the sheets.
I used one of the images to make a very quick easy card, which is featured in the 3rd photograph attached.
I printed the pink tiny white spot backing sheet onto both sides of 170gsm photo paper, printing the verse onto the right side of the insert section, trimmed this to measure 28x14cm and scored and folded it before attaching the 2 backing sheets using D.S. tape.
The Pink Chantilly lace backing sheet, cup1106589_21027, is cut at 13.5cm square and the matching pink white spot backing sheet measures 13cm square.
I attached the pink fine line peel off strips to the outside edges of the pink backing sheet.
I cut out the main element and attached it to the card front, attaching the blue peel off strips to the outside edges of the central image, then the white decorative strips to the outside edges of the central image, leaving the ribbon image untouched to give more depth to the final image.
I finished the embellishment to the card front attaching the deep rose, pink bow and the pink decorative peel off corners.
I used the 3 images from the printed copies, to make a step-by-step decoupage to complete the next card, which is the 1st photograph attached.
I prepared the main card using 170gsm satin finished white paper to copy a pink backing sheet onto the insert side and repeat the copying twice to give a darker rose, pink image on the outside section of the card.
I trimmed the sheet to measure 29x14cm and scored and folded it before defining the card front section using a blue metallic permanent pen.
I set this aside while I prepared the decoupage.
I wanted to retain 2 of the main blue outer frames to use as part of the insert, and carefully cut this frame away carefully, from each of the 2 images, so as not to damage the rest of the images.
I used my glue tape runner to attach both of these to the inside of the card. I used cup1106589_21027, to cut at 13cm square and defined the edge with the blue metallic pen.
To this backing sheet I attached the one full main image, complete with the blue frame, the edges of which I have also defined with the blue metallic pen.
I used the broad steel blue satin ribbon to attach horizontally across the ribbon print and using a glue tape roller attached the floral, lace strip, wrapping the tails at the back of the larger backing sheet, before attaching this image to the card front, using red power tape.
I used the next main image, which has had the blue frame removed, to attach using padded D.S. tape. The next image which has also had the frame removed, I have carefully cut away the verse and the butterflies, leaving intact the bird and all the flowers and some of the darker foliage.
I attached this using a combination of silicone glue, allowing it to dry a little to become quite tacky, D.S. tape and squares.
I cut away the butterflies from the verse section, I had removed, and attached them using silicone glue. I have made a large, matching blue, ribbon bow from narrower ribbon.
I have attached a small image from the sheet provided onto the left side of the insert and have made 3 small 6x6cm folded gift cards with matching envelopes.
I have a friend moving house soon and she is moving her whole garden with her, so I have left the inside verse section blank as I am using this as a welcome to your new house greeting card.
Thank you Ceredwyn, I love this design.
Pamela Horton The Whispering Platypus.
More Products from Craft Express