

Mini Kit: SewingCompleted by Pamela Horton The whispering Platypus
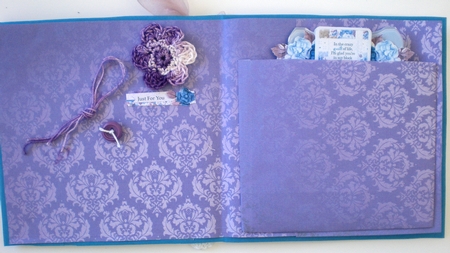
OccasionThis is indeed a beautiful card when completed, and the maker has many options, either to use all the elements provided for one card, or to simply choose one or two elements for each card. I chose to use most of the elements and made a main card with a pocket inside in the insert to store the elements that make a plate style stand. I followed the directions, by writing in pencil on the back so that I knew which smaller element belonged to which main or larger element. I cut away the inner white background from the first large image, so that the card had a more 3 dimensional effect. I used 200gsm CB white matte card, so it was easy to cut in and around the sewing machine, tiny flowers and cotton reels. When I make this card again I am going to cut away the white section on the largest element, and use some mirror card behind. I used a step by step process to put the topper together, laying it out carefully before attaching the padded D.S squares, tape and tiny dots as the size required. I also made the stand and the plate style topper, from sheet 4, in the same way using the D.S adhesives as needed. I made a white backing sheet which measures 13 x 12.5 and attached it to a black backing sheet which measures 12 x 11.5. I then made a mauve frame in light card, it measures 12.5 cm wide and 12 cm high, so the white backing sheet is visible and the frame edges are 0.5cm wide so the black backing sheet is visible. I attached the completed step by step decoupage, using D.S tape, to the black backing sheet, and then used a 2.5cm wide mauve organza ribbon to wrap around the lower front of the topper, before using D.S. tape to attach this to a blue card front which measures 14cm square. I then added the pink jewels, the button and the hand crochet white flower. I used a damask finished dark mauve paper for the insert, and on the left hand side, keeping with the sewing theme, I attached another button, some crochet cotton and a crochet flower, plus a sentiment. I made a pocket for the right hand side to house the extra decoupage and plate stand. This pocket is very simple to make. I cut it to size, by measuring the completed decoupage and adding 0.5cm to the side and bottom edges, and folded in 0.5cm on the 3 sides, and used D.S. tape to these inside edges to attach it to the right hand side of the insert. The pocket itself is not as high as the elements, so that if the plate stand and decoupage are in the pocket they are visible if the card is standing open. An absolutely beautiful card, I love it and will use this design many times. Thank you for making it available for purchase.
Pamela Horton
