

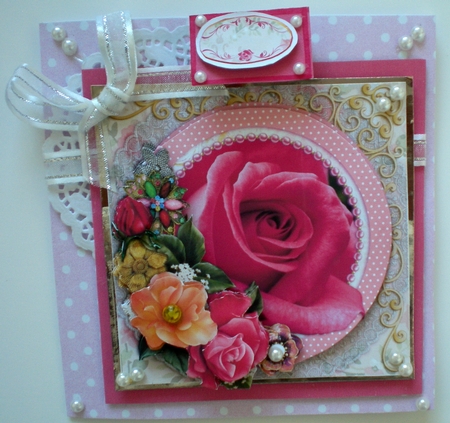

Rose Chartreuse de Parme With Jewels Birthday/Various OccasionsCompleted by Pamela Horton The whispering Platypus
OccasionThis beautiful card design has such universal appeal and is adaptable for so many occasions and celebrations, that it is a must for any serious card maker to have in their stash. I really love making these designs that have so much appeal, offer so many sentiments and a step by step decoupage. I copied the sheets provided onto CB, 200gsm matte white card, and cut out all the elements. I used D.S padded tape to attach the main image to some gold gloss card which I had cut at 10.25 x 10.25cm. I made the next backing sheet in a deep rose pink to match the shade of the main rose. I cut it at 11.5cm high x 11cm wide, and attached the white organza and satin trimmed ribbon across the front, 5cm down from the top edge. I used a tiny white 9cm doily to attach behind the backing sheet, using spots of white glue and then wrapped the ribbon around to the back of the backing sheet, without crushing the doily. I made the main card from a white spotted pale pink, which I had printed onto both sides and then cut it at 26 x 13.5cm, and then scored and folded it. I attached the pink backing sheet, 0.5cm from the right hand edge of the card front, using padded D.S tape. I used tiny D.S padded squares to make up the decoupage, following the steps provided. I then used padded D.S. tape to attach this completed topper with the gold gloss backing sheet onto the card front. I attached the onestep bow, with spots of white glue. I added pearls to the corners of the card front and to the main image. I also added a yellow jewel and a pearl to the flower spray. To complete the insert I used the element provided for the insert to attach with white glue, onto the right hand side of the insert and for the left hand side insert, I used a 9cm doily and attached a circle of the same rose pink card to the front. I also attached a pearl to the single flower. I then used the blank sentiment to colour the edges with a rose pink pen and attach to the front of an oval shaped, piece of white card, and then to a piece of the rose pink card, which measures 4cm x 2cm. I attached this to the front M fold of a 3 step concertina folded sentiment tag, that I had cut at 6 cm high, and 3.5cm wide. I closed the mountain fold with D.S tape and attached the back of the tag to the very top of the card, adding the 4 smaller pearls. This is a beautiful card and would delight any recipient. I am thrilled with the result. Thank you for offering this card design for me to purchase
Pamela Horton
