


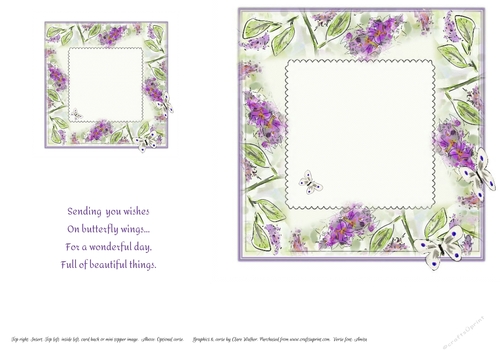
BUTTERFLY BUSH FLORAL INSERT: With Optional Verse and Bonus Back, Gift Tag or Mini-Topper Image
The soft purples of this beautiful butterfly insert image will enhance any female occasion card, (though it's also designed to match the "Butterfly Bush" 7x7 card front sheet too -cup796507_79993).
As well as the insert itself, the sheet includes an optional verse and a bonus (approx 3x3") version of the insert image, suitable for the back or inside left of your card, to use as a gift tag, or as a mini- topper or decoration in other projects.
As with all my designs, this sheet comes with "small-scale commercial use", meaning that you're free to sell anything you physically yandmake using this sheet, whether on CUP or anywhere else.

Photographs from the Community (4)

I had previously purchased the Butterfly Bush Card topper, cup796507_79993, designed by Clare and this Butterfly Bush Insert, is the perfect match for the original card.
I have remade the card and used this as the insert and made some other cards using this insert as the main feature.
The First of these, which I call main feature cards, is made as a 3 fold free standing card. I printed the sheet supplied onto CB matte white 180gsm card, and cut out the main image.
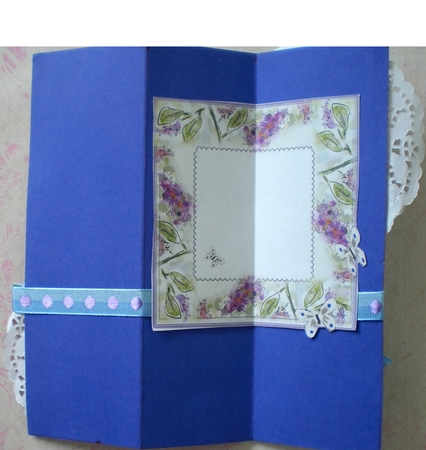
I prepared the purple 200gsm backing sheet which measures, 5.75 cm x 16.25cm and then I measured the purple card and scored it vertically at 5.5cm in from the left hand side, and 5.25cm in from the right hand side.
I measured and scored the main image at 5cm in from the left hand side and 4.75 from the right hand side.
I then used D.S. tape to attach to either side of the 2 score lines, on the back of the main image and around all four sides.
I then used 2/3 of a 9cm doily to attach to the left top corner of the purple backing sheet and the remaining 1/3 to the lower left hand corner of the purple backing sheet.
I then carefully lined up the score lines of both the backing sheet and the main image and peeled off the tape backing and secured the D.S. tape.
I lay this down on a flat surface wrong side up, and upside down.
This means that the left hand side now has a little of the lace doily showing at the left bottom of the card back and a smaller section showing at the right top of the purple backing sheet.
I then scored the first vertical line firmly, and this will make a valley fold. I then turned the card over so that it was still upside down but the right side was facing me.
This score line should already have been made as a valley fold and only may need a amount of pressure to secure it as a valley fold.
If you know how to make a 3 fold card, you may not need to follow these directions. I then turned the card around 180 degrees, so that it was right side up and facing me.
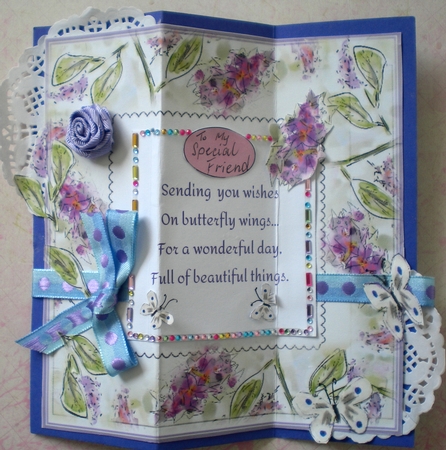
I used 31.5cm of the blue, purple spot embroidered 1cm wide ribbon and measured up 5.5 cm from the bottom, and using D.S tape attached it, starting at the centre back of the purple backing sheet, and continued around the card, over lapping the small ends at the centre back.
I then cut out the verse, which now measures 7.5cm square. I scored it to match the score lines of the main image, before attaching it in the same manner with D.S. tape.
I used strips of coloured gems to edge all 4 sides.
I used the blank verse to write To My Special Friend and attached it to the centre top of the card.
I made a mauve grosgrain ribbon rose and a simple bow using the blue ribbon. I used a paper copy of the sheet supplied and some left over butterflies from the original purchased sheet to add to the card front.
I used the smaller image for my personal greeting on the back of the card. I used a second copy of the insert to print in a smaller size and made a slightly different 3 fold card.
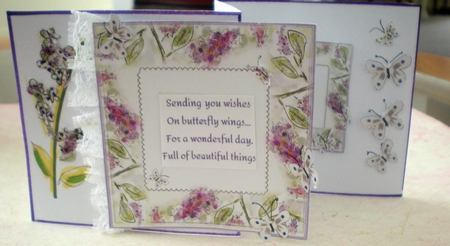
I used 21cm x 8cm of white card and beginning at the left hand side, scored it as a mountain fold at 8cm and a valley fold at 5cm.
I edged the card with a purple pen. The insert measures 7.5cm square which includes the overhanging butterflies.
I used some small pieces of the coloured sections of the extra paper copy to draw 13 very tiny flowers, and drew a flower stem on the very left of the first section of the mountain fold.
I gathered and attached 14cm of lace down the left hand side of the main image, using power tape. I then used tiny padded squares to attach this insert as a topper 3cm in from the left hand edge.
This then left, 2.5cm of the back of this topper without being attached.. I attached a smaller version of the insert for my special greeting on the last third of the card, and to complete this section, I used extra butterflies.
To make the butterfly trail, I used tiny spots of white glue and let them dry before colouring them with a silver glitter pen.
I have been able to use all the matching sections of both cards, and I am still thinking of making a couple more of the smaller cards for “Keeping in Touch”, as I write a lot of letters each week.
My elderly relatives and many friends my own age do not use email or social media. Thank you, Clare I love this Insert. Pamela Horton.

I had previously purchased the Butterfly Bush Card topper, cup796507_79993, designed by Clare and this Butterfly Bush Insert, is the perfect match for the original card.
I have remade the card and used this as the insert and made some other cards using this insert as the main feature.
The First of these, which I call main feature cards, is made as a 3 fold free standing card. I printed the sheet supplied onto CB matte white 180gsm card, and cut out the main image.
I prepared the purple 200gsm backing sheet which measures, 5.75 cm x 16.25cm and then I measured the purple card and scored it vertically at 5.5cm in from the left hand side, and 5.25cm in from the right hand side.
I measured and scored the main image at 5cm in from the left hand side and 4.75 from the right hand side.
I then used D.S. tape to attach to either side of the 2 score lines, on the back of the main image and around all four sides.
I then used 2/3 of a 9cm doily to attach to the left top corner of the purple backing sheet and the remaining 1/3 to the lower left hand corner of the purple backing sheet.
I then carefully lined up the score lines of both the backing sheet and the main image and peeled off the tape backing and secured the D.S. tape.
I lay this down on a flat surface wrong side up, and upside down.
This means that the left hand side now has a little of the lace doily showing at the left bottom of the card back and a smaller section showing at the right top of the purple backing sheet.
I then scored the first vertical line firmly, and this will make a valley fold. I then turned the card over so that it was still upside down but the right side was facing me.
This score line should already have been made as a valley fold and only may need a amount of pressure to secure it as a valley fold.
If you know how to make a 3 fold card, you may not need to follow these directions. I then turned the card around 180 degrees, so that it was right side up and facing me.
I used 31.5cm of the blue, purple spot embroidered 1cm wide ribbon and measured up 5.5 cm from the bottom, and using D.S tape attached it, starting at the centre back of the purple backing sheet, and continued around the card, over lapping the small ends at the centre back.
I then cut out the verse, which now measures 7.5cm square. I scored it to match the score lines of the main image, before attaching it in the same manner with D.S. tape.
I used strips of coloured gems to edge all 4 sides.
I used the blank verse to write To My Special Friend and attached it to the centre top of the card.
I made a mauve grosgrain ribbon rose and a simple bow using the blue ribbon. I used a paper copy of the sheet supplied and some left over butterflies from the original purchased sheet to add to the card front.
I used the smaller image for my personal greeting on the back of the card. I used a second copy of the insert to print in a smaller size and made a slightly different 3 fold card.
I used 21cm x 8cm of white card and beginning at the left hand side, scored it as a mountain fold at 8cm and a valley fold at 5cm.
I edged the card with a purple pen. The insert measures 7.5cm square which includes the overhanging butterflies.
I used some small pieces of the coloured sections of the extra paper copy to draw 13 very tiny flowers, and drew a flower stem on the very left of the first section of the mountain fold.
I gathered and attached 14cm of lace down the left hand side of the main image, using power tape. I then used tiny padded squares to attach this insert as a topper 3cm in from the left hand edge.
This then left, 2.5cm of the back of this topper without being attached.. I attached a smaller version of the insert for my special greeting on the last third of the card, and to complete this section, I used extra butterflies.
To make the butterfly trail, I used tiny spots of white glue and let them dry before colouring them with a silver glitter pen.
I have been able to use all the matching sections of both cards, and I am still thinking of making a couple more of the smaller cards for “Keeping in Touch”, as I write a lot of letters each week.
My elderly relatives and many friends my own age do not use email or social media. Thank you, Clare I love this Insert. Pamela Horton.
I had previously purchased the Butterfly Bush Card topper, cup796507_79993, designed by Clare and this Butterfly Bush Insert, is the perfect match for the original card.
I have remade the card and used this as the insert and made some other cards using this insert as the main feature.
The First of these, which I call main feature cards, is made as a 3 fold free standing card. I printed the sheet supplied onto CB matte white 180gsm card, and cut out the main image.
I prepared the purple 200gsm backing sheet which measures, 5.75 cm x 16.25cm and then I measured the purple card and scored it vertically at 5.5cm in from the left hand side, and 5.25cm in from the right hand side.
I measured and scored the main image at 5cm in from the left hand side and 4.75 from the right hand side.
I then used D.S. tape to attach to either side of the 2 score lines, on the back of the main image and around all four sides.
I then used 2/3 of a 9cm doily to attach to the left top corner of the purple backing sheet and the remaining 1/3 to the lower left hand corner of the purple backing sheet.
I then carefully lined up the score lines of both the backing sheet and the main image and peeled off the tape backing and secured the D.S. tape.
I lay this down on a flat surface wrong side up, and upside down.
This means that the left hand side now has a little of the lace doily showing at the left bottom of the card back and a smaller section showing at the right top of the purple backing sheet.
I then scored the first vertical line firmly, and this will make a valley fold. I then turned the card over so that it was still upside down but the right side was facing me.
This score line should already have been made as a valley fold and only may need a amount of pressure to secure it as a valley fold.
If you know how to make a 3 fold card, you may not need to follow these directions. I then turned the card around 180 degrees, so that it was right side up and facing me.
I used 31.5cm of the blue, purple spot embroidered 1cm wide ribbon and measured up 5.5 cm from the bottom, and using D.S tape attached it, starting at the centre back of the purple backing sheet, and continued around the card, over lapping the small ends at the centre back.
I then cut out the verse, which now measures 7.5cm square. I scored it to match the score lines of the main image, before attaching it in the same manner with D.S. tape.
I used strips of coloured gems to edge all 4 sides.
I used the blank verse to write To My Special Friend and attached it to the centre top of the card.
I made a mauve grosgrain ribbon rose and a simple bow using the blue ribbon. I used a paper copy of the sheet supplied and some left over butterflies from the original purchased sheet to add to the card front.
I used the smaller image for my personal greeting on the back of the card. I used a second copy of the insert to print in a smaller size and made a slightly different 3 fold card.
I used 21cm x 8cm of white card and beginning at the left hand side, scored it as a mountain fold at 8cm and a valley fold at 5cm.
I edged the card with a purple pen. The insert measures 7.5cm square which includes the overhanging butterflies.
I used some small pieces of the coloured sections of the extra paper copy to draw 13 very tiny flowers, and drew a flower stem on the very left of the first section of the mountain fold.
I gathered and attached 14cm of lace down the left hand side of the main image, using power tape. I then used tiny padded squares to attach this insert as a topper 3cm in from the left hand edge.
This then left, 2.5cm of the back of this topper without being attached.. I attached a smaller version of the insert for my special greeting on the last third of the card, and to complete this section, I used extra butterflies.
To make the butterfly trail, I used tiny spots of white glue and let them dry before colouring them with a silver glitter pen.
I have been able to use all the matching sections of both cards, and I am still thinking of making a couple more of the smaller cards for “Keeping in Touch”, as I write a lot of letters each week.
My elderly relatives and many friends my own age do not use email or social media. Thank you, Clare I love this Insert. Pamela Horton.
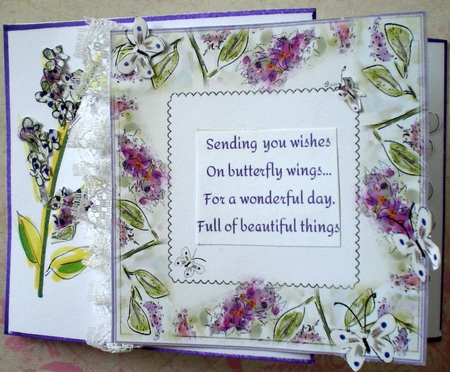
I had previously purchased the Butterfly Bush Card topper, cup796507_79993, designed by Clare and this Butterfly Bush Insert, is the perfect match for the original card.
I have remade the card and used this as the insert and made some other cards using this insert as the main feature.
The First of these, which I call main feature cards, is made as a 3 fold free standing card. I printed the sheet supplied onto CB matte white 180gsm card, and cut out the main image.
I prepared the purple 200gsm backing sheet which measures, 5.75 cm x 16.25cm and then I measured the purple card and scored it vertically at 5.5cm in from the left hand side, and 5.25cm in from the right hand side.
I measured and scored the main image at 5cm in from the left hand side and 4.75 from the right hand side.
I then used D.S. tape to attach to either side of the 2 score lines, on the back of the main image and around all four sides.
I then used 2/3 of a 9cm doily to attach to the left top corner of the purple backing sheet and the remaining 1/3 to the lower left hand corner of the purple backing sheet.
I then carefully lined up the score lines of both the backing sheet and the main image and peeled off the tape backing and secured the D.S. tape.
I lay this down on a flat surface wrong side up, and upside down.
This means that the left hand side now has a little of the lace doily showing at the left bottom of the card back and a smaller section showing at the right top of the purple backing sheet.
I then scored the first vertical line firmly, and this will make a valley fold. I then turned the card over so that it was still upside down but the right side was facing me.
This score line should already have been made as a valley fold and only may need a amount of pressure to secure it as a valley fold.
If you know how to make a 3 fold card, you may not need to follow these directions. I then turned the card around 180 degrees, so that it was right side up and facing me.
I used 31.5cm of the blue, purple spot embroidered 1cm wide ribbon and measured up 5.5 cm from the bottom, and using D.S tape attached it, starting at the centre back of the purple backing sheet, and continued around the card, over lapping the small ends at the centre back.
I then cut out the verse, which now measures 7.5cm square. I scored it to match the score lines of the main image, before attaching it in the same manner with D.S. tape.
I used strips of coloured gems to edge all 4 sides.
I used the blank verse to write To My Special Friend and attached it to the centre top of the card.
I made a mauve grosgrain ribbon rose and a simple bow using the blue ribbon. I used a paper copy of the sheet supplied and some left over butterflies from the original purchased sheet to add to the card front.
I used the smaller image for my personal greeting on the back of the card. I used a second copy of the insert to print in a smaller size and made a slightly different 3 fold card.
I used 21cm x 8cm of white card and beginning at the left hand side, scored it as a mountain fold at 8cm and a valley fold at 5cm.
I edged the card with a purple pen. The insert measures 7.5cm square which includes the overhanging butterflies.
I used some small pieces of the coloured sections of the extra paper copy to draw 13 very tiny flowers, and drew a flower stem on the very left of the first section of the mountain fold.
I gathered and attached 14cm of lace down the left hand side of the main image, using power tape. I then used tiny padded squares to attach this insert as a topper 3cm in from the left hand edge.
This then left, 2.5cm of the back of this topper without being attached.. I attached a smaller version of the insert for my special greeting on the last third of the card, and to complete this section, I used extra butterflies.
To make the butterfly trail, I used tiny spots of white glue and let them dry before colouring them with a silver glitter pen.
I have been able to use all the matching sections of both cards, and I am still thinking of making a couple more of the smaller cards for “Keeping in Touch”, as I write a lot of letters each week.
My elderly relatives and many friends my own age do not use email or social media. Thank you, Clare I love this Insert. Pamela Horton.