
Make Z Fold Cards That Fit UK Envelopes With Measured Cuts
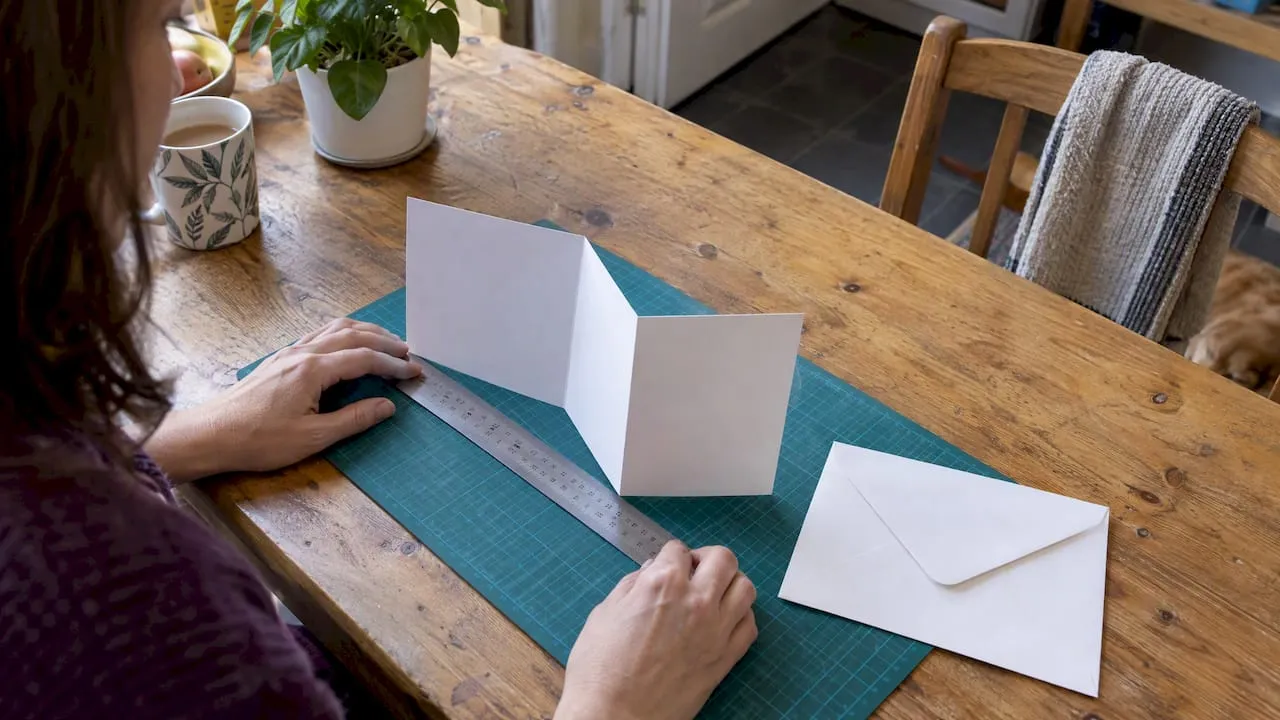
A Z-fold card is a strip of cardstock scored and folded in a zigzag, so it opens like a short accordion. This tutorial gives measured instructions, in metric and imperial, for both the standard and the double Z-fold. You need cardstock, a trimmer, a scoring board and a bone folder, and everything else is optional decoration.
TL;DR:
- On a double Z fold, score matching strips at 4 and 8 inches (10.2 and 20.3 cm), overlap one panel, and keep the joint thin.
- An A6 card uses 105 by 148 mm panels and a 315 mm strip; keep the closed card smaller than its envelope on every side.
- Keep foam pads on the front panel and bulky decorations away from hinges; extra layers can stop the card closing or make it spring open.
- Test a spare strip before decorating, since accurate scores and square cuts determine whether panels align and the finished card lies flat.
- Score each line once in a steady pass, then fold with a bone folder; repeated passes can shift the score and make panels misalign.
Table of Contents
- What materials and tools do you need for a Z-fold card?
- How do you make a standard Z-fold card step by step?
- How do you assemble a double Z-fold card?
- How do you decorate a Z-fold card without spoiling the fold?
- What problems can go wrong with a Z-fold card and how do you fix them?
- How do you scale a Z-fold card for different sizes and envelopes?
- How do you score and fold accurately?
- How can you add interactive elements to a Z-fold card?
- Which occasions and themes suit a Z-fold card?
- What are the best printing tips for digital Z-fold downloads?
- How should you store and share finished Z-fold cards and templates?
- An honest view from the cutting mat
- Where can you find Z-fold templates and supplies from us?
- FAQ
- Useful pages for more fold styles
What materials and tools do you need for a Z-fold card?
Gather everything before you cut, because a Z-fold depends on accurate scoring and clean edges. Most mistakes start with the wrong paper weight or a blunt trimmer blade, not with the folding itself.
Choose cardstock suitable for folding and sturdy enough to support your decorations. Lighter stock folds crisply but can sag under decoration, while heavier stock resists scoring and can crack along the fold unless you score it firmly.
- Cardstock of a suitable weight for the base strip
- A trimmer with both metric and imperial guides
- A scoring board and a bone folder for crisp creases
- A ruler and a sharp pencil for marking and checking
- Thin double-sided tape or a strong, slim-line adhesive
- Optional extras: patterned paper, foam pads, dies or a cutting machine, and a corner rounder
Pro Tip: Cut one spare base strip from scrap card and run the whole fold on it first. If the spare folds flat and the panels line up, your real card will too.
How do you make a standard Z-fold card step by step?
A standard Z-fold has equal panels. Choose a strip length that divides evenly into panels, then score at each panel boundary.
- Cut your base strip to your chosen dimensions, checking that the edges are straight and square.
- Score the strip along its length at the panel boundaries, pressing firmly with the scoring tool.
- Fold the first score as a valley fold and the second as a mountain fold, so the strip forms a Z when viewed from the side.
- Cut panel layers slightly smaller than the base panels from patterned paper, leaving a neat border of the base showing.
- Glue the panels to the base with thin tape, keeping adhesive away from the score lines.
- Add final embellishments only once the card sits flat and folds cleanly.
Line up patterned panels against the edge of the base before pressing them down, and give liquid glue a few minutes to set before you close the card.
Quick checklist: trim, score, fold, adhere panels, then embellish.
Craft downloads can save you the measuring: our printable cut and fold card templates can help with your project.
How do you assemble a double Z-fold card?
A double Z-fold uses strips that nest together, creating panels that zigzag back and forth. It looks richer than a standard Z-fold and gives you more room for greetings, photos and layered artwork.
Choose the finished panel dimensions, then cut matching strips and score each at the panel boundaries along its length.
- Cut both strips to the same size and check they match by laying one on top of the other.
- Score each strip at 4" and 8" (10.2 cm and 20.3 cm).
- Fold the first strip as a valley then a mountain, and repeat on the second strip, so both form a Z.
- Place the second strip so its first panel overlaps the last panel of the first strip, keeping the folds running in the same direction.
- Attach the overlap with thin double-sided tape, pressing it flat along the whole joint.
- Fold the joined card closed and check that the panels stack neatly.
- Keep the joint to a single thin layer, because bulk at the join is what makes the card spring open.
- Match patterns across the overlap before the tape grips, since adjusting afterwards tears the paper.
- To fit an envelope, make sure the closed card is smaller than the envelope on every side.
How do you decorate a Z-fold card without spoiling the fold?
Good decoration works with the zigzag rather than against it. Think of the three visible panels as a front, a middle and a back, and plan the layout so the front tells the story and the middle carries the message.
- Use thin double-sided tape for large panels and a small dab of liquid glue for tiny pieces.
- Reserve foam pads for the front panel only, where nothing has to fold over them.
- Choose thin die-cuts, stamped sentiments and flat sequins, and keep bulky items away from the hinge areas.
- Pair a bold pattern on the middle panel with a plain front, so the card does not feel busy when it opens.
- For a birthday card, try bright papers and a stamped greeting. For thank-you cards, soft neutrals with one accent colour work well. For seasonal cards, a single themed die-cut across the front is often enough.
Pro Tip: Decorate each panel flat before you attach it to the base. It is far easier to place embellishments on a loose piece than on a folded card.
What problems can go wrong with a Z-fold card and how do you fix them?
Most faults come from thickness, misplaced scores or glue in the wrong place. Each is easy to avoid once you know where to look.
- Card will not fold flat: every layer adds thickness, so reduce the layer count or switch to lighter cardstock.
- Score in the wrong place: re-score a few millimetres away and fold along the new line, then trim the strip so the panels still match.
- Panels misaligned: realign before the adhesive sets, and use a ruler against the edge as a guide.
- Card will not close: remove foam pads or bulky pieces near the hinge, and keep glue clear of the creases.
- Card bows or curls: press it flat under a heavy book for a few minutes once the glue has dried.
How do you scale a Z-fold card for different sizes and envelopes?
The rule is simple: the panel width equals one third of the strip length, and every score sits at a panel boundary. Change one measurement and the rest follow.
- A6 style: panels of 105 mm × 148 mm (about 4⅛" × 5¾"), strip 315 mm long.
- Slimline: panels of 99 mm × 210 mm (about 3⅞" × 8¼"), strip 297 mm long.
- Square: panels of 5½" × 5½" (14 cm × 14 cm), strip 16½" (42 cm) long.
- Choose an envelope larger than the closed card on every side for an easy fit.
How do you score and fold accurately?
Accuracy lives or dies at the scoring stage. Line the strip up against the guide of your board, check that the edge sits exactly on the marker, and run the scoring tool in one firm, steady pass. A second pass usually shifts the line.
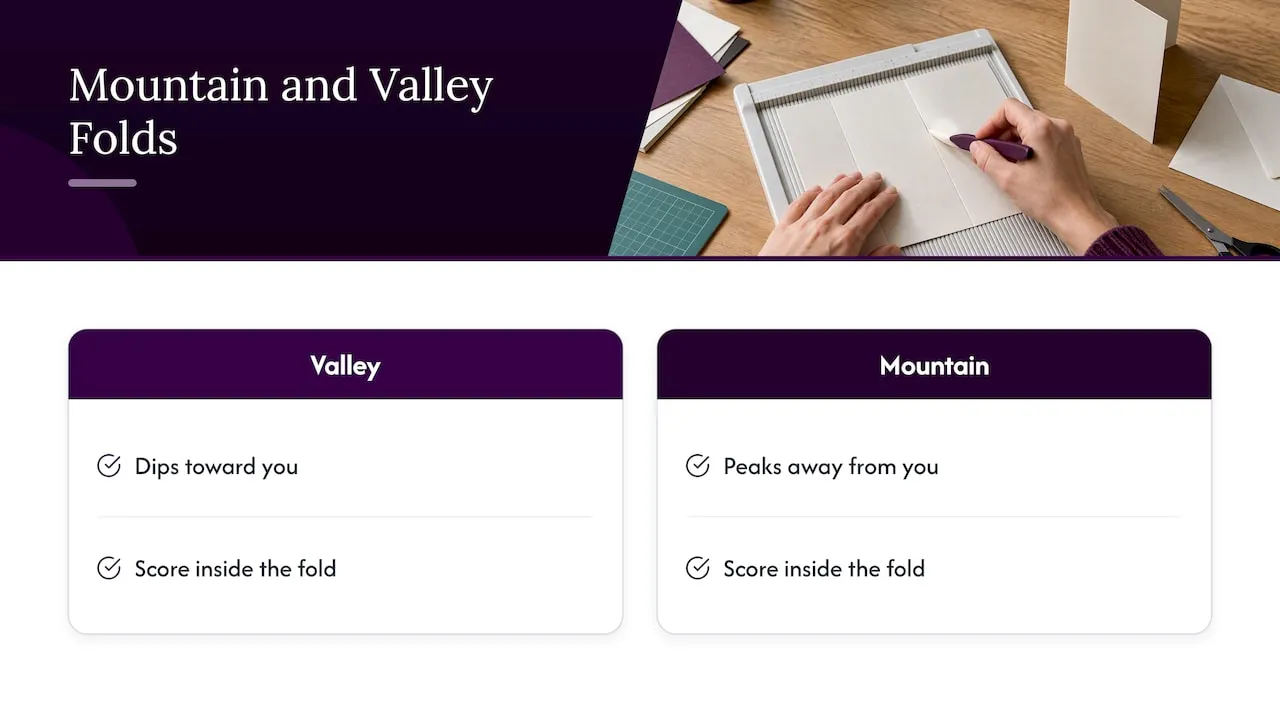
Mountain and valley folds matter because they set the direction of the zigzag. A valley fold dips toward you, and a mountain fold peaks away from you. Score on the side that will end up inside each fold, and the paper bends cleanly instead of cracking.
Allow for thickness as well. When you add a layer of patterned paper or a mat, the fold has to wrap around that extra material, so leave a little more room at the hinge, or make decorative layers slightly smaller than the panel. Press each crease with the bone folder, working from the centre of the fold outward, and the card will lie flat rather than spring open.
How can you add interactive elements to a Z-fold card?
The Z-fold shape is made for movement, because the panels already open in sequence. That makes it easy to add small surprises that reward the person opening the card.
- Reveal panels: put a hidden message or photo on the middle panel, so it appears only as the card unfolds.
- Pull tabs: a thin strip of card tucked into a slot on the front panel can slide a small picture across a window.
- Pop-out pieces: a die-cut attached with a small flat hinge folds down when the card closes.
- Pockets: a slim pocket on the back panel holds a gift card, tag or photo.
Keep every interactive piece flat enough to fold inside the closed card. If you add several heavy parts, use lighter cardstock for the base, because stacked layers can stop the mechanism moving smoothly.
Which occasions and themes suit a Z-fold card?
Because the panels unfold one after another, Z-folds suit occasions with a story to tell. A birthday card can build from a playful front to a long message in the middle, and a wedding or anniversary card can carry a photo sequence across the panels.
- Birthdays: bright patterns, a stamped sentiment and a hidden middle panel.
- Thank-you cards: muted colours with a single accent and generous writing space.
- Baby cards: soft palettes and a row of tiny motifs across the panels, such as our printable baby card kits.
- Christmas: a themed front with simple flat die-cuts, or our Christmas print-and-cut files used across the panels.
- Gate fold alternatives: if you want a symmetrical opening, compare gate fold cards for another layout.
What are the best printing tips for digital Z-fold downloads?
Printing a template well matters as much as folding it well. Always run a test print on ordinary paper first, so you can check that the score lines and panel edges sit where they should before you commit your good cardstock.
- Print at the template’s intended scale and turn off any “fit to page” setting, because shrinking the page shifts every measurement.
- Choose the heaviest weight your printer accepts, and use the rear paper tray if it has one for a straighter path.
- Select a high-quality print setting for patterned panels, and let the ink dry before you score.
- Check the printed score lines against a ruler, since a small drift can ruin a double fold.
- If you build your own template in Word, set the page to landscape and use a two-column layout, then test-print to check alignment.
How should you store and share finished Z-fold cards and templates?
Store finished cards flat, in a box or between sheets of tissue, so the folds keep their shape. Cards with raised embellishments do best in a single layer, and a card that has not been posted is happiest in a clear sleeve with a backing board.
Templates deserve the same care. Keep printed spares in a folder labelled by size, and save digital files in a named folder, such as “Z-fold A6” or “Z-fold square”, so you can find them later.
If you want to share a finished design, photograph the card closed and open against a plain background, and note the paper weights and measurements you used. That information is what other makers want most. If you publish your own templates, you can sell them through our designer resources and let other crafters build on your work.
An honest view from the cutting mat
The most common advice about folded cards is to buy more embellishments, and I think it points the wrong way. A Z-fold looks best when the folds are crisp and the panels are exact, and that comes from accurate trimming and scoring, not from extra layers. Templates help here, because the panel sizes and score lines are already worked out, so you spend your time on the creative part. Our card making kits, printable templates and cutting files can help you prepare a batch of cards.
— Rob
Where can you find Z-fold templates and supplies from us?
If you want to skip the measuring, we offer printable templates and supplies for your card-making projects.
- Card making kits and printable templates
- Cards and paper for bases, panels and adhesives
- Cutting files for die-cut panels and embellishments
Browse our templates and supplies today and have your next Z-fold card ready to cut.
FAQ
How does a fold card work?
A fold card is a strip of cardstock scored so it bends along set lines. In a Z-fold, the folds alternate direction, so the panels stack like a short accordion and open one after another.
How do you fold cardstock perfectly?
Score the card first, then fold along the score with a bone folder. Scoring creates a groove that guides the crease, so the paper bends cleanly instead of cracking.
How can you make your own folded greeting card?
Cut a strip of cardstock, score it into equal panels, fold it into a zigzag and decorate each panel. A trimmer and a scoring board make the process quick and accurate.
How do you make a foldable greeting card in Word?
Set the document to landscape and use a two-column layout, then print on cardstock suitable for your printer. Test-print on ordinary paper first, so you can check the alignment before using good materials.
Useful pages for more fold styles
If you want to keep exploring, these pages cover other fold types and printable cut-and-fold designs.
- Accordion fold shaped cards for more multi-panel layouts
- Tri-fold cards for further panel sizing ideas
- Creative card folding styles on our blog
- Craft supplies for papers, tools and decoration materials