


2 More Christmas Trees
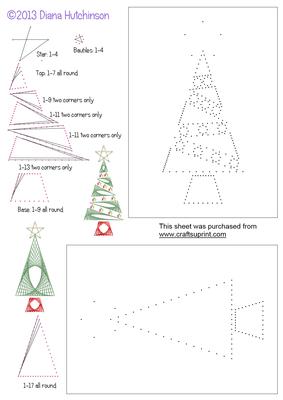
Another two stitch or prick patterns of Christmas trees.


Photographs from the Community

Two more Christmas trees is the title of the sheet provided, however the title doesn’t say how delightful the finished work looks and the then potential versatility of the finished stitched design has then become.
I copied the sheet provided onto an A4 sheet and marked the design onto white card and following all the very clear instructions, I stitched the first tree using green polyester thread, the base with red polyester thread and the star with gold metallic thread.
I then backed this with white copy paper using D.S. tape to secure the stitching before attaching this topper to the card front.
I have used a green card cut at 26 x 18cm and scored and folded this before completing the insert.
I have used cup735376_16808 Holly Paper backing sheet to print twice and cut one copy at 25.5cm x 17.75cm to ttch into the centre fold and then to the back inside cover.
The second copy I folded with the print on the inside and cut it at 25cm x 17cm and attached the Christmas carol Jolly Santa Claus printed and reduced to fit onto the front page of this insert with a slight white margin.
This insert is secured using D.S. tape to the back of the larger insert only. To complete the card front for this larger card, I attached a red 12 x 17 backing sheet to the card front and added the peel off gold strip to the green card.
I trimmed the stitched design to measure 16.25 x 11cm and defined the edges with a red alcohol pen before attaching it to the card front.
I added the peel off stars, sentiment and the red bow, and completed the embellishments with gold peel of strips along the edges of the red defined line.
Before stitching the second tree, I used my water colour pencils to shade the tree shapes.
It took me a second attempt to complete this tree as the metallic thread was not suitable and I have used the same polyester as the first tree and the gold metallic for the baubles and the star.
I have treated each stitched tree differently to show some of the versatility, by making the first tree into a quick and easy card using a very simple topper effect and the second one by cutting around the finished stitched tree leaving a white margin all the way around.
I have added the gold, green and red glitter glue on the outside edges and on the inside of the baubles, base and star, sparingly, and allowed this to dry before cutting out the tree 2mm wider than the stitched work.
I have made a red main card cut at 22 x 16, then scored and folded it.
I completed the insert for the inside of the second red smaller card in a similar manner except I folded the second insert front section 1 cm narrower than the back and this back is then attached to the original insert.
I have used the Christmas carol print and attached some gold peel off embellishments.
To complete the card front for this second tree, I have used a 15 x 9.5 cm pale blue snowflake print to cover with an acetate snowflake embossed 15 x 9.5cm using red Power tape in the centre where the tape will be hidden by the attached Christmas tree and tiny spots of clear drying white glue along the edges.
I attached this backing sheet using D.S. tape, and framed it with gold peel off strips before attaching the completed Christmas tree using padded D.S. squares.
I added some extra gold stars a sentiment and some peel off corners as embellishments.
I have left the insert blank for my Christmas message and hand written letter. This was a most rewarding satisfying day of card making, thank you Diana, for the clear instructions and helpful hints that helped make the outcome so successful.
Pamela Horton. The Whispering Platypus.
More Products from Diana Hutchinson