


New Baby Boy Pop Up Box Card 7.5
New Baby Boy 3 sheet mini kit, which creates a pop up box card, which folds flat for posting.
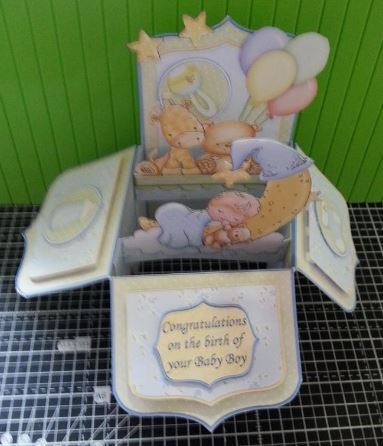
Features cute baby on the moon, with a nursery shelf behind on which is perched several baby toys and a bunch of balloons.
When folded flat, the finished card measures 7.5" x 7" and fits well into an 8x8 envelope, with spare room if you add your own embellishments which overlap the edges of the box.
Kit includes
1. Card base (Print twice and stick back to back)
2. card back panels and cross bars
3. Decoupage for outside and inside box, sentiment tags
4. Instructions with diagrams.
Sentiment tags, include one blank and the other reads,
Congratulations on the birth of your Baby Boy
The elements inside the box, can be adhered by their bottom edges, to the cross bars. You could also add your own embellishments, stick them to vertical card or acetate strips first, which are then adhered to the crossbars, to give added height or the sense of floating elements.

Photographs from the Community


Printed on to good quality card stock. Cut out all pieces. Glued pieces directed back to back. Scored, folded and cut all areas directed. Assembled the box following the step by step instructions included in the kit using double sided sticky tape and a fast drying wet glue.
Attached 3d pieces using foam pads. This box folds flat for mailing and will make a great keepsake for the new born baby boy!!


I printed the design onto good quality 255gsm photographic paper and cut it out. I scored and folded the box as instructed. I assembled the box using strong double sided tape. I added the cross bars using strong double sided tape to attach them to the inside of the box.
I added the decoupage to the cross bars using thin foam tape. I also used some strips of acetate to attach the stars to the crossbars.
Lovely Its a Boy Pop up box, Printed on quality A4 white card it was printed on 200 gsm, but i found its to thick as you have to glue 2 sides together, so a lighter gsm would be better.

 )
Cut out all pictures on the dark lines and score as directed. Make sure you glue the sides with a strong glue as it quite often comes apart with the basic children's glue. Fit the inserts in the square and add the embellishments added to the sheets.
With the stars a 3D effect could be achieved by attaching them with 3D foam squares. :-)

Made this box card with 250gsm card. It was easy to assemble and it folds flat for delivery. Added a few extras I had to complete a beautiful keepsake card