


3D Room with a View - Down at the Local Pub
This is a stunning card kit from my 3d Room with a View collection. This is a really lovely design, that features a Pub, complete with bar and drinks etc. The Down at the Local Pub design is ideal for those people, who love going out to Pubs!
Suitable for both the men and the ladies!
Looking into the card, on the inside left of the Card is a Door to the Toilets and to the inside right of the card is a Dart Board complete with Chalk boards and cabinet There is a Back Bar, with Fridge, Shelves, Bottles Glasses and Beer Cans, with a cash register.
The Top Back Upright is a modern Candelabra. The Front frame of the card features a Beer and Wine Labels in Bright Colours. The Back Upright is the Bar complete with Beer Pumps, poured drinks and Bar Stool.
The Middle Upright has a Chair and Table and the Front Upright is a Stool. You can?t see the inside sides of the pub on the preview, but if you would like to take a look in the Forum under Self Promotion, I will put photos of the inside sides of this card shortly after uploading to the site.
Click on the mortar board icon below, where there are more photographs, of the inside views, of the whole collection.
A really special card for any person who enjoys a tipple. A large range of sentiments are included , please see the full list above. This is a stunning concept, which is very easy to make, even for beginners who are trying their hand at card making!
This beautiful card will take pride of place on anyone?s mantelpiece! Any of your recipients, will be well impressed that you have actually made it! It is so dimensional and you can peer right into the pub, from the front frame! When you pull the slider doors open, the free standing card has an impressive width of 12 5/8 inch (32cm).
The height is 7 5/8 inch (19.3cm). The depth from the Front Frame to the back of the Bar is 2 1/2 inch (6.5cm). ... and to top it all, it even folds down FLAT for posting, and will fit into a standard 8 inch x 8 inch envelope!
A photographic step by step tutorial, is included in the kit, but if you would like to see the tutorial before you buy, to see how very easy, it is to make, then please click on the mortar board icon, which will take you straight to it.
There is also a CUP TV episode icon for you to click on as well to see a card being made from my 3d Room with a view Collection.
A large range of sentiment labels and Age Labels, are provided, for the bottom front and top front of the card.
Both of these labels are also provided in blank versions, for your own peel-offs or stamp, making this design just perfect for any occasion!
A text panel is also provided on the back of the card, for your own sentiments and greetings, Please take a look, at my other designs in this collection, by clicking on my photo, and typing ?Room? in my store search box.
If you would like to see my other designs, please click on my photo.
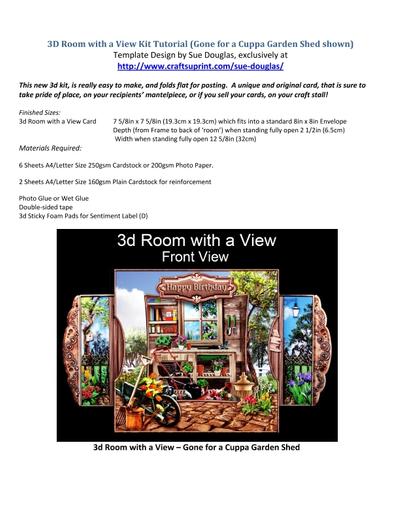
 3D Room with a View - Gone for a Cuppa Garden Shed
 3D Room with a View Kit - the Flower Shop
 3D Room with a View - DIY Shed
 3D Room with a View - Christmas Down at the Local Pub
 3D Room with a View - Christmas at Home
 3D Room with a View - Vintage Christmas
 3D Room with a View - Church Wedding
 3D Room with a View - Vintage Music Room
 3D Room with a View - My Craft Room
 3D Room with a View - Pamper Yourself
 3D Room with a View - Sweet Dreams New Baby Girl
 3D Room with a View - Sweet Dreams New Baby Boy
 3D Room with a View - Lets Rock!
 3D Room with a View - the Boudoir
 3D Room with a View - Secret Garden
Despite having really impressive 'Mantelpiece Appeal', they are so EASY to make, that even a beginner to Card Making would have no problems!
Please see the Tutorial below, which has photographs, and very clear instructions, at every step of the way!
The tutorial also has inside views of the whole collection, as the previews don't actually show that detail. Thanks for looking! x


Related Products

Photographs from the Community

is to the left, this will make people smile...it did me!!I added empty beer can 'ring pulls' to the opening doors, I added a clock beneath the open sign, 2 bottles of wine and 2 glasses to the front and a bottle of wine to the back writing panel, a fantastic finished card which is sure to amaze the recipient.)
Printed all sheets onto Crafty Bobs matte photo paper and followed the very clear instructions & diagrams, this amazing card is surprisingly easy to make and suitable for all skill levels, I used gold peel off's on the blank sentiment to say 'OPEN' which says the pub is 'open' , when you look inside the dart board is to the right of the card and the door to the toilets (toilet sign on door)is to the left, this will make people smile...it did me!!I added empty beer can 'ring pulls' to the opening doors, I added a clock beneath the open sign, 2 bottles of wine and 2 glasses to the front and a bottle of wine to the back writing panel, a fantastic finished card which is sure to amaze the recipient.


 movements, but I always use white card to do this as I can never find the perfect colour match. I finished off by adding 2 tiny dominoes to the front.
These are so amazing and I can just see a children's range in this style. Children will love the sliding doors concept. I think a dolls house would be so popular)
I printed all the sheets onto 250 gram smooth card and made up as required. Once you have made a few of these you do not need the instructions. They look so complicated and you think at first that you would never be able to make one without following the instructions to the letter. I always add my doors at the very last stage and this is when it all comes together. I do re-inforce the doors as I find it gives more stability and they open better without any (jerky) movements, but I always use white card to do this as I can never find the perfect colour match. I finished off by adding 2 tiny dominoes to the front.
These are so amazing and I can just see a children's range in this style. Children will love the sliding doors concept. I think a dolls house would be so popular

I put this card together as instructed then sprayed the front with varnish and gold glitter spray to give that little suttle bit of bling this is a beautiful card added the sentiments with 3d glue

A beautiful design for a special occasion. The room with a view card is printed on 300grm gloss card. Although intricate it is easy to make and its impact is very rewarding.

bought - print and post - second attempt due to print error, but didn't given in lol - well worth the trying again and achieving this style of card - backed all the pieces with matching colour card and paper to give a nicer and sturdy finish - few metal embleshiments- will defo be making this card again and others in this design - despite being 3d it fitted great in a 8x8 standard envelope - little fiddling around when put it together but great end result - great design with lovely detail - xt

bought - print and post - second attempt due to print error, but didn't given in lol - well worth the trying again and achieving this style of card - backed all the pieces with matching colour card and paper to give a nicer and sturdy finish - few metal embleshiments- will defo be making this card again and others in this design - despite being 3d it fitted great in a 8x8 standard envelope - little fiddling around when put it together but great end result - great design with lovely detail - xt

all the pages for this card were printed onto good quality photo paper. all items were then cut out, and all scoring and folding where needed. the elements of the card were stuck together using double sided tape.
Personalisation was done to blank sentiments before adding.

all the pages for this card were printed onto good quality photo paper. all items were then cut out, and all scoring and folding where needed. the elements of the card were stuck together using double sided tape.
Personalisation was done to blank sentiments before adding.

all the pages for this card were printed onto good quality photo paper. all items were then cut out, and all scoring and folding where needed. the elements of the card were stuck together using double sided tape.
Personalisation was done to blank sentiments before adding.

bought - print and post - second attempt due to print error, but didn't given in lol - well worth the trying again and achieving this style of card - backed all the pieces with matching colour card and paper to give a nicer and sturdy finish - few metal embleshiments- will defo be making this card again and others in this design - despite being 3d it fitted great in a 8x8 standard envelope - little fiddling around when put it together but great end result - great design with lovely detail - xt

bought - print and post - second attempt due to print error, but didn't given in lol - well worth the trying again and achieving this style of card - backed all the pieces with matching colour card and paper to give a nicer and sturdy finish - few metal embleshiments- will defo be making this card again and others in this design - despite being 3d it fitted great in a 8x8 standard envelope - little fiddling around when put it together but great end result - great design with lovely detail - xt