


3D Perfumes Double Tri Shutter Card Kit
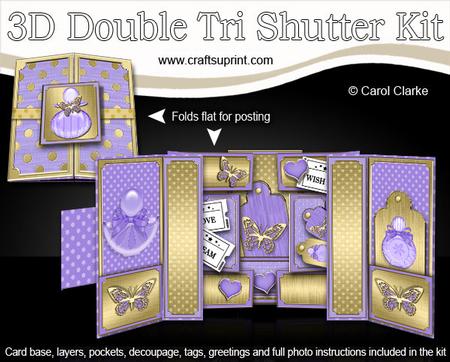
A gorgeous 3D design with that added WOW factor! A square card that looks really complicated but is very easy to make. The card opens with 2 tri shutters on the inside and is approximately 21" wide when fully opened but will easily fold flat and is approx 6" x 6" square when closed.
Included in the kit are:- Tri shutter layers, 3D decoupage items, squares and rectangles to add to the tri shutters, pockets to add to the inner fronts or the inner back of your card, tags in various sizes, greetings sentiments and blank for your own greetings, backing sheet to print on the reverse of your card, card front and card back panel for you to write your own greeting. Every surface of your card will be decorated making a visually beautiful card from any angle.
A beautiful card with lots of options as the decoration is all separate you can make this fabulous card differently every time to suit the recipient!! It could even be personalised with the addition of photos to celebrate a special person, day or event etc.
Everything you need to make a really gorgeous 3D card that is approximately 6 x 6 inch square when closed and 21 x 6 inch when opened.
The preview pic shows the card partially opened, to see a fully opened card please take a look at the tutorial in the forum.
There are many more of my Double Tri Shutter Card Kits to choose from and together they would make a great set of cards to sell at craft fairs etc.
Full photo instructions are included in the kit and can also be found in the forum under Tutorials.
This beautiful 3D kit is great for female birthday cards, Mothers Day Cards, Cards for Special occasions, Anniversary Cards, rak and swap cards etc


Photographs from the Community


I printed the design onto good quality 255gsm photographic paper and cut it out. I scored and folded the design following the easy instructions included with the kit. I assembled the steppers and added the panels using double sided tape.
I added the pockets using thin foam tape on three sides. I added the decoupage pieces using thin foam tape. I added some organza ribbon under the front panel. This holds the card closed and when untied it lets the card spring open to give a lovely surprise inside.
A lovely card when finished and great fun to make.


I loved making this card and found the step by step instructions very easy to follow. I printed onto 200g card stock, scored, cut and folded as instructed.
I used wet glue to attach the pieces as that allowed more time to get the positioning right. the fun bit was decorating and I used bits from my own stock to compliment the many pieces provided.
I have made both a birthday card and a wedding card from this.